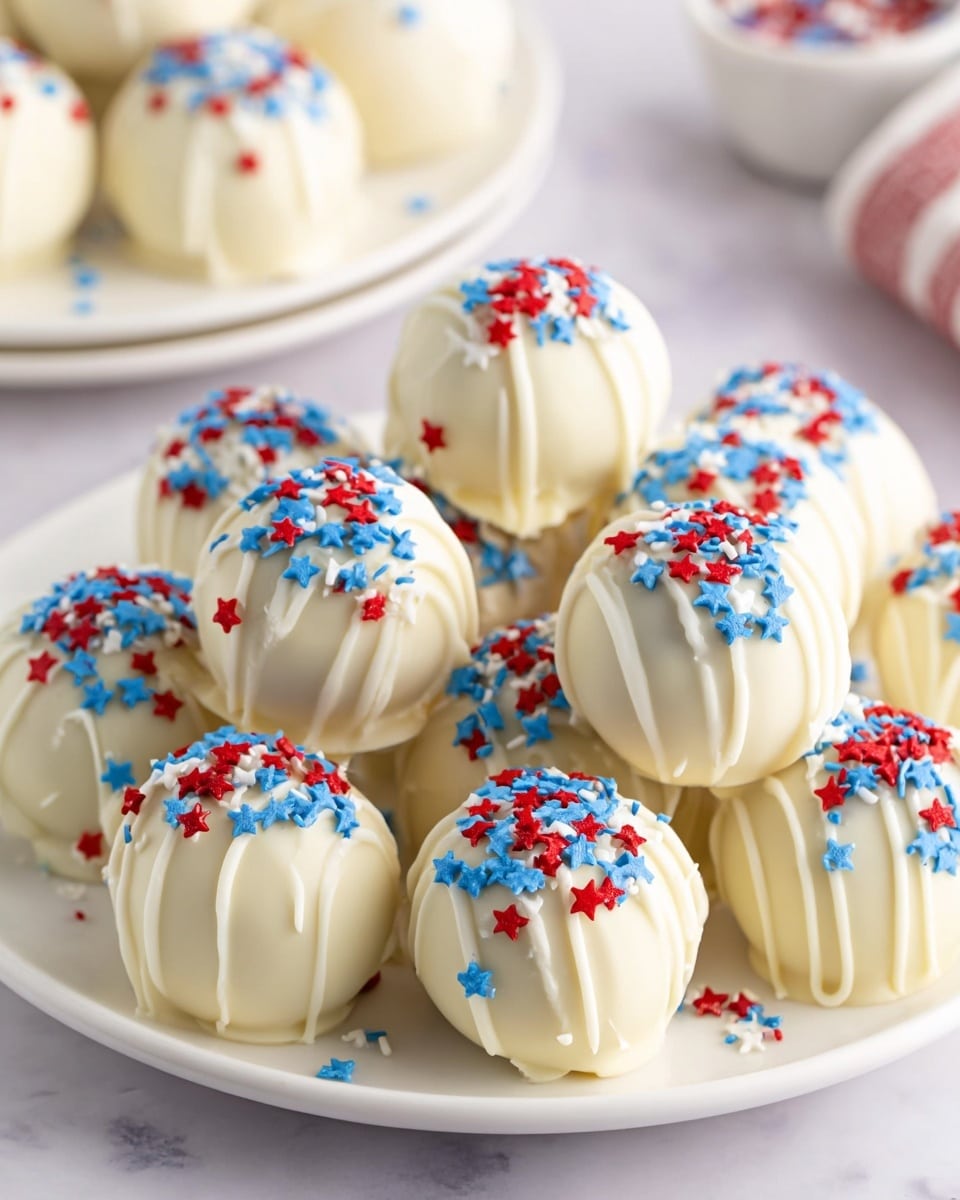
4th of July Cake Balls Recipe
If you’re looking for a festive, fun, and utterly delicious treat to celebrate Independence Day, you’ve come to the right place. These 4th of July Cake Balls Recipe are not just adorable bites of Americana—they’re also incredibly easy to make and perfect for sharing with friends and family at your BBQ or picnic. Trust me, once you try these red, white, and blue delights, you’ll wonder how you ever survived a summer party without them!
Why This Recipe Works
- Vibrant, Patriotic Colors: The separate red, white, and blue cake layers come together beautifully for that perfect 4th of July look.
- Cream Cheese Moisture: Mixing cream cheese with cake crumbs keeps the cake balls moist and rich without being overly sweet.
- Easy Dipping Technique: Using melting wafers allows for a smooth, glossy coating that hardens just right to hold the balls together.
- Simple Assembly: This recipe is straightforward enough for beginners but impressive enough to wow any crowd.

Ingredients & Why They Work
The ingredients in this 4th of July Cake Balls Recipe come together to create that classic, crowd-pleasing texture and flavor you want. It’s all about balancing moisture, color, and that creamy coating that ties it all up.

- White Cake Mix: Your base for that fluffy crumb texture; plus, using a box mix keeps things easy and consistent.
- Red and Blue Food Coloring: To get those vibrant festive hues — adding color in small increments helps you control the shade.
- Cream Cheese: Adds a tangy richness and binds the cake crumbs smoothly; make sure it’s softened for easiest mixing.
- Ghirardelli Vanilla Melting Wafers: These melt perfectly into smooth dipping chocolate that sets firmly without fuss.
- Red and Blue Candy Melts: Optional but fun if you want extra pops of color in the coating or decorations.
- Red, White, and Blue Sprinkles: The final festive touch that gives your cake balls personality and crunch.
Tweak to Your Taste
I like to play around with this 4th of July Cake Balls Recipe depending on the crowd or occasion. You can switch up the cake flavors, add some edible glitter, or even swap the sprinkles out for mini stars. Don’t be afraid to customize it; after all, creativity is part of the fun!
- Variation: I once swapped the white cake mix for a lemon flavor and loved the zing that added, especially with a little lemon zest mixed into the cream cheese.
- Dietary Modifications: For gluten-free or vegan pals, there are fantastic cake mix alternatives and dairy-free cream cheese options that work beautifully.
- Seasonal Twist: Try adding a hint of cinnamon or patriotic-themed edible glitter for holiday parties beyond July 4th.
Step-by-Step: How I Make 4th of July Cake Balls Recipe
Step 1: Whip Up Your Colorful Cake Layers
Preheat your oven to 350°F (or follow the cake mix instructions). Mix your white cake batter according to the box directions, then divide it evenly into three bowls. Leave one plain, add red food coloring drop by drop into the second bowl until you get your desired red, and do the same with blue food coloring for the third bowl. Remember, I find using separate spoons for each helps avoid any color mishaps!
Step 2: Bake and Cool the Cake
Pour each batter into its own greased pan—8×8 inch pans work like a charm—and bake for about 14 to 16 minutes. Use a toothpick to check for doneness; it should come out clean. Then, let the cakes cool completely. Patience here is key because warm cakes won’t crumble as nicely.
Step 3: Mix Crumbled Cake with Cream Cheese
Once cooled, crumble each cake into separate bowls. Beat your softened cream cheese until smooth, then divide it evenly among the bowls. Mix until completely combined but not too wet—you want the mixture to hold its shape without being sticky. Cleaning your mixer or spatula between colors keeps your layers flawless!
Step 4: Form the Tri-Color Cake Balls
Here comes the fun part—rolling! Take small chunks (about 1 inch) of each colored cake mixture and roll them together gently with your hands into one ball. It’s okay if the colors swirl a bit; that’s the charm. Place the balls on parchment-lined trays and pop them in the fridge for 1-2 hours. Chilling helps everything hold nicely when it’s time for dipping.
Step 5: Dip and Decorate Your Cake Balls
Melt your vanilla melting wafers slowly, using a double boiler or microwaving on low and stirring frequently to prevent burning. Holding a cake ball on a fork, dip it carefully, tap off excess coating, and set it back on the tray. Before it sets, sprinkle liberally with those festive red, white, and blue sprinkles. Then chill again for 15 minutes to let the coating set.
Pro Tips for Making 4th of July Cake Balls Recipe
- Softened Cream Cheese: Let it sit out at room temp for at least 30 minutes before mixing; it blends way smoother.
- Chill Twice: Refrigerate both before and after dipping to keep your cake balls firm and coating crisp.
- Use Parchment Paper: It’s a lifesaver for easy cleanup and keeps your treats from sticking.
- Gentle Rolling: Roll gently to blend colors without squishing the cake too much.
How to Serve 4th of July Cake Balls Recipe

Garnishes
I love sprinkling the finished cake balls with a generous mix of festive red, white, and blue sprinkles because it adds a nice crunch and that classic celebration vibe. Sometimes I throw on some edible glitter for a little sparkle—it’s playful and pretty, especially under the summer sun!
Side Dishes
Pair these cake balls with traditional 4th of July sides like grilled corn on the cob, fresh watermelon slices, or homemade coleslaw. They’re a sweet complement to savory favorites and keep the menu balanced and fun.
Creative Ways to Present
For a party, I like skewering several cake balls on a stick to create “cake pops” and then arranging them upright in a decorated styrofoam block wrapped with patriotic fabric. Another easy option is arranging them on a tiered dessert tray with mini flags for that extra festive touch.
Make Ahead and Storage
Storing Leftovers
Place leftover cake balls in an airtight container and refrigerate—they keep wonderfully for up to 5 days. This way, you can enjoy a little celebration treat for several days after the party.
Freezing
For longer storage, freeze the cake balls on a baking sheet first, then transfer them to a freezer-safe container or bag. This prevents them from sticking together. When you’re ready, thaw them overnight in the fridge to keep their shape and texture.
Reheating
Because these are no-bake balls after the initial baking, reheating isn’t necessary. If the coating gets a little soft, just let them come to room temperature before serving, and they firm right back up.
FAQs
-
Can I use other cake flavors for the 4th of July Cake Balls Recipe?
Absolutely! While the classic white cake works best for vibrant colors, you can experiment with yellow, lemon, or even funfetti cake mixes to suit your taste. Just be mindful that darker cakes may affect the vibrancy of the red and blue food coloring.
-
How do I prevent the cake balls from falling apart?
Chilling the cake balls before and after dipping is crucial for firmness. Also, adding cream cheese binds the crumbs and adds moisture, helping them hold their shape well. Be gentle when mixing and rolling to avoid overly soft balls.
-
Can I make these cake balls ahead of time?
Yes! These can be made a day or two ahead and stored in the fridge in an airtight container. Just add sprinkles right before chilling to keep them fresh. They’re also great frozen and thawed the day of your event.
-
What’s the best way to melt the candy coating?
Slow and steady wins the race. Use a double boiler or microwave in short intervals on low power, stirring every 30 seconds to avoid burning. Thin the coating with a bit of vegetable oil if it’s too thick for dipping.
-
Can I skip the cream cheese?
The cream cheese is key for moisture and binding the crumbs. Skipping it could result in dry or crumbly cake balls. If you need a dairy-free option, you can try vegan cream cheese alternatives to keep the texture right.
Final Thoughts
Honestly, this 4th of July Cake Balls Recipe has become my go-to whenever I’m invited to a summer party. There’s something so joyful about biting into these colorful, creamy bites that instantly bring out the festive spirit. I hope you’ll give them a try—they’re easier than you think and guaranteed to impress anyone with a sweet tooth. Grab your mixing bowls, and let’s make your next 4th of July celebration extra sweet!
Print
4th of July Cake Balls Recipe
- Prep Time: 1 hour
- Cook Time: 16 minutes
- Total Time: 3 hours
- Yield: 30 cake balls
- Category: Dessert
- Method: Baking
- Cuisine: American
- Diet: Vegetarian
Description
Celebrate the 4th of July with these festive and colorful cake balls made from a white cake mix, cream cheese, and coated with vanilla melts in red, white, and blue. Perfect for summer parties and easy to make ahead!
Ingredients
Cake Batter
- 15.25 ounce white cake mix, plus ingredients on box needed to make it
- Red food coloring
- Blue food coloring
Filling
- 8 ounce block cream cheese, softened to room temperature
Coating and Decoration
- 10 oz bag Ghirardelli vanilla melting wafers
- ½ cup red candy melts
- ½ cup blue candy melts
- Red, white, and blue sprinkles
Instructions
- Preheat Oven: Preheat the oven to 350°F or the temperature specified on the cake mix box. Lightly grease three 8×8 inch baking pans and set aside.
- Prepare Batter: In a large mixing bowl, combine the cake mix and all ingredients called for on the box, whisking together until smooth batter forms.
- Divide and Color Batter: Divide the batter evenly into three smaller bowls. Leave one bowl plain, add red food coloring to the second bowl and blue food coloring to the third, mixing 5 drops at a time until the desired color is reached. Use separate spoons for each bowl to avoid color mixing.
- Bake Cakes: Pour each colored batter into its own greased baking pan. Bake for 16 minutes or until a toothpick inserted in the center comes out clean and tops appear set.
- Cool Cakes: Remove pans from oven and cool completely on wire racks.
- Prepare Cake Crumbles: Once cooled, crumble each cake into separate bowls.
- Mix Cream Cheese: In a large bowl, beat cream cheese on medium-high speed until smooth and creamy.
- Combine Cake and Cream Cheese: Divide cream cheese evenly into three portions; mix each with a different color cake crumble until fully incorporated. Use a hand mixer on low-medium speed or a rubber spatula, cleaning between colors.
- Form Cake Balls: Line two baking trays with parchment paper. Break small one-inch chunks from each colored cake mixture and roll them together by hand into balls. Place each ball on the prepared trays.
- Chill Cake Balls: Refrigerate the cake balls for 2 hours to firm up and hold their shape.
- Melt Coating: Melt the white melting wafers using a double boiler on low heat or microwave on the defrost/low setting, stirring every 30 seconds until smooth.
- Dip and Decorate: Dip each cake ball using a fork into the melted wafers. Tap off excess coating, place back on the tray, and immediately top with red, white, and blue sprinkles. Repeat for all cake balls.
- Set Coating: Refrigerate the dipped cake balls for 15 minutes to allow the coating to firm up completely.
- Serve and Store: Keep cake balls refrigerated until serving. Enjoy your festive 4th of July treat!
Notes
- Refrigerate leftovers in an airtight container for up to 5 days.
- Use separate utensils when mixing colors to avoid color bleeding.
- Ensure cream cheese is softened for easier mixing and smooth texture.
- Chilling the cake balls before dipping helps maintain their shape.
- Use a fork or dipping tool for even coating and easy handling of cake balls.
- For a quicker melt, use high-quality candy melts and avoid over-heating to prevent clumps.
Nutrition
- Serving Size: 1 cake ball
- Calories: 150 kcal
- Sugar: 18 g
- Sodium: 120 mg
- Fat: 7 g
- Saturated Fat: 4 g
- Unsaturated Fat: 2 g
- Trans Fat: 0 g
- Carbohydrates: 20 g
- Fiber: 0.5 g
- Protein: 2 g
- Cholesterol: 20 mg
