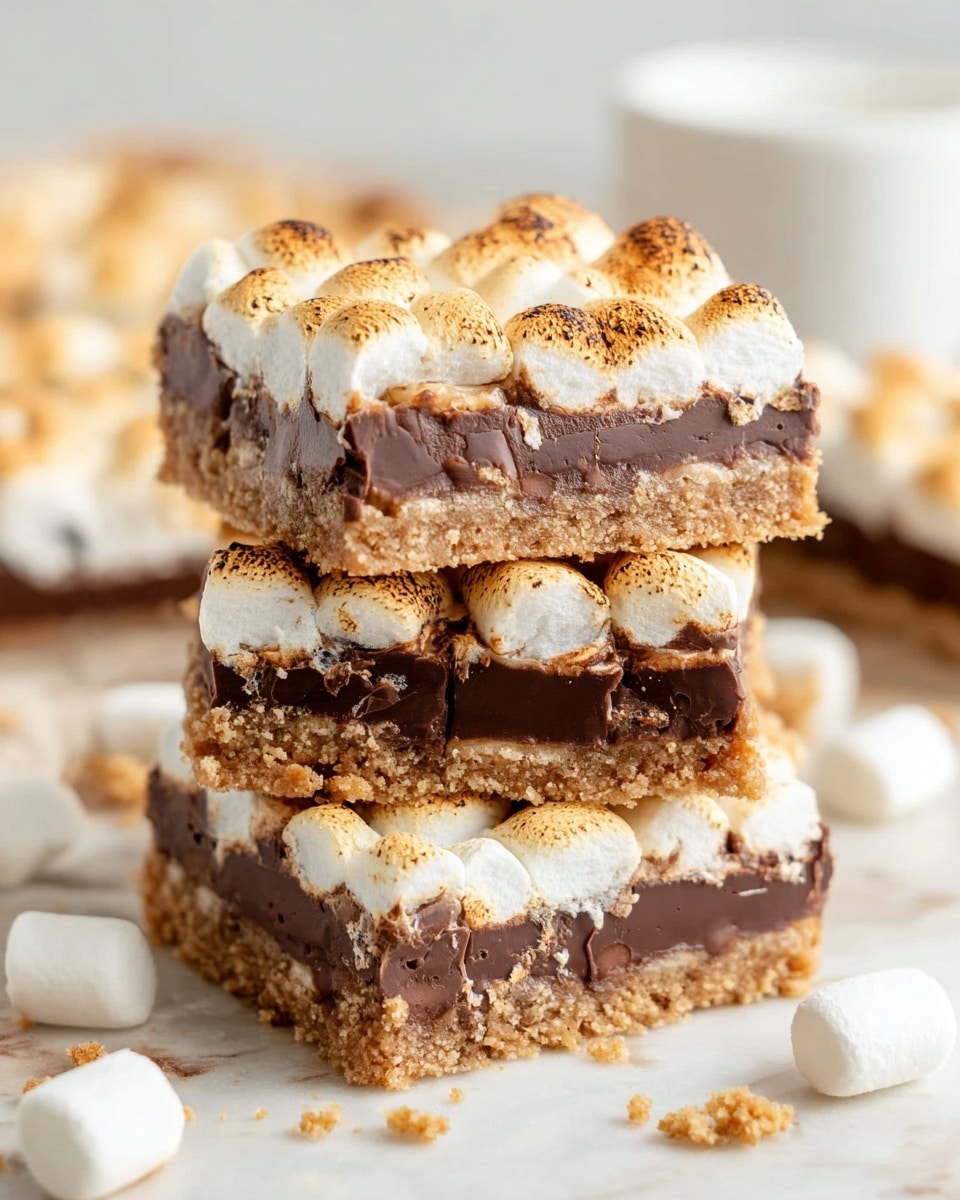
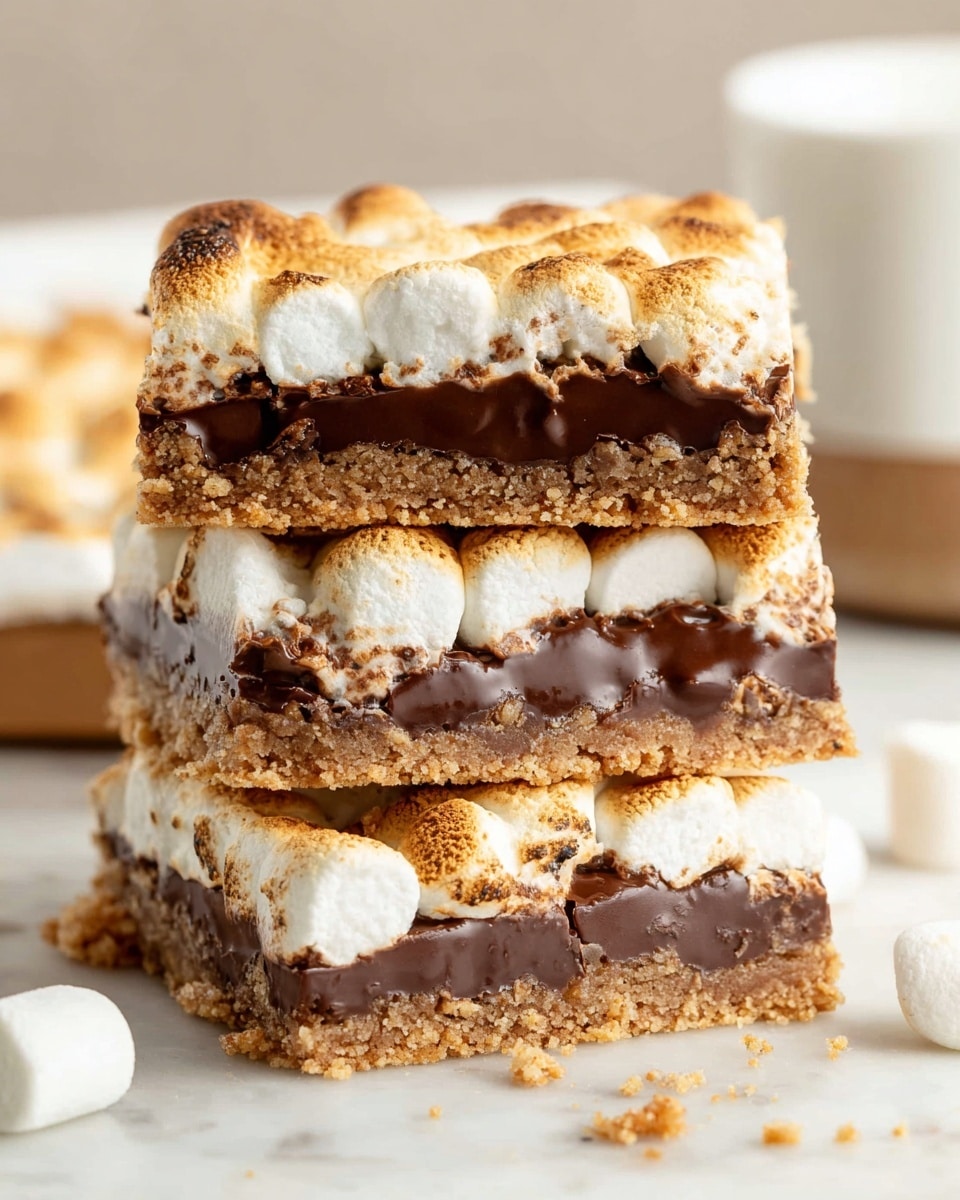
S’mores Bars Recipe
If you’ve ever wished you could capture that perfect campfire treat in an easy-to-make pan dessert, then this S’mores Bars Recipe is going to knock your socks off. It’s like having all the gooey, chocolatey, marshmallowy goodness of a traditional s’more without needing a fire pit, sticks, or even perfect weather. Seriously, I love making these for casual get-togethers or whenever I’m craving that nostalgic, sweet crunch.
What makes this S’mores Bars Recipe so special is the way it strikes the perfect balance between crispy graham cracker crust, melting chocolate, and toasted marshmallows right on top. I find they’re perfect for when you want a crowd-pleaser that’s quick but still feels homemade and indulgent. Plus, you can tweak the layers easily, and I’m going to share all my best tips so your bars come out just like mine — maybe even better!
Why This Recipe Works
- Simple Yet Delicious: Few ingredients come together quickly for maximum flavor and nostalgia.
- Perfect Texture Layers: Crunchy graham crust, melty chocolate, and toasted marshmallows create irresistible contrast.
- Customizable: Easily adjust chocolate types or marshmallow amounts to suit your preferences.
- Quick Bake Time: Ready in under 30 minutes, great for last-minute desserts or snacks.

Ingredients & Why They Work
Let’s talk about the magic behind the ingredients in this S’mores Bars Recipe. Each one complements the other perfectly to recreate that classic campfire flavor without fuss—plus, you probably already have these basics in your pantry or fridge!
- Graham cracker crumbs: They form the crunchy, slightly sweet base that’s crucial for that iconic s’mores crust.
- Butter (melted): Helps bind the graham crumbs together and adds richness for a tender but firm crust.
- Powdered sugar: Sweetens and slightly firms up the crust, ensuring it holds together when you cut into the bars.
- Hershey chocolate bars: Classic milk chocolate melts beautifully over the crust, giving you that signature s’mores chocolate layer.
- Mini marshmallows: The star on top — they toast quickly under the broiler, adding a lovely caramelized flavor and gooey texture.
Tweak to Your Taste
One of the things I enjoy most about this S’mores Bars Recipe is how easy it is to make your own with just a few tweaks. You can truly make it your own, whether you want it richer, sweeter, or a bit healthier.
- Dark Chocolate Variation: I swapped in semi-sweet or dark chocolate bars once and loved the slightly less sweet, more intense chocolate flavor it gave the bars.
- Peanut Butter Twist: Adding a swirl of peanut butter on the crust before adding chocolate creates a decadent, nutty layer I can’t get enough of.
- Gluten-Free Version: Using gluten-free graham cracker crumbs worked beautifully when I made these for my friend with dietary restrictions.
- Extra Marshmallows: For a super gooey top, add an extra layer of mini marshmallows – just keep a close eye under the broiler!
Step-by-Step: How I Make S’mores Bars Recipe
Step 1: Prepare the Crust
Start by preheating your oven to 350°F and grease a 9×13 pan with non-stick butter spray — this will save you from any sticky cleanup! In a medium bowl, mix the graham cracker crumbs with powdered sugar and melted butter. The key here is to stir until the crumbs are thoroughly coated and look like wet sand — this means they’ll pack nicely to form a crust that holds together once baked. Press this mixture firmly and evenly along the bottom and edges of your pan. Don’t be shy, use your fingers to really pack it down so it crisps up just right.
Step 2: Bake the Crust
Bake the crust for about 5-8 minutes, just until you start to see the edges turn a lovely golden brown. This short bake firms up the base so it doesn’t crumble when you layer on the chocolate and marshmallows later. Let it cool completely before moving on, which helps maintain those distinct layers in your bars.
Step 3: Layer the Chocolate
Once your crust is cool (or at least room temperature), lay the Hershey bars evenly across the surface, covering as much of the crust as possible. Pop the pan back into the oven for about 3 minutes until the chocolate just starts to melt and looks shiny. Perfect timing here ensures the chocolate will be spreadable but won’t pool into a mess. Remove and let it cool for a minute or two.
Step 4: Add and Toast the Marshmallows
Now the fun part: pile those mini marshmallows tightly on top of the warm chocolate layer. Don’t skimp here — the marshmallow layer is what brings the gooey charm of this S’mores Bars Recipe alive. Set your oven to broil and carefully slide the pan in. This is where you want to become a marshmallow hawk — watch those little puffs closely as they can go from toasted perfection to burnt in soon as a blink. Usually 2 minutes is perfect, but be ready to pull them out the moment they get a golden-brown hue. Trust me, I learned this the hard way!
Step 5: Cool, Chill, and Cut
Let your bars cool to room temperature, then pop them in the fridge for better setting — this makes slicing easier and less sticky. When you’re ready to cut, heat a sharp knife under hot water, dry it quickly, then slice. Warm knives cut through the sticky marshmallow and melty chocolate better, and you might need to repeat this warming step for clean cuts.
Pro Tips for Making S’mores Bars Recipe
- Perfect Crust Pack: Press the graham cracker mixture firmly to avoid crumbly edges that fall apart.
- Broiler Vigilance: Stay right by the oven when toasting marshmallows — they burn fast and you want that golden glow, not black edges.
- Knife Warm-Up: Warm your knife under hot water to slice smoothly through the sticky marshmallow topping.
- Chill Before Cutting: Refrigerate the cooled bars for at least 15-20 minutes so they set firmly for neat slices.
How to Serve S’mores Bars Recipe
Garnishes
I like to keep things simple with these bars, but a light dusting of powdered sugar or a sprinkle of crushed graham crackers on top adds a pretty finish. On occasion, I’ve even drizzled a little caramel sauce over the marshmallows right before serving for an extra sweet touch that’s irresistible.
Side Dishes
These bars are a dessert that shines on its own but pairing them with vanilla ice cream or fresh berries really elevates the experience. A hot cup of coffee or a cold glass of milk makes the perfect balance to the sweetness and gooey texture of the bars.
Creative Ways to Present
For summer parties, I’ve served these in mini mason jars layered with extra marshmallows and crushed graham crackers for a fun, portable treat. Around the holidays, adding festive sprinkles on top of the marshmallows before broiling is a cute way to customize these classic s’mores bars.
Make Ahead and Storage
Storing Leftovers
I store any leftovers in an airtight container in the fridge — they keep well for about 3-4 days without losing much of their gooey charm. Just make sure to press parchment paper between layers if stacking to avoid sticking.
Freezing
Freezing s’mores bars works surprisingly well! I wrap individual bars tightly in plastic wrap, then place them in a freezer bag. When I want a treat, I let them thaw in the fridge overnight and they maintain their texture better than I expected.
Reheating
If you want to warm up leftover bars, a quick zap in the microwave (around 15 seconds) brings back that melty marshmallow goodness. Just be careful not to overheat or the marshmallows can get tough and chewy instead of soft.
FAQs
-
Can I use different types of chocolate in this S’mores Bars Recipe?
Absolutely! Milk chocolate is classic, but you can use dark chocolate, white chocolate, or even chocolate chips. Just keep in mind that different chocolates melt at different rates, so watch your bars carefully to avoid over-melting or burning.
-
How do I prevent marshmallows from burning under the broiler?
Stay close and watch your bars the entire time under the broiler. It usually takes about 2 minutes for marshmallows to get perfectly toasted, but ovens vary. As soon as you see them turning golden brown, pull them out immediately to avoid burning.
-
Can I make these s’mores bars ahead of time?
Yes! You can bake the crust and let it cool the day before. Add the chocolate and marshmallows just before your event or when you’re ready to serve, then broil and enjoy fresh. This way, the marshmallows stay perfectly toasted and gooey.
-
What’s the best way to cut sticky s’mores bars?
Warm a sharp knife under hot water, dry it quickly, then slice through the bars. This helps prevent the marshmallow and chocolate from sticking to the blade. You might need to repeat warming the knife for clean cuts when slicing multiple bars.
Final Thoughts
This S’mores Bars Recipe holds a special place in my heart because it brings that campfire magic indoors with so little effort — perfect for anytime you crave a cozy treat. I hope you’ll find making and sharing these as joyful as I do. Trust me, once you try these bars, they’ll become your go-to dessert for every gathering or quiet night craving something sweet and nostalgic.
Print
S’mores Bars Recipe
- Prep Time: 10 minutes
- Cook Time: 15 minutes
- Total Time: 25 minutes
- Yield: 16 servings
- Category: Dessert
- Method: Baking
- Cuisine: American
Description
Delicious and easy-to-make S’mores Bars featuring a crispy graham cracker crust, melted Hershey chocolate, and toasted mini marshmallows. Perfect for a crowd-pleasing dessert that captures the classic campfire treat in bar form.
Ingredients
Crust
- 2 cups graham cracker crumbs
- 8-12 tablespoons butter, melted
- 1/2 cup powdered sugar
Topping
- 4 Hershey Chocolate Bars (4.4 ounces each)
- 1 package mini marshmallows
Instructions
- Preheat oven: Preheat your oven to 350 degrees Fahrenheit and grease a 9×13 inch pan with non-stick butter spray to prepare for baking.
- Prepare crust mixture: In a medium bowl, combine the graham cracker crumbs, powdered sugar, and melted butter. Mix well until the mixture is evenly moistened and holds together.
- Form crust: Spread the graham cracker mixture evenly into the bottom and along the sides of the prepared pan. Press firmly with your fingers to pack it tightly and create a solid crust base.
- Bake crust: Place the pan in the oven and bake for about 8 minutes or until the edges begin to turn golden brown. Remove from oven and allow to cool completely. The crust will harden as it cools.
- Add chocolate layer: Lay the 4 Hershey chocolate bars covering the entire surface of the cooled crust as evenly as possible.
- Melt chocolate: Return the pan to the oven for approximately 3 minutes until the chocolate just starts to melt and becomes shiny. Remove from oven and let cool for 1 to 2 minutes.
- Add marshmallows: Place the mini marshmallows closely packed together over the melted chocolate layer to cover it fully.
- Broil marshmallows: Turn the oven to the broil setting. Place the pan under the broiler and watch carefully, as the marshmallows will toast quickly—about 2 minutes. Remove as soon as they begin to turn golden brown to prevent burning.
- Cool and set: Allow the bars to cool completely. For easier cutting and better texture, refrigerate the bars until they are firm.
- Cut and serve: Use a sharp knife warmed under hot water and dried before each cut to slice the bars cleanly without sticking. Serve and enjoy your S’mores Bars.
Notes
- Use the higher amount (12 tablespoons) of melted butter if you prefer a richer, firmer crust.
- Keep a close watch during broiling as marshmallows can burn quickly and even catch fire.
- Refrigerating after assembling helps the bars set and makes them easier to cut.
- Warming the knife under hot water before slicing prevents marshmallow sticky buildup on the blade.
- You can substitute Hershey bars with any milk chocolate if desired.
Nutrition
- Serving Size: 1 bar
- Calories: 250 kcal
- Sugar: 20 g
- Sodium: 100 mg
- Fat: 15 g
- Saturated Fat: 9 g
- Unsaturated Fat: 5 g
- Trans Fat: 0 g
- Carbohydrates: 28 g
- Fiber: 1 g
- Protein: 2 g
- Cholesterol: 30 mg
