
Ghosts in the Graveyard Dirt Pudding Cups Recipe
If you’re looking for a fun and spooky dessert that’s as delicious as it is adorable, you have to try my Ghosts in the Graveyard Dirt Pudding Cups Recipe. It’s a fantastic treat that never fails to impress, especially when you want something quick but still festive for Halloween or any hauntingly good occasion. Trust me, once you make these, you’ll want to whip them up every year.
Why This Recipe Works
- Simple & Quick: You can have these pudding cups ready in about 10 minutes, perfect for last-minute parties.
- Creative Presentation: The cute “graveyard” theme makes a memorable impression on kids and adults alike.
- Versatile Ingredients: Easily swap out cookie crumbs or decorations to suit your taste or pantry.
- Kid-Friendly: No baking required, so it’s a fun project to do with little helpers in the kitchen.

Ingredients & Why They Work
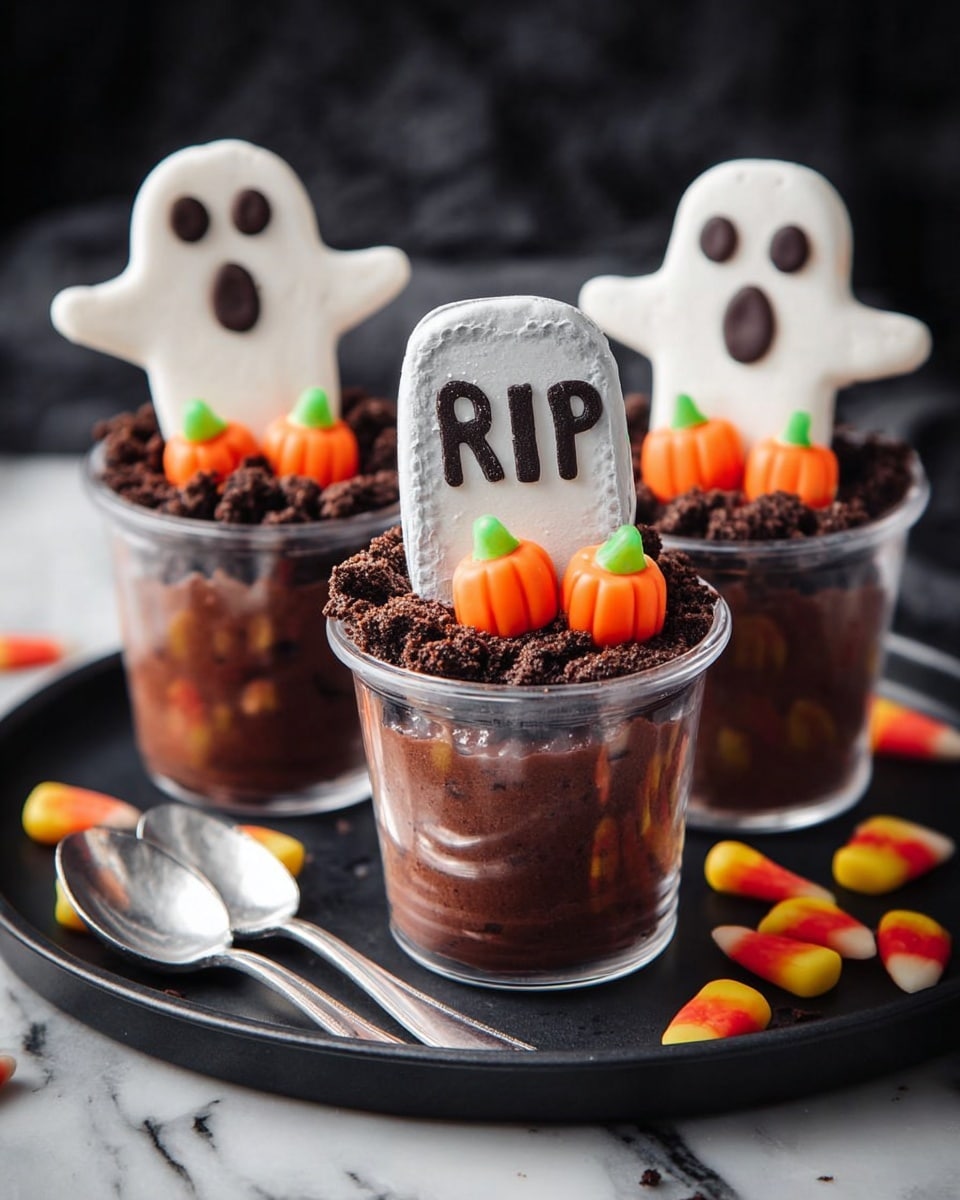
This Ghosts in the Graveyard Dirt Pudding Cups Recipe uses simple ingredients that combine textures and flavors beautifully. The creamy chocolate pudding forms the ‘dirt’ base, the cookie crumbs add crunch and authenticity, and the marshmallow ghost brings in the fun factor. For best results, choose quality pudding and cookies that you love eating on their own!
- Chocolate pudding: Ready-made pudding keeps things easy, and using a rich chocolate flavor really sells the “dirt” idea.
- Chocolate graham cracker crumbs (or Oreo crumbs): Adds great texture and looks just like dirt when sprinkled on top.
- Milano cookie: Perfect “headstone” canvas for your piped “RIP” lettering; choose a sturdy cookie to hold up well.
- Chocolate frosting: Best for piping letters because it holds shape nicely and enhances the chocolate theme.
- Marshmallow ghost: Cute, spooky, and soft – this brings the ghostly character to life.
- Candy pumpkins: Adds a pop of color and extra fun to your graveyard scene.
Tweak to Your Taste
I love mixing things up depending on who I’m serving. You can absolutely customize the Ghosts in the Graveyard Dirt Pudding Cups Recipe to make it your own — whether that’s dietary tweaks, flavor swaps, or just adding your favorite Halloween goodies. Don’t be afraid to get creative!
- Variation: I once swapped the chocolate pudding for vanilla with crushed Oreos as “dirt” for a lighter twist – it was a huge hit and just as spooky.
- Dietary tweak: For a gluten-free version, use gluten-free cookies and graham cracker crumbs; the pudding is usually fine but double-check labels.
- Extra fun: Add gummy worms or edible candy spiders crawling over the top for an extra creepy factor.
Step-by-Step: How I Make Ghosts in the Graveyard Dirt Pudding Cups Recipe
Step 1: Layer the ‘Dirt’ with Pudding and Crumbs
Start by spooning your prepared chocolate pudding into clear plastic cups — I like using 9-ounce cups because they hold a good amount without being too big. Fill the cup almost to the top but leave space for the toppings. Then, sprinkle chocolate graham cracker crumbs or Oreo crumbs evenly over the pudding to create the perfect dirt layer. Make sure the crumbs don’t get soggy by adding them just before serving or storing.
Step 2: Create the Headstone
Next up, the Milano cookie becomes your graveyard headstone. Using chocolate frosting and either a small piping tip or a plastic zip-top bag with a tiny corner snipped off, carefully pipe “RIP” onto the cookie. It doesn’t have to be perfect — in fact, a little wobbly makes it look more authentic. Let it set for a few minutes so the frosting firms up before placing it in the cup.
Step 3: Arrange the Ghost and Pumpkins
Finally, place the decorated Milano cookie standing up slightly tilted in the pudding so it looks like a headstone sticking out of the ground. Nestle a marshmallow ghost beside it to bring the cup to life, and scatter three candy pumpkins around for that perfect fall vibe. I like to position the marshmallow ghost slightly at the front so you get that cute face first.
Step 4: Serve or Store
Serve your Ghosts in the Graveyard Dirt Pudding Cups Recipe immediately for best flavor and texture, or cover the cups with plastic wrap and refrigerate for up to 24 hours. Just know the cookies might get a bit soft and marshmallows could dry out, but the flavors will still be delicious!
Pro Tips for Making Ghosts in the Graveyard Dirt Pudding Cups Recipe
- Use Clear Cups: I always choose clear cups so the layers and spooky details really pop visually—it makes a big difference!
- Pipe Slowly: Take your time piping the “RIP” on the cookie—it’s easier if the frosting is at room temperature and not too stiff.
- Add Decorations Last: Place gummy worms or candy decorations just before serving to keep them from melting or getting soggy.
- Prevent Soggy Cookies: If making ahead, keep the cookie and marshmallow decorations separate until just before serving to maintain their texture.
How to Serve Ghosts in the Graveyard Dirt Pudding Cups Recipe
Garnishes
I love sprinkling a few gummy worms crawling over the crumbs, plus a tiny drizzle of extra chocolate frosting on the grave marker for a wet look. Sometimes, I add candy eyeballs to the marshmallow ghost to make it extra spooky. These little touches always get a lot of smiles!
Side Dishes
Since these dirt pudding cups are sweet and rich, I like serving them alongside savory finger foods like mini sandwiches or some crunchy veggie sticks. For Halloween parties, a batch of pumpkin-spiced popcorn fits perfectly with the theme and balances the sweetness.
Creative Ways to Present
One of my favorite presentation ideas is serving these in mini mason jars for a rustic vibe, with a little wooden spoon tied on with orange twine. For kids’ parties, I’ve also used little plastic cauldrons and added dry ice for a spooky fog effect—so much fun and super kid-friendly!
Make Ahead and Storage
Storing Leftovers
I usually cover leftover pudding cups tightly with plastic wrap and keep them in the fridge for up to 24 hours. The pudding stays creamy, but the cookie and marshmallow might soften a bit, so I recommend assembling the decorations fresh if possible next time.
Freezing
Freezing these isn’t ideal because pudding can separate when thawed, and the marshmallow ghosts tend to get rubbery. So, I’d skip freezing if you want the best texture and flavor intact.
Reheating
Since this dessert is best served cold, reheating isn’t really necessary or recommended. If you want to enjoy leftovers, just take them out of the fridge 10 minutes before serving to let the pudding soften slightly.
FAQs
-
Can I use homemade pudding for the Ghosts in the Graveyard Dirt Pudding Cups Recipe?
Absolutely! Homemade pudding works wonderfully here and can make the dessert feel extra special. Just be sure it’s chilled well before assembling to keep the “dirt” layer firm enough to hold the toppings.
-
Can I prepare these pudding cups ahead of time?
You can prepare the pudding and crumbs a day ahead, but I recommend adding cookies, marshmallows, and candy pumpkins right before serving to keep everything fresh and prevent sogginess.
-
What can I use instead of Milano cookies for the headstones?
If you don’t have Milano cookies, rectangular or oval-shaped cookies like wafer cookies, shortbread, or even rectangular Oreos work great. Just make sure they’re sturdy enough to stand up in the pudding.
-
How long will the dessert stay fresh?
Stored properly in the fridge and covered, these pudding cups stay tasty for up to 24 hours. Beyond that, the texture of the decorations starts to change, so it’s best to enjoy them as fresh as possible.
Final Thoughts
This Ghosts in the Graveyard Dirt Pudding Cups Recipe holds a special place in my heart because it brings together quick prep, fun creativity, and truly delicious flavors — a rare combo! It’s perfect for celebrations or whenever you want to impress guests (or kids) without hours in the kitchen. Honestly, whip these up and watch how fast everyone reaches for seconds — it’s like Halloween magic in a cup!
Print
Ghosts in the Graveyard Dirt Pudding Cups Recipe
- Prep Time: 10 minutes
- Cook Time: 0 minutes
- Total Time: 10 minutes
- Yield: 1 serving
- Category: Dessert
- Method: No-Cook
- Cuisine: American
Description
These festive Ghosts in the Graveyard Dirt Pudding Cups are a fun and spooky Halloween treat featuring creamy chocolate pudding, chocolate cookie crumbs, a decorated Milano cookie headstone, and spooky marshmallow and candy decorations. Perfect for kids and party gatherings.
Ingredients
Dirt Pudding Cups
- 8 ounces prepared chocolate pudding
- 2 tablespoons chocolate graham cracker crumbs or Oreo cookie crumbs
- 1 Milano cookie
- Chocolate frosting for piping
- 1 marshmallow ghost
- 3 candy pumpkins
Instructions
- Fill the Cup: Place the prepared chocolate pudding in a clear plastic cup, filling it almost to the top.
- Add Dirt Layer: Sprinkle 2 tablespoons of chocolate graham cracker crumbs or Oreo cookie crumbs over the pudding to create a dirt-like topping.
- Decorate the Headstone: Using chocolate frosting and a small decorating tip or a plastic bag with the corner snipped off, pipe the letters “RIP” onto the Milano cookie to create a spooky graveyard headstone.
- Assemble Decorations: Arrange the decorated Milano cookie, the marshmallow ghost, and the candy pumpkins on top of the pudding cup to complete the graveyard scene.
- Serve or Store: Serve immediately for the best texture, or cover the cups with plastic wrap and refrigerate for up to 24 hours. Note that cookies may become soggy and marshmallows may dry out over time.
- Multiply as Needed: Repeat the process to assemble as many pudding cups as desired for your party or gathering.
Notes
- Scale the recipe up or down according to the number of servings needed.
- If using small prepared pudding cups, approximately 2 cups of pudding are needed per 9-ounce plastic cup.
- For added Halloween fun, include gummy worms, candy spiders, or other creepy candies on top.
- Store covered in the refrigerator for up to 24 hours, but expect cookies to soften and marshmallows to dry out with longer storage.
Nutrition
- Serving Size: 1 cup
- Calories: 300 kcal
- Sugar: 35 g
- Sodium: 150 mg
- Fat: 10 g
- Saturated Fat: 5 g
- Unsaturated Fat: 4 g
- Trans Fat: 0 g
- Carbohydrates: 45 g
- Fiber: 2 g
- Protein: 4 g
- Cholesterol: 20 mg


