
RIP Halloween Dessert Shooters Recipe
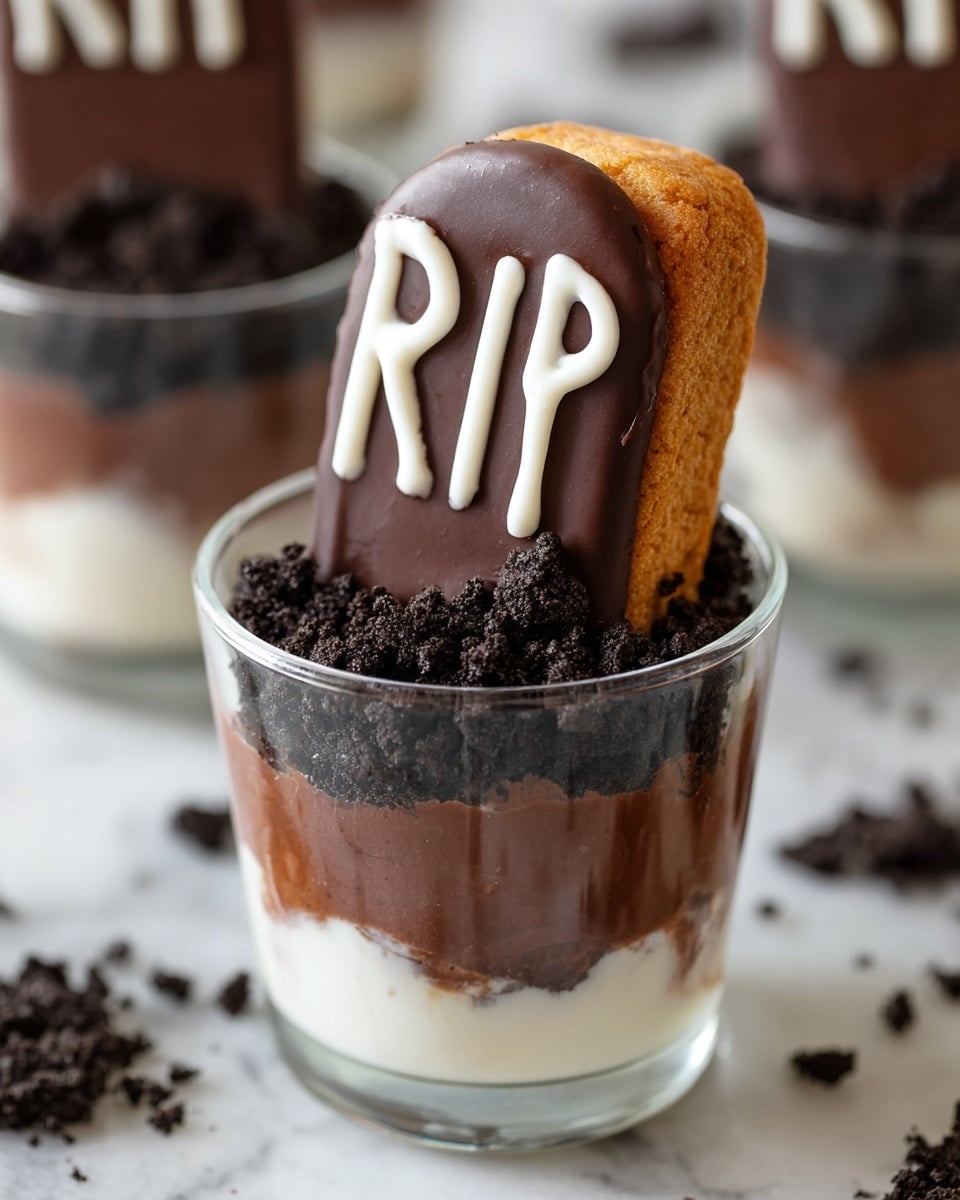
If you’re looking for a spooky, crowd-pleasing treat this season, you have to try my RIP Halloween Dessert Shooters Recipe. These little gems combine creamy, chocolaty pudding with cookie “soil” and cute little chocolate-dipped ladyfinger gravestones that you can decorate yourself. I made these last year for a Halloween party, and everyone kept coming back for seconds! Trust me, once you get the hang of it, you’ll want to whip up a batch every October.
Why This Recipe Works
- Perfect Texture Balance: The smooth puddings blend perfectly with crumbly Oreo soil and crisp chocolate-coated ladyfingers, making every bite exciting.
- Fun to Customize: You can personalize the “gravestones” with your own spooky messages using royal icing — it’s a super fun touch for parties.
- Easy to Assemble Ahead: You can prep the pudding and decorate the ladyfingers in advance, making party day stress-free.
- Crowd-Friendly Size: The shooter glasses keep portions just right, so everyone can enjoy a little slice of Halloween delight.

Ingredients & Why They Work
The magic of this RIP Halloween Dessert Shooters Recipe lies in how simple ingredients come together to build layers of flavor and texture. Plus, these ingredients are easily found at your local grocery store, which always makes baking less stressful.
- Oreo Cookies: Scraping the white filling to mix into the pudding gives an extra creamy richness while the crushed cookies create that perfect “dirt” texture on top.
- Pudding Powder: Choose any flavor you like — chocolate or vanilla work beautifully; just follow packet instructions for a silky base.
- Semisweet or Dark Chocolate: Melting this with butter creates a smooth coating to make the ladyfingers look like spooky gravestones.
- Unsalted Butter: Adds richness to the chocolate mix, and a nice sheen to the gravestones once they set.
- Ladyfingers: These biscuits are perfect because of their size and shape, easy to dip and write on for that Halloween vibe.
- Egg White: Combined with powdered sugar, it forms the royal icing for writing “RIP” on each gravestone, adding a cute handmade touch.
- Powdered Sugar: Sifted for smooth royal icing consistency – no lumps allowed for perfect piping!
Tweak to Your Taste
One of my favorite things about the RIP Halloween Dessert Shooters Recipe is how easy it is to make your own with little tweaks. If you don’t like the idea of butter in the chocolate, you can simply melt chocolate on its own. Or swap out Oreo for chocolate wafer crumbs for a lighter dirt layer — either way, these shooters turn out delicious.
- Variation: Last year I tried using pumpkin spice pudding — it added a subtle fall flavor that was totally impressive and definitely kid-friendly.
- Dietary Swap: For gluten-free friends, ladyfinger substitutes like gluten-free vanilla cookies work well when dipped carefully.
- Decorations: Instead of “RIP,” you can pipe silly Halloween sayings or draw little spider webs, which is always a hit with the kids.
Step-by-Step: How I Make RIP Halloween Dessert Shooters Recipe
Step 1: Prepare the Oreo Soil and Pudding Base
Start by carefully scraping the white filling from every Oreo cookie — don’t rush this part! I like to use a small butter knife. Put this filling in a bowl and set it aside. Next, toss the remaining cookie halves into your food processor and pulse until you get fine crumbs that look just like dirt. Make your pudding according to the packet instructions — here is where the magic happens: while it’s still warm, stir in the Oreo filling you set aside earlier. This adds incredible richness and flavor. Let the pudding cool a little before pouring it halfway into your shooter glasses. This gives space for the layers to build!
Step 2: Make the Chocolate Gravestones
While the pudding chills, melt chocolate and butter together over simmering water. Patience is key here — melting slowly prevents the chocolate from seizing. Slice ladyfingers in half lengthwise for gravestone-size treats. Use a spatula to evenly coat each half with the melted mixture, then place on baking paper to cool and set. I usually pop them in the fridge so they firm up faster.
Step 3: Pipe the “RIP” with Royal Icing
Make your royal icing by whisking egg white and sifted powdered sugar until smooth and foamy — I use a fork to beat the egg white first, then mix in sugar for the best consistency. Transfer the icing into a small ziplock bag and snip a tiny corner to pipe. When your chocolate gravestones are set, carefully pipe “RIP” on each one. Don’t stress if your first few look a little shaky — practice makes perfect!
Step 4: Assemble the Dessert Shooters
Once the pudding is slightly set, sprinkle the Oreo crumbs on top to make that iconic soil layer. Then, gently stick the decorated ladyfinger upright into each shooter glass. Pop everything back in the fridge until you’re ready to serve — chilling helps all flavors settle together for a delightful bite.
Pro Tips for Making RIP Halloween Dessert Shooters Recipe
- Don’t Skip the Oreo Filling: Mixing the white cream from the Oreos into the pudding adds lusciousness and makes your soil taste extra indulgent.
- Melt Chocolate Slowly: Use a double boiler; rushing with a microwave could burn your chocolate and spoil the smooth coating.
- Piping Patience: If your royal icing is too runny, add a bit more powdered sugar; if too stiff, a drop or two of water can help.
- Chill Everything Thoroughly: Setting the pudding, crumbs, and gravestones well in the fridge ensures your shooters hold their shape perfectly when served.
How to Serve RIP Halloween Dessert Shooters Recipe
Garnishes
I like to sprinkle a tiny pinch of edible glitter or use mini plastic spiders for an extra creepy effect on top of the Oreo soil. Adding a fresh mint leaf or a small candy pumpkin beside the gravestone also adds a pop of color and whimsy.
Side Dishes
These shooters are a sweet finale, so I usually pair them with savory finger foods like mini sliders or stuffed mushrooms at Halloween gatherings. The balance between salty and sweet is a total crowd-pleaser.
Creative Ways to Present
Try serving these shooters on a tray decorated with dry ice for that eerie fog effect — it’s a total showstopper! Or place them in a hollowed-out pumpkin for a fun seasonal centerpiece. I once arranged them on a graveyard-themed tiered dessert stand with candy “bones” sprinkled around. Super fun and guaranteed to impress your guests.
Make Ahead and Storage
Storing Leftovers
If you happen to have leftovers (lucky you!), cover the shooters tightly with plastic wrap and store them in the fridge. They keep well for up to 3 days. Just remember to keep the gravestones standing upright to avoid messy spills.
Freezing
I haven’t personally frozen these shooters because the pudding texture changes a bit after thawing, but you can freeze the components separately — Oreo crumbs and decorated ladyfingers freeze well, and you can prepare pudding fresh on party day.
Reheating
This dessert is best served cold, so no reheating needed! Just pull them out of the fridge about 10 minutes before serving to take the chill off slightly—you don’t want them frozen solid in your mouth.
FAQs
-
Can I make the pudding from scratch instead of using a packet?
Absolutely! Homemade pudding made with milk, sugar, cornstarch, and cocoa powder or vanilla extract works beautifully. Just make sure it’s thickened well before mixing in the Oreo filling and layering.
-
What can I use instead of egg whites in the royal icing?
If you prefer to avoid raw egg whites, you can use meringue powder mixed with water as a substitute for royal icing—just follow the package instructions to get the right consistency for piping.
-
How long do these dessert shooters last once assembled?
When stored in the refrigerator covered well, they stay fresh and tasty for up to 3 days. Just keep an eye on the texture of the Oreo crumbs, as they can absorb moisture over time.
-
Can I prepare these for a party the day before?
Definitely! I usually prepare the pudding and Oreo soil a day ahead and chill them overnight. The chocolate gravestones can be made a day or two before too. Assemble everything the morning of your event, and you’re set!
Final Thoughts
This RIP Halloween Dessert Shooters Recipe holds a special place in my heart because it’s not just tasty—it’s also playful and creative. It’s one of those recipes that makes everyone smile, from kids decorating gravestones to adults sneaking a second helping. I truly hope you have fun making these as much as I do sharing them. So grab your Oreos, pudding mix, and chocolate, and let’s make your Halloween gatherings unforgettable with these little spooky delights!
Print
RIP Halloween Dessert Shooters Recipe
- Prep Time: 40 minutes
- Cook Time: 0 minutes
- Total Time: 40 minutes
- Yield: 24 servings
- Category: Dessert
- Method: No-Cook
- Cuisine: American
Description
RIP Halloween Dessert Shooters are spooky, layered treats featuring creamy pudding, crushed Oreo cookie soil, and chocolate-dipped ladyfinger gravestones decorated with royal icing. Perfect for Halloween parties, these bite-sized desserts combine rich chocolate, creamy pudding, and crunchy cookie crumbs in an eye-catching presentation.
Ingredients
Soil
- 12 Oreo cookies
- 1 packet pudding powder of your choice (1.4 ounces/43 grams)
Gravestones
- 2 ounces semisweet or dark chocolate (60 grams)
- 3 tablespoons unsalted butter
- 12 ladyfingers
- 1 tablespoon egg white
- 5 tablespoons powdered sugar, sifted
Instructions
- Prepare the Oreo soil: Scrape the white filling from each Oreo cookie and place it in a bowl, set aside. Place the Oreo cookies (without filling) into a food processor and pulse until they form a fine crumb texture.
- Make the pudding layer: Prepare the pudding according to the packet instructions. While the pudding is still hot, stir in the reserved Oreo filling until well combined. Allow the pudding mixture to cool slightly.
- Layer the pudding: Pour the pudding mixture into small glasses, filling each glass halfway to leave room for the Oreo crumbs and gravestone. Place the glasses in the refrigerator to chill.
- Prepare the chocolate gravestones: Melt the chocolate and unsalted butter together over a pot of simmering water until smooth. Cut each ladyfinger in half, then spread melted chocolate evenly over each half using a spatula. Lay them on a sheet of baking paper and allow the chocolate to set.
- Make royal icing: Beat the egg white with a fork until foamy. Gradually mix in the sifted powdered sugar until smooth. Transfer the icing into a ziplock bag, snip a small corner to create a piping tip.
- Decorate gravestones: Once the chocolate on the ladyfingers is set, pipe the letters “RIP” onto each ladyfinger using the royal icing.
- Assemble dessert shooters: After the pudding has partially set, sprinkle Oreo crumbs on top. Insert a decorated ladyfinger gravestone into each glass. Refrigerate until ready to serve.
Notes
- Use glasses with a capacity of about 1.5 ounces (45 ml) for correct proportions.
- For extra flavor, try using flavored pudding powders like chocolate or vanilla.
- Ensure the chocolate and butter mixture is fully cooled before spreading onto ladyfingers to prevent sogginess.
- Royal icing can be substituted with store-bought frosting or white chocolate for easier decorating.
- Keep dessert shooters refrigerated until serving to maintain texture and freshness.
Nutrition
- Serving Size: 1 shooter (approximately 45 ml)
- Calories: 150 kcal
- Sugar: 18 g
- Sodium: 70 mg
- Fat: 7 g
- Saturated Fat: 4 g
- Unsaturated Fat: 2 g
- Trans Fat: 0 g
- Carbohydrates: 20 g
- Fiber: 1 g
- Protein: 2 g
- Cholesterol: 15 mg

