
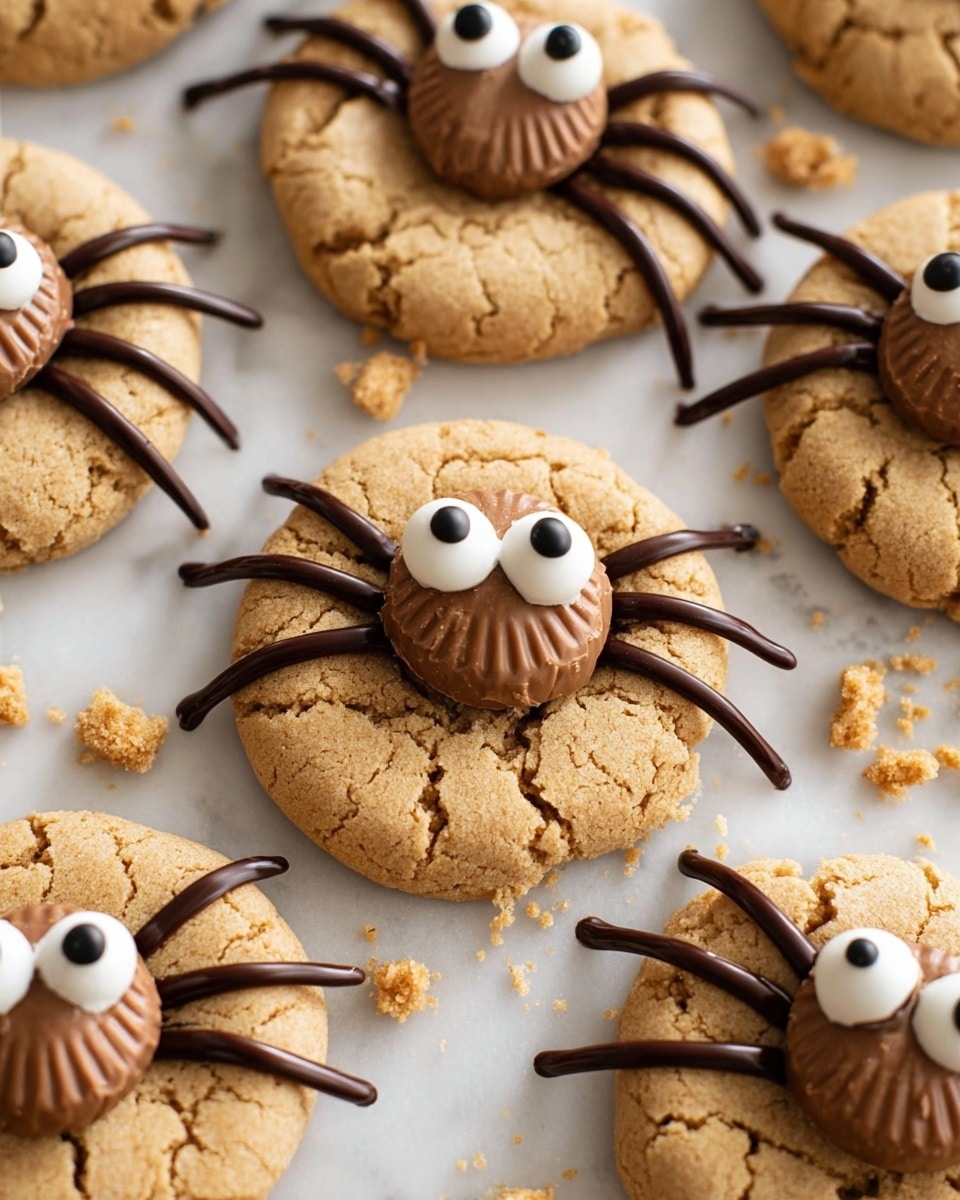
Halloween Inspired Peanut Butter Blossom Spider Cookies Recipe
If you’re looking to add a bit of fun (and a dash of spooky goodness) to your Halloween festivities, you absolutely have to try this Halloween Inspired Peanut Butter Blossom Spider Cookies Recipe. I stumbled on this idea a few years ago, and it instantly became my go-to festive treat. These aren’t just any cookies — they combine that classic peanut butter bliss with cute, creepy spider decorations that both kids and adults adore. Trust me, once you try them, you’ll be making these every October!
Why This Recipe Works
- Classic Flavor Combo: The rich peanut butter balances perfectly with the sweet Reese’s cups, making every bite irresistible.
- Fun & Festive: Candy eyes and chocolate spider legs make these cookies a hit with kids and adults alike, adding spooky charm without being scary.
- Easy to Assemble: Once you bake the base cookie, decorating is quick and customizable — great for parties or last-minute treats.
- Perfect Texture: Soft and chewy cookies with melted peanut butter cups that don’t turn mushy thanks to chilling and timing tricks.

Ingredients & Why They Work
The magic of this Halloween Inspired Peanut Butter Blossom Spider Cookies Recipe lies in trusting the ingredients for both taste and texture. I always pick creamy peanut butter for that smooth, rich base, and the miniature Reese’s cups add that peanut-chocolate wow factor at the very end — like a little surprise in each cookie.
- Unsalted butter: Softened butter helps achieve a tender, chewy cookie without extra salt altering the flavor balance.
- Creamy peanut butter: Smooth texture blends seamlessly with butter for a melt-in-your-mouth base.
- Granulated sugar: Sweetens the dough and rolls onto the cookie dough balls for a subtle sugary crust.
- Eggs: Brings moisture, helps bind everything together, and gives that perfect cookie softness.
- Vanilla extract: Adds warm, aromatic notes that amplify the peanut butter flavor.
- All-purpose flour: The foundation of the cookie — use fresh, good quality for best results.
- Baking soda: Gives slight lift and helps with soft texture.
- Salt: Enhances the sweetness and balances the richness.
- Miniature Reese’s Peanut Butter Cups: The signature candy “center” for the spider body — go for the mini size so the cookie won’t overwhelm your bite.
- Candy eyes: Fun spooky detail — a must for those spider vibes!
- Semi-sweet chocolate chips (melted): Used to pipe spider legs on and secure candy eyes if needed.
Tweak to Your Taste
One of the best parts about this Halloween Inspired Peanut Butter Blossom Spider Cookies Recipe is how easy it is to personalize. I love to mix things up depending on who’s coming over and what flavors are in season.
- Variation: I’ve swapped creamy peanut butter for natural peanut butter for a nuttier taste, but just be sure to stir it well since natural separates.
- Dietary tweak: When friends have allergies, I swap the all-purpose flour for gluten-free flour blends and ensure allergy-safe candy eyes.
- Decor twist: Instead of candy eyes, try edible googly eyes or use black gel icing to painstakingly paint tiny spider features if you’re feeling artsy.
- Chocolate options: Swap semi-sweet for dark chocolate in melted form to lower sweetness or for milk chocolate for that classic touch.
Step-by-Step: How I Make Halloween Inspired Peanut Butter Blossom Spider Cookies Recipe
Step 1: Cream things up — butter, sugar, and peanut butter
Start by creaming your softened butter and sugar together in a large mixing bowl using a paddle attachment if you’ve got a stand mixer. I do it for about 4-5 minutes until the mixture is light and fluffy — this is key for those soft cookies. Then, add the peanut butter and mix for another minute or two until well combined. This step is where the magic starts!
Step 2: Eggs and vanilla go in
Add the eggs one at a time, making sure they’re at room temperature to avoid any mixing issues, and then stir in vanilla extract. Mix everything until smooth and creamy. Now, your batter is rich and ready for the dry ingredients.
Step 3: Combine dry ingredients gently
In a separate bowl, whisk together the all-purpose flour, baking soda, and salt. Gradually add this into the wet mixture until just combined — no overmixing here or you’ll risk a tougher cookie. Your dough will be soft but firm enough to scoop.
Step 4: Chill and shape
Cover the cookie dough and pop it in the fridge for about 25-30 minutes. This chilling step is crucial — it helps the dough firm up so the cookies don’t spread too much. Once chilled, scoop out about 1 oz. of dough with a measuring spoon or scoop, roll smoothly in your palms, then roll each ball in granulated sugar for a lovely sparkle.
Step 5: Bake with care
Arrange your cookie dough balls 2-3 inches apart on a parchment-lined baking sheet and bake in a 350°F (175°C) oven. Bake for 9-11 minutes — you’re looking for golden brown edges but still soft centers. Important tip: the cookies will feel very soft initially, but they set as they cool, so resist the urge to underbake or overbake.
Step 6: Add the Reese’s cups and decorate spiders
After baking, let the cookies cool for about 5 minutes to firm slightly. Then gently press a miniature Reese’s peanut butter cup in the center of each cookie. If the cups start to melt too quickly, a quick chill in the freezer before decorating helps a lot. Stick two candy eyes onto each peanut butter cup — they’ll cling naturally thanks to the warm chocolate, but if not, a dab of melted chocolate works like glue. Finally, grab a piping bag or a sandwich bag with a tiny cut corner, fill it with melted chocolate, and pipe spider legs around the Reese’s cup to complete your festive spiders.
Pro Tips for Making Halloween Inspired Peanut Butter Blossom Spider Cookies Recipe
- Chill the dough: It prevents spreading and helps keep those adorable spider shapes crisp and defined.
- Freeze Reese’s cups briefly: This little hack stops the candies from melting too much when pressed on warm cookies.
- Use a small piping tip or cut a tiny corner of a bag: Precision in spider legs elevates your cookie game to next level!
- Patience for cooling: Don’t rush decorating; slightly cooled cookies make for cleaner, less messy assembly.
How to Serve Halloween Inspired Peanut Butter Blossom Spider Cookies Recipe
Garnishes
I keep it simple with the candy eyes for that classic spider look, but sometimes I toss edible glitter or colored sugar sprinkles around the edges for a little Halloween sparkle. If I’m feeling crafty, I add a touch of orange or black gel icing for extra creepy details.
Side Dishes
These cookies go wonderfully with a cold glass of milk or a piping hot cup of spiced pumpkin latte — perfect for warming you up during spooky season gatherings. If you’re serving kids, I like pairing them with simple fruit platters or even popcorn for a fun snack mix vibe.
Creative Ways to Present
For a Halloween party, I’ve arranged these spider cookies crawling out of a mini “haunted” cauldron platter — it’s super cute and invites guests to grab them. You could also place them on a black serving tray with fake cobwebs and little plastic spiders for a dramatic effect. Wrapping a few in clear cellophane bags tied with orange ribbons makes them fabulous take-home gifts too.
Make Ahead and Storage
Storing Leftovers
I store leftovers in an airtight container at room temperature, layering parchment paper between to keep the spider legs from sticking. These cookies stay soft and delicious for about 3-4 days, which is great because they tend to disappear fast!
Freezing
Freeze unbaked dough balls to make future baking days easier — just thaw in the fridge overnight, then roll in sugar and bake as usual. I don’t recommend freezing fully decorated cookies because the Reese’s cups and candy eyes don’t freeze well and might get messy.
Reheating
If you want warm cookies later, you can microwave an individual cookie for about 10-15 seconds — it refreshes the softness and melted peanut butter goodness without ruining the spider decoration.
FAQs
-
Can I make these Halloween Inspired Peanut Butter Blossom Spider Cookies vegan?
Absolutely! Swap the butter for a plant-based alternative, choose a vegan peanut butter, and replace eggs with flax eggs or a suitable vegan substitute. Also, look for vegan mini peanut butter cups and candy eyes to keep the decorations festive and animal-friendly.
-
How do I prevent the Reese’s cups from melting too much on the cookies?
Make sure to let your cookies cool for about 5 minutes after baking before pressing the Reese’s cups in. For extra protection, pop the peanut butter cups in the freezer for a few minutes beforehand, which slows down melting when they meet warm cookies.
-
Can I use a different candy instead of Reese’s peanut butter cups?
You can, but peanut butter cups give the perfect flavor combo and are the right size to create that spider body. If you want to experiment, mini chocolate candies or even round caramel treats could work, but the peanut butter taste is hard to beat here!
-
How long do these cookies keep fresh?
Stored properly at room temperature in an airtight container, they stay fresh and tasty for about 3 to 4 days. The texture is soft with a slightly crisp edge, which is how I love ’em best!
Final Thoughts
Honestly, the Halloween Inspired Peanut Butter Blossom Spider Cookies Recipe is one of those little rituals I look forward to every fall. It’s a joy to make and even more fun to share with friends and family. The way the peanut butter melds with the chocolate and the playful spider design just brings a smile to everyone’s face — no matter their age. Give it a try this season, I promise you’ll be glad you did. Now, go get baking — your spooktacular snack awaits!
Print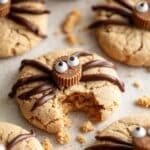
Halloween Inspired Peanut Butter Blossom Spider Cookies Recipe
- Prep Time: 20 minutes
- Cook Time: 10 minutes
- Total Time: 1 hour
- Yield: 24 cookies
- Category: Dessert
- Method: Baking
- Cuisine: American
- Diet: Vegetarian
Description
Halloween Inspired Peanut Butter Blossom Spider Cookies combine creamy peanut butter and soft sugar cookies with festive Reese’s peanut butter cups and candy eyes, decorated with chocolate spider legs for a spooky treat perfect for Halloween celebrations.
Ingredients
Cookie Dough
- 1/2 cup Unsalted butter, softened
- 1 cup Creamy peanut butter
- 1 1/2 cups Granulated sugar
- 2 tbsp Granulated sugar for rolling
- 2 Eggs, room temperature
- 1 tbsp Vanilla Extract
- 2 1/2 cups All-purpose Flour
- 1 tsp Baking Soda
- 1 tsp Salt
Decorations
- 24 Miniature Reese’s Peanut Butter Cups
- Candy eyes
- 1 oz Semi-sweet chocolate chips, melted
Instructions
- Cream Ingredients: In a large mixing bowl fitted with a paddle attachment, cream the softened butter and 1 1/2 cups granulated sugar for 4-5 minutes until the mixture is light and fluffy. Add in the creamy peanut butter and mix for an additional 1-2 minutes to combine.
- Add Eggs and Vanilla: Add the eggs and vanilla extract to the bowl and mix until fully incorporated.
- Incorporate Dry Ingredients: Gradually add the all-purpose flour, baking soda, and salt to the wet ingredients, mixing until everything is fully combined and a dough forms.
- Chill Dough: Cover the dough and chill in the refrigerator for 30 minutes to firm up.
- Form Cookies: Using a 1 oz portion scoop or measuring spoon, scoop out dough portions and roll each into smooth balls using your palms. Then, roll each ball in the 2 tablespoons of granulated sugar to coat.
- Prepare Baking Sheet: Preheat the oven to 350 degrees Fahrenheit. Line a sheet pan with parchment paper and arrange the cookie dough balls 2-3 inches apart.
- Bake: Bake the cookies in the preheated oven for 10 minutes until golden brown. The cookies will still be soft. Remove and let sit for a few minutes on the baking sheet, then transfer to a wire rack to cool completely for about 5 minutes.
- Add Reese’s Cups and Candy Eyes: Once slightly cooled but still warm, press one miniature Reese’s peanut butter cup into the center of each cookie. Then, press two candy eyes onto each peanut butter cup. If the candy eyes don’t stick, use a small dot of melted chocolate to adhere them.
- Pipe Spider Legs: Place melted chocolate chips in a piping bag or plastic sandwich bag with a small corner snipped off, and pipe spider legs onto each cookie around the Reese’s cup to complete the spider decoration. Let the chocolate cool and harden completely.
- Store: Store leftover cookies in an airtight container at room temperature for 3-4 days.
Notes
- Let the cookies cool for about 5 minutes after baking before adding the Reese’s cups to prevent melting.
- Freezing the Reese’s cups for a few minutes before pressing onto the cookies helps prevent them from melting too much.
- The candy eyes usually stick naturally to the warm peanut butter cup; if not, use a small dab of melted chocolate as glue.
- Spider legs can also be drawn with a toothpick dipped in melted chocolate or replaced with black Twizzlers or gel icing for decoration variation.
- Cooling the cookies fully on a wire rack ensures the best texture before decorating.
Nutrition
- Serving Size: 1 cookie
- Calories: 180 kcal
- Sugar: 15 g
- Sodium: 150 mg
- Fat: 10 g
- Saturated Fat: 3 g
- Unsaturated Fat: 6 g
- Trans Fat: 0 g
- Carbohydrates: 18 g
- Fiber: 1 g
- Protein: 4 g
- Cholesterol: 25 mg


