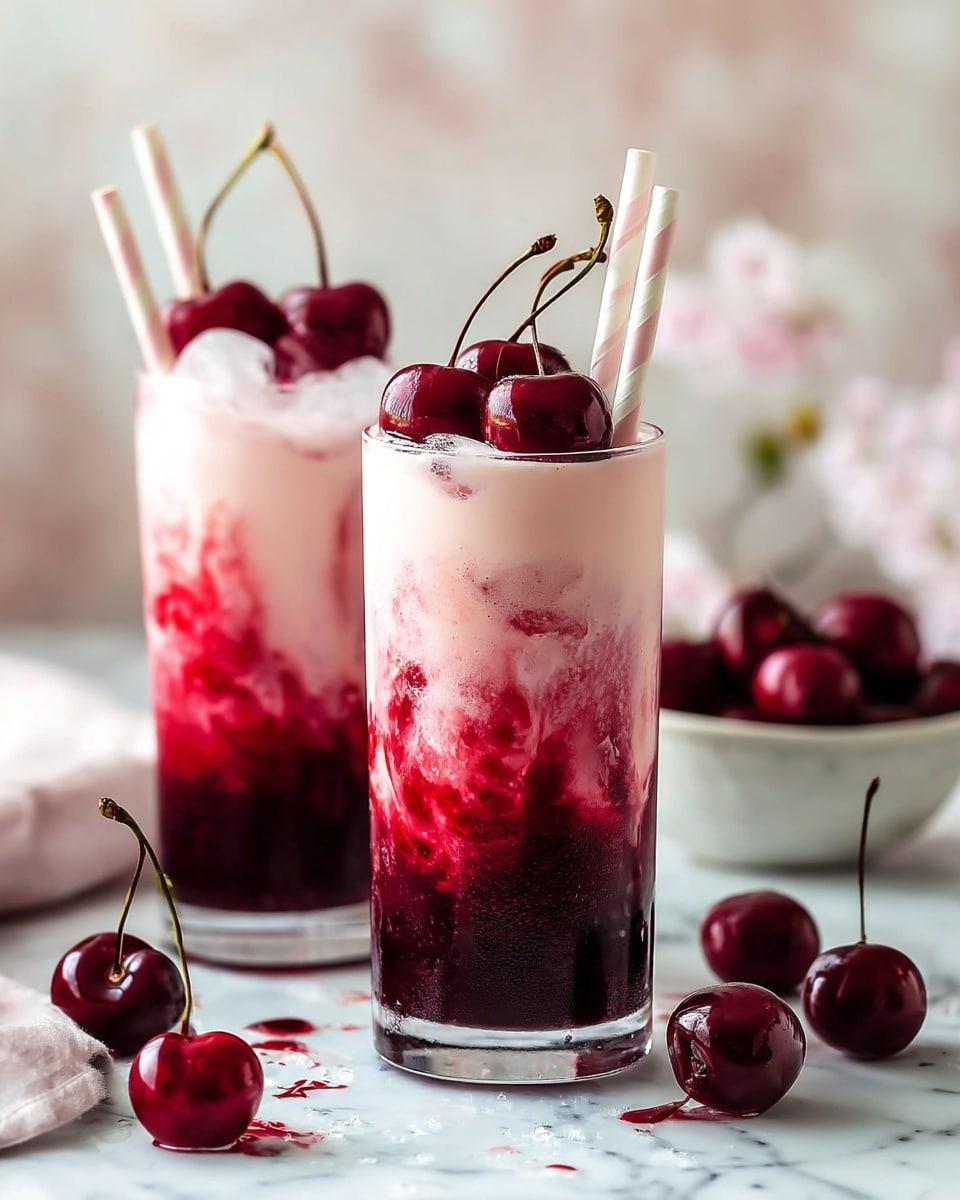
Cherry Earl Grey Milk Tea Recipe
I’m so excited to share this Cherry Earl Grey Milk Tea Recipe with you because it’s one of those delightful sips that feels both fancy and comforting at the same time. The combination of fragrant Earl Grey with juicy cherries and creamy milk creates a really unique flavor that’s perfect for afternoon tea or a cozy break. If you love trying tea drinks but want something a little different, this recipe will surprise you in the best way!
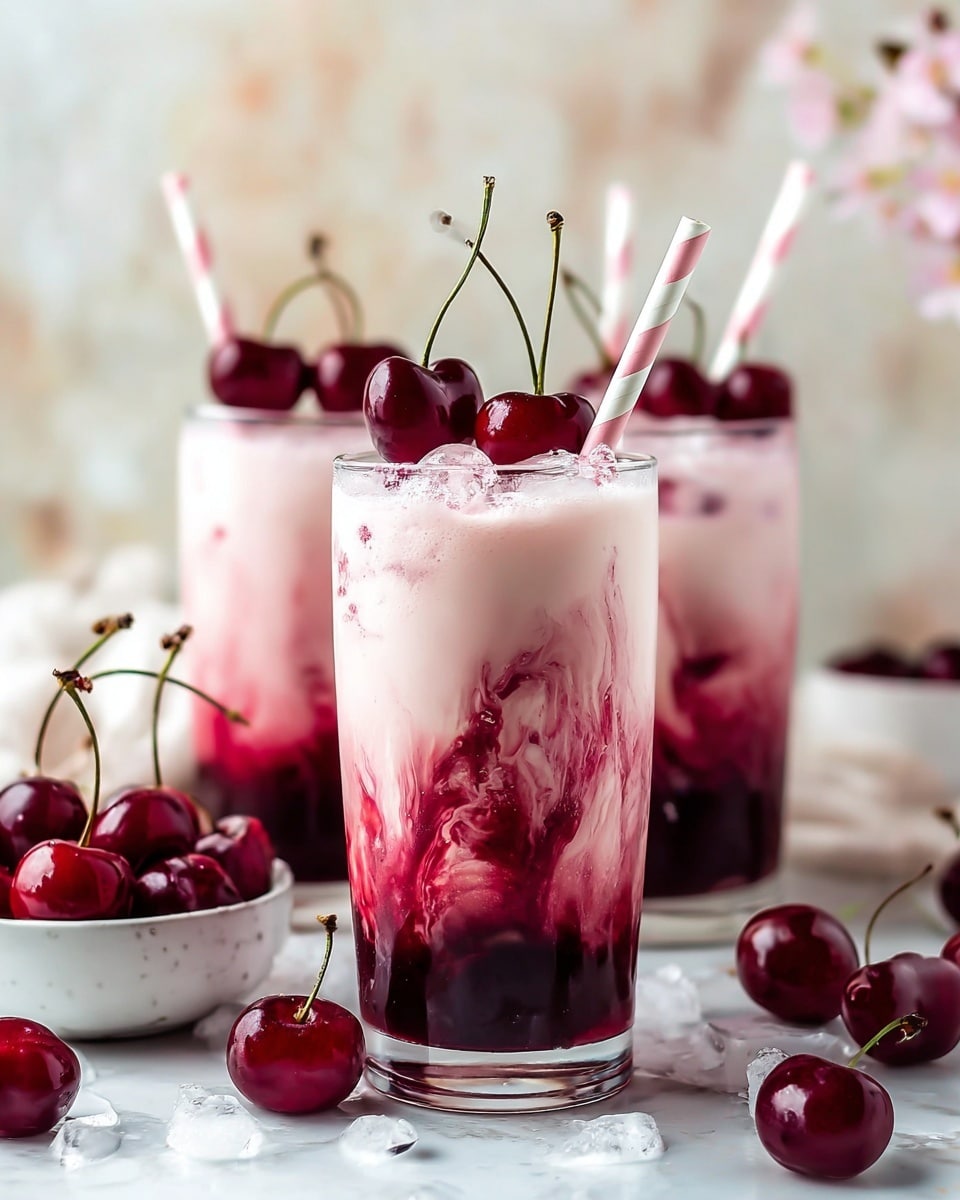
Whether you’re craving something refreshing iced on a warm day or a soothing warm cup to relax with, this Cherry Earl Grey Milk Tea Recipe adapts beautifully. I find it especially perfect for weekends when I want a little treat without going out—and trust me, once you try making it at home, you’ll want it again and again.
Why This Recipe Works
- Balanced Flavors: The citrusy notes of Earl Grey tea pair perfectly with the natural sweetness and tartness of fresh cherries.
- Simple Yet Sophisticated: Minimal ingredients make it easy to prepare but the taste feels like a café specialty.
- Versatile Serving Options: You can enjoy it hot or iced depending on the season or your mood.
- Customizable Sweetness: Vanilla syrup lets you adjust the sweetness to exactly what you like, making it a perfect personal treat.

Ingredients & Why They Work
Each ingredient in this Cherry Earl Grey Milk Tea Recipe plays a key role in developing a rich, layered flavor profile that’s both comforting and refreshing. When you pick good quality ingredients, it really shows, so I’ll share tips on what to look for when shopping.

- Earl Grey tea: I love using loose leaf for a more intense bergamot flavor, but tea bags are convenient and work just fine.
- Fresh cherries: Ripe, juicy cherries bring in natural sweetness and a lovely hint of tartness that’s hard to replicate with cherry flavoring.
- Milk: Dairy or plant-based milks all work here – I usually go with oat milk for that creamy, slightly sweet touch.
- Vanilla syrup: This adds warmth and rounds out the cherry and tea without overpowering them. You can make your own vanilla syrup or buy a good quality one.
- Cinnamon stick (optional): Adds a hidden layer of spice that makes the drink feel cozy and a little extra special.
- Water: Simple, but crucial for brewing the perfect cup of tea and simmering the cherries gently.
- Ice (optional): For when you want a refreshing iced version that still keeps all the lovely flavors intact.
Tweak to Your Taste
I always like to experiment a bit with my Cherry Earl Grey Milk Tea Recipe depending on the season or what I’m craving. Feel free to make it sweeter or more aromatic – you really can’t go wrong. It’s also fun to swap in different syrups or milks if you want to change things up!
- Variation: I sometimes add a splash of almond extract for a nutty twist that pairs perfectly with the vanilla and cherry flavors.
- Dairy-Free: Using oat or almond milk makes this recipe friendly for dairy-free diets without sacrificing creaminess.
- Extra Spice: If you love warming spices, try steeping a small piece of fresh ginger with the cherry mixture for a zingy upgrade.
- Iced Version: On hotter days, serve over plenty of ice and add a slice of lemon for an extra refreshing zing.
Step-by-Step: How I Make Cherry Earl Grey Milk Tea Recipe
Step 1: Simmer the Cherries to Unlock Flavor
Start by placing fresh, pitted cherries in a small saucepan with about 2 tablespoons of water. Simmer this on low heat for about 3 to 5 minutes until the cherries soften and release their juices. I like to gently mash them while simmering to coax out even more juicy flavor—just be careful not to turn it into a puree. This simmering step really brings that bright cherry flavor forward, setting the foundation for the drink.
Step 2: Brew the Perfect Earl Grey
While your cherries are gently simmering, boil 1 cup of water and steep your Earl Grey tea bag or loose leaves for 3 to 5 minutes depending on how strong you like your tea. A longer steep will give you a bolder bergamot flavor, but if you prefer something lighter, aim for closer to 3 minutes. Once brewed, remove the tea bag or strain. Trust me, freshly brewed tea makes all the difference in this recipe.
Step 3: Warm the Milk & Combine Flavors
Next, pour your choice of milk into the saucepan with the softened cherries and turn the heat to low. Stir occasionally to warm the milk gently—don’t let it boil or it might curdle. If you want that cozy cinnamon hint, toss in a cinnamon stick now and let it steep as the milk warms. Then stir in 1 to 2 teaspoons of vanilla syrup, taste-testing to get it just right for your sweetness preference.
Step 4: Combine & Serve Your Tea
Pour the brewed Earl Grey tea into your favorite mug, then strain the warm milk and cherry mixture on top, pressing gently on the cherries to release every last bit of juice. Stir it all together so the flavors meld perfectly. If you prefer iced tea, let the mixture cool slightly before pouring over ice. Otherwise, enjoy it warm right away.
Pro Tips for Making Cherry Earl Grey Milk Tea Recipe
- Use Fresh, Ripe Cherries: The fresher your cherries, the more vibrant your tea will taste—avoid cherries that are too firm or underripe.
- Don’t Overheat Milk: Heat the milk slowly on low to prevent a grainy texture or skin forming on top.
- Adjust Vanilla Syrup Gradually: Add syrup little by little to avoid oversweetening your tea.
- Press, Don’t Crush the Cherries: When straining, press cherries gently to release juice without breaking them into mash.
How to Serve Cherry Earl Grey Milk Tea Recipe
Garnishes
I often top my tea with a single fresh cherry on the rim of the glass – it looks inviting and adds a pop of color. A light dusting of cinnamon powder is a nice touch if you used the cinnamon stick while warming the milk. Sometimes, I add a small sprig of mint for a fresh contrast that looks beautiful too.
Side Dishes
This tea pairs wonderfully with lightly sweet pastries like buttery scones, lemon cookies, or a simple slice of pound cake. I find that the cherry and bergamot notes brighten up richer treats perfectly, balancing sweetness with that hint of citrus aroma.
Creative Ways to Present
For special gatherings, I’ve served this Cherry Earl Grey Milk Tea Recipe in clear glass teapots or cups so the lovely colors show through. Adding edible flower petals like violet or pansy on top creates a pretty, Instagram-worthy presentation that guests love. You can also serve it with a small dish of fresh cherries and cinnamon sticks alongside for a charming tea-time display.
Make Ahead and Storage
Storing Leftovers
If you happen to have leftovers, store your cherry milk mixture and brewed tea separately in airtight containers in the fridge. The cherry milk can keep well for 2-3 days, but I don’t recommend combining everything in advance because some separation happens.
Freezing
I haven’t personally frozen this milk tea because the milk and the brewed tea separate and the texture changes when thawed. It’s best enjoyed fresh or refrigerated for a day or two for the best taste and texture.
Reheating
When reheating the cherry milk mixture, do it gently over low heat, stirring frequently to avoid scorching or curdling. Then mix it with freshly brewed Earl Grey tea for the best warmth and flavor—this helps maintain that nice tea aroma and freshness.
FAQs
-
Can I use frozen cherries for the Cherry Earl Grey Milk Tea Recipe?
Yes, frozen cherries can work well, especially when fresh ones aren’t in season. Just thaw them first and gently simmer to release their flavor like you would with fresh cherries.
-
Is this recipe suitable for a dairy-free diet?
Absolutely! You can easily make this Cherry Earl Grey Milk Tea Recipe with any plant-based milk like oat, almond, or soy milk for a creamy, dairy-free version.
-
Can I sweeten the tea with something other than vanilla syrup?
Yes, you can substitute vanilla syrup with honey, maple syrup, or simple syrup depending on your preference. Just keep in mind that each option will slightly alter the flavor.
-
How long can I keep the prepared milk tea in the fridge?
Once combined and refrigerated, it’s best to consume within 24 hours for optimal flavor and freshness. Storing components separately helps extend the milk mixture up to 3 days.
Final Thoughts
This Cherry Earl Grey Milk Tea Recipe quickly became a favorite way for me to enjoy tea at home with a bit of flair and comfort. It’s a lovely balance of fruitiness, creamy smoothness, and aromatic tea that feels like a warm hug in a cup. I hope you give it a try and find your own little moment of joy with this special drink—trust me, once you make it, you’ll be looking forward to your next cup.
Print
Cherry Earl Grey Milk Tea Recipe
- Prep Time: 10 minutes
- Cook Time: 10 minutes
- Total Time: 20 minutes
- Yield: 1 serving
- Category: Beverage
- Method: Stovetop
- Cuisine: Fusion
- Diet: Vegetarian
Description
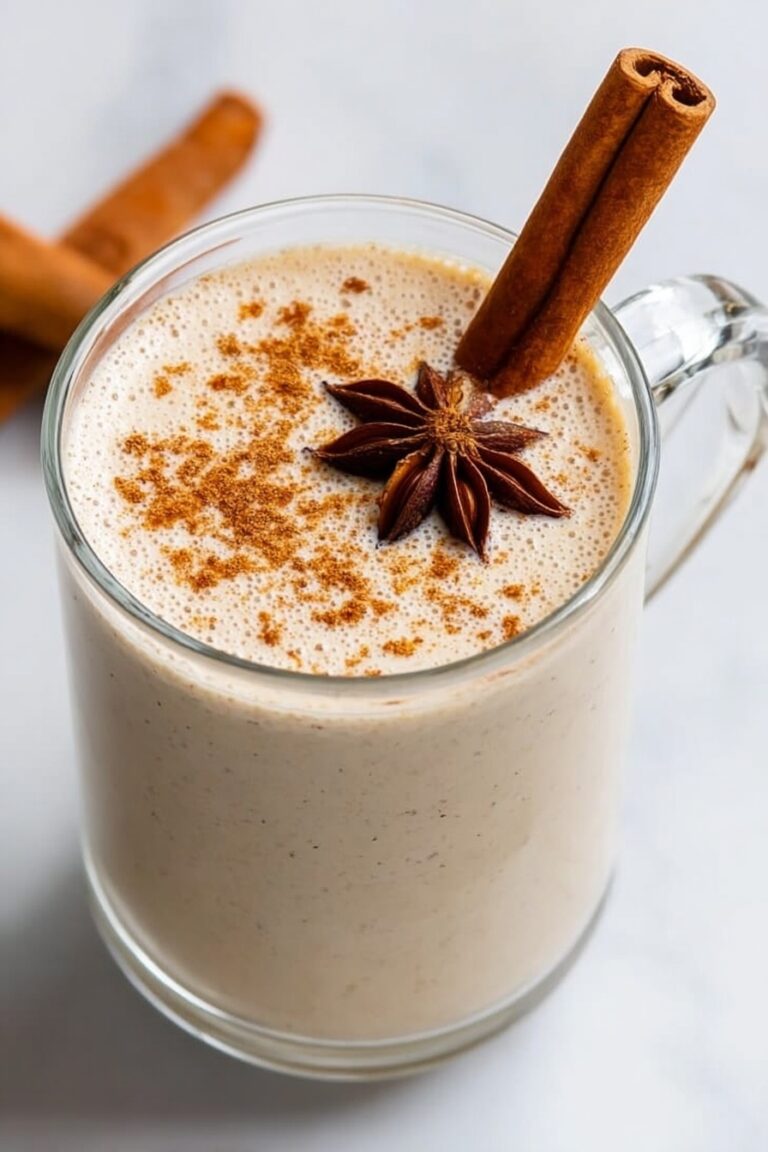
This Cherry Earl Grey Milk Tea is a delightful twist on classic Earl Grey tea, combining the floral notes of bergamot with the sweet, tart flavor of fresh cherries and creamy milk. Enhanced with vanilla syrup and a hint of cinnamon, it can be enjoyed hot or iced, making it a versatile and refreshing beverage.
Ingredients
Tea Base
- 1 Earl Grey tea bag (or 1 tsp loose leaf Earl Grey tea)
- 1 cup water
Cherry Milk Mixture
- 4-5 fresh cherries (pitted and halved)
- 2 tablespoons water
- 1/2 cup milk (any type: dairy, almond, oat, etc.)
- 1-2 tsp vanilla syrup (adjust to taste)
- 1 cinnamon stick (optional)
Optional
- Ice (optional for iced version)
Instructions
- Simmer Cherries: In a small saucepan, combine the fresh cherries and 2 tablespoons of water. Simmer over low heat for 5 minutes until the cherries soften and release their juices. Gently mash the cherries to extract more flavor.
- Brew Earl Grey Tea: While cherries simmer, bring 1 cup of water to a boil. Steep the Earl Grey tea bag or loose leaf tea in the hot water for 5 minutes, then remove the tea bag or strain the leaves.
- Warm Milk Mixture: Pour the milk into the saucepan with the softened cherries and heat gently, stirring occasionally until warmed through. Add the cinnamon stick if using to infuse a subtle spice.
- Add Sweetener: Stir in 1 to 2 teaspoons of vanilla syrup into the cherry and milk mixture, adjusting sweetness to your preference.
- Combine Tea and Milk: Pour the brewed Earl Grey tea into a mug. Strain the warm milk and cherry mixture into the mug, pressing on cherries to release all juices. Stir well to combine.
- Serve: For iced tea, let the mixture cool slightly and pour over a glass filled with ice. For hot tea, serve immediately. Garnish with a fresh cherry or sprinkle of cinnamon if desired.
Notes
- Use any type of milk you prefer or have on hand, such as dairy, almond, oat, or soy.
- Adjust vanilla syrup to taste or substitute with honey or maple syrup for a different sweetness profile.
- For a stronger cherry flavor, increase the number of cherries or simmer longer to concentrate the juice.
- The cinnamon stick is optional but adds a lovely warmth to the drink; you can substitute with a pinch of ground cinnamon if preferred.
- The tea can be served hot or iced depending on your preference and the season.
Nutrition
- Serving Size: 1 cup
- Calories: 120 kcal
- Sugar: 12 g
- Sodium: 50 mg
- Fat: 3 g
- Saturated Fat: 1.5 g
- Unsaturated Fat: 1 g
- Trans Fat: 0 g
- Carbohydrates: 18 g
- Fiber: 1 g
- Protein: 3 g
- Cholesterol: 10 mg


