
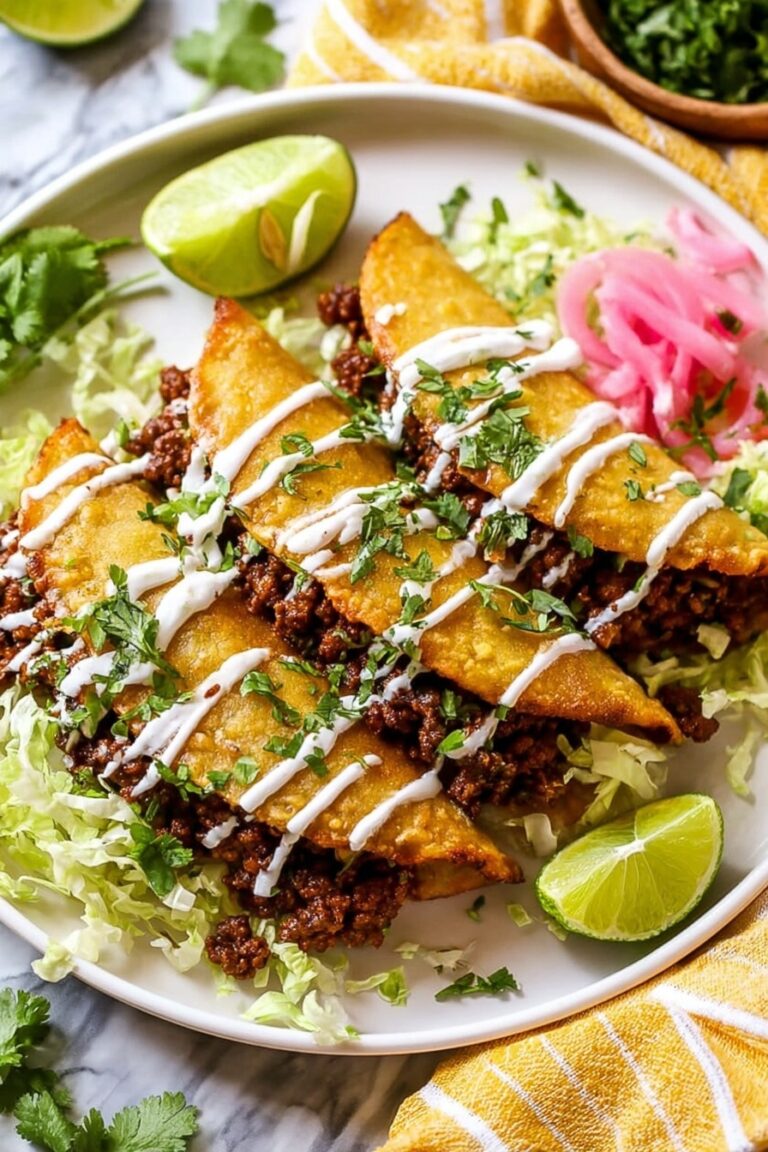
Chicken Taquito Recipe
If you’re craving a crunchy, cheesy, and totally addictive snack or meal, this Chicken Taquito Recipe is going to become your new go-to. Seriously, these little rolled-up delights pack a punch of flavor with every crispy bite, and I can’t wait to share all my best tips to help you nail them perfectly at home.
Why This Recipe Works
- Balanced Flavors: Cream cheese and salsa create a creamy, tangy base that perfectly complements the shredded chicken and spices.
- Easy Prep: Using rotisserie chicken cuts down on prep time, making weeknight meals a breeze.
- Customizable Crispiness: Whether you bake or fry, you control the crunch level to fit your mood or diet.
- Kid-Friendly & Crowd-Pleasing: Perfect for parties, lunchboxes, or casual dinners that everyone will love.

Ingredients & Why They Work
Let’s talk about the magic behind each ingredient. Together, these create a creamy, cheesy filling that’s bursting with flavor while the tortillas crisp up beautifully—trust me, the combination is irresistible. Plus, I’ll drop a few tips on picking the best ingredients to make this recipe shine.

- Cooked shredded chicken: Rotisserie chicken is a lifesaver here—it’s juicy, flavorful, and saves loads of time.
- Cream cheese: Softened cream cheese adds creaminess that holds everything together without being runny.
- Salsa: Pick your favorite—mild, spicy, chunky—whatever suits your taste and adds a zesty kick.
- Sour cream: Adds tang and richness for a well-rounded filling.
- Shredded cheddar cheese: Melts into the filling, offering cheesy goodness in every bite.
- Baby spinach leaves: A sneaky way to add fresh greens without overpowering the flavors.
- Cumin, garlic powder, chili powder: These seasonings add depth and warmth, giving your taquitos that classic Tex-Mex vibe.
- Salt and freshly ground black pepper: Essential for rounding out all those flavors.
- Corn or flour tortillas: Softened before filling and rolling, they crisp up perfectly when cooked.
Tweak to Your Taste
One of my favorite things about this Chicken Taquito Recipe is how flexible it is. I often switch up the spices or play with different cheeses depending on what I have on hand or who I’m cooking for—don’t hesitate to make it your own.
- Add some heat: If you love spicy food, adding a pinch of cayenne or some diced jalapeños to the filling turns up the heat beautifully. I remember making these extra spicy for a game night, and they disappeared in minutes!
- Vegetarian option: Swap chicken for black beans or sautéed mushrooms and you’ve got a veggie-friendly alternative that’s still super satisfying.
- Cheese variations: Monterey Jack or pepper jack cheese works great if you want a different flavor profile or a little extra kick.
- Make it gluten-free: Use corn tortillas and double-check your salsa and seasonings to keep it safe for gluten-sensitive eaters.
Step-by-Step: How I Make Chicken Taquito Recipe
Step 1: Whip up the creamy, flavorful filling
I start by mixing softened cream cheese, salsa, and sour cream in a bowl until smooth — this acts as the base that coats every shred of chicken so well. Then I stir in the shredded chicken, shredded cheddar, chopped spinach, and spices. Give it a taste before rolling; sometimes I add a pinch more chili powder or a dash of salt to balance it out perfectly.
Step 2: Warm your tortillas to roll easily
If you’re using corn tortillas (my favorite for that authentic feel), heat them gently on a dry griddle for 15–30 seconds on each side until warm and pliable. This keeps them from cracking when rolled, and covering them with foil keeps them warm while you assemble.
Step 3: Fill and roll tight
Place a generous spoonful of the filling lengthwise on each tortilla. Roll them up as tightly as you can—this helps them stay together when cooking. If you’re worried, a toothpick works as a handy “roll security” to keep everything intact.
Step 4: Choose your cooking method – bake or fry
For a healthier spin, I usually bake mine at 425°F. I give the rolled taquitos a quick spritz of cooking spray or brush with a little oil on top for that golden crunch magic. Bake for about 15-20 minutes until they’re crisp and lightly browned.
Want that extra crispy, classic taste? Fry in about 1 ½ inches of hot oil. They only take a few seconds per side—rotate them gently until they turn a gorgeous golden brown. Drain on paper towels, and you’re ready to dig in!
Pro Tips for Making Chicken Taquito Recipe
- Soft Tortillas Before Rolling: Never skip warming the tortillas—they break so easily if cold and stiff, and softer ones roll up without cracking or tearing.
- Don’t Overfill: Filling should be generous but manageable; too much will make rolling tricky and could cause taquitos to burst open while cooking.
- Use a Toothpick When Needed: If you notice your rolls loosening while cooking, a toothpick helps hold them tight—just remember to remove them before eating.
- Watch Your Cooking Time: Overbaking or frying can make taquitos too hard or dry; keep an eye for a golden crisp without burning.
How to Serve Chicken Taquito Recipe

Garnishes
I love topping mine with creamy guacamole for a richness that balances the crunch. A dollop of sour cream adds cool tang, and a little fresh salsa brings bright freshness. Sometimes I sprinkle chopped cilantro or a squeeze of lime juice on top for that extra pop. These simple garnishes really take the taquitos next level.
Side Dishes
My favorite sides include a fresh Mexican street corn salad or a simple black bean and corn salad. A crisp green salad with a citrus vinaigrette also pairs beautifully to lighten up the plate. For a hassle-free combo, chips and salsa always work well!
Creative Ways to Present
Throw a fun taco night by serving these Chicken Taquitos in a big basket lined with colorful napkins, alongside mini bowls of various dips. For parties, I like to stand the taquitos upright in a glass or jar—it looks so cute and makes grabbing easier. You can even slice some taquitos for appetizer platters; bite-sized pieces are perfect finger food!
Make Ahead and Storage
Storing Leftovers
My method is to store leftover filling separately in an airtight container in the fridge for up to one day, then roll fresh tortillas right before cooking. This keeps the tortillas from getting soggy when stored.
Freezing
Chicken taquitos freeze beautifully. I roll the filled tortillas but don’t cook yet, then place them in a ziplock bag in a single layer in the freezer for up to three months. When I’m ready to eat, I bake them straight from frozen (covered with foil at first) to keep that crispy exterior and melty inside.
Reheating
To keep them crisp, I always reheat taquitos in an oven or air fryer rather than the microwave. 350°F for 10-15 minutes does the trick—crispy on the outside and piping hot inside, just like fresh.
FAQs
-
Can I use flour tortillas instead of corn for this Chicken Taquito Recipe?
Absolutely! Flour tortillas work great and are often easier to roll without cracking. Just be sure to warm them so they’re pliable. Corn tortillas offer a more authentic flavor and texture, but flour is a fine alternative if you prefer or have dietary reasons.
-
Is it better to bake or fry Chicken Taquitos?
Both methods have their perks! Baking is healthier and less messy, giving you a nice crisp without all the oil. Frying, however, results in a super crunchy exterior that tastes more traditional. I tend to bake them for weeknights and fry when I’m in the mood for something extra indulgent.
-
Can I prepare and freeze these taquitos ahead of time?
Yes! Freeze them unbaked after rolling and cooking later from frozen. This makes for an easy freezer meal you can enjoy anytime, perfect for busy days or unexpected guests.
-
What’s the best way to prevent tortillas from cracking when rolling?
Warming the tortillas briefly on a griddle makes them soft and flexible, which drastically cuts down on cracking. Also, avoid overstuffing them to keep the roll tight and intact.
Final Thoughts
This Chicken Taquito Recipe has been my secret weapon for quick, tasty dinners and party snacks for years. The blend of creamy, cheesy filling wrapped in toasted tortillas is just pure comfort with a fun crunch. If you’re looking to impress without a complicated recipe, give these a try—you’ll find yourself making them again and again, just like I do. Trust me, your friends and family will thank you!
Print
Chicken Taquito Recipe
- Prep Time: 10 minutes
- Cook Time: 22 minutes
- Total Time: 32 minutes
- Yield: 4 servings
- Category: Main Course
- Method: Baking
- Cuisine: Mexican
- Diet: Low Lactose
Description
Delicious and crispy Chicken Taquitos made with a creamy, flavorful filling of shredded chicken, cream cheese, salsa, and spices, rolled in soft tortillas and baked or fried to perfection. Serve with guacamole, sour cream, and salsa for a perfect appetizer or main course that’s easy to prepare.
Ingredients
Filling
- 2 cups cooked shredded chicken (rotisserie recommended)
- 6 ounces cream cheese, softened
- 1/4 cup salsa, your favorite kind
- 1/4 cup sour cream
- 1 cup shredded cheddar cheese
- 1 cup baby spinach leaves, chopped
- 1/4 teaspoon cumin
- 1/4 teaspoon garlic powder
- 1/4 teaspoon chili powder
- Salt and freshly ground black pepper, to taste
Tortillas
- 15-20 corn or flour tortillas
For Serving
- Guacamole
- Sour cream
- Salsa
- Hot sauce
Instructions
- Prepare the filling: In a mixing bowl, add softened cream cheese, salsa, and sour cream. Stir until smooth and well combined. Add shredded chicken, cheddar cheese, chopped spinach, cumin, garlic powder, chili powder, salt, and black pepper. Toss everything to mix thoroughly. Taste and adjust seasonings as needed.
- Soften the tortillas: For corn tortillas, heat a non-stick griddle or skillet over medium-high heat. Cook each tortilla for 15 to 30 seconds on each side until they become soft and pliable. Remove and cover with foil to keep warm and flexible.
- Assemble the taquitos: Place about a large spoonful of the filling in a line along one side of each tortilla. Roll tightly to enclose the filling, securing with a toothpick if necessary.
- Bake the taquitos: Preheat your oven to 425 degrees Fahrenheit. Arrange the rolled taquitos seam-side down on a baking sheet. Lightly spray the tops with cooking spray or brush with oil to help them crisp up. Bake for 15 to 20 minutes until golden and crispy.
- Alternatively, fry the taquitos: Pour about 1.5 inches of oil into a large skillet and heat over medium-high. When the oil is hot enough that tortillas sizzle on contact, fry the taquitos in small batches. Cook for a few seconds on each side, rotating them until all sides are golden and crispy. Drain on paper towels.
- Serve: Remove toothpicks and serve taquitos hot with guacamole, sour cream, salsa, and hot sauce as desired.
Notes
- Make ahead: Prepare the filling up to one day in advance and store it in the refrigerator. Roll tortillas just before baking or frying.
- Freezing: Assemble taquitos with filling and tortillas, place in a ziplock freezer bag, and freeze for up to 3 months. To cook frozen taquitos, place them on a lined or greased baking sheet covered with foil and bake at 350 degrees Fahrenheit for 20 minutes. Remove foil and bake for an additional 15 to 20 minutes until heated through and crispy.
- For extra crispiness, brush baked taquitos lightly with oil before baking.
- Use flour tortillas for a softer texture or corn tortillas for a traditional flavor.
- Adjust spice levels by adding more chili powder or hot sauce to the filling.
Nutrition
- Serving Size: 1 serving
- Calories: 350 kcal
- Sugar: 3 g
- Sodium: 550 mg
- Fat: 20 g
- Saturated Fat: 9 g
- Unsaturated Fat: 9 g
- Trans Fat: 0 g
- Carbohydrates: 25 g
- Fiber: 3 g
- Protein: 22 g
- Cholesterol: 65 mg

