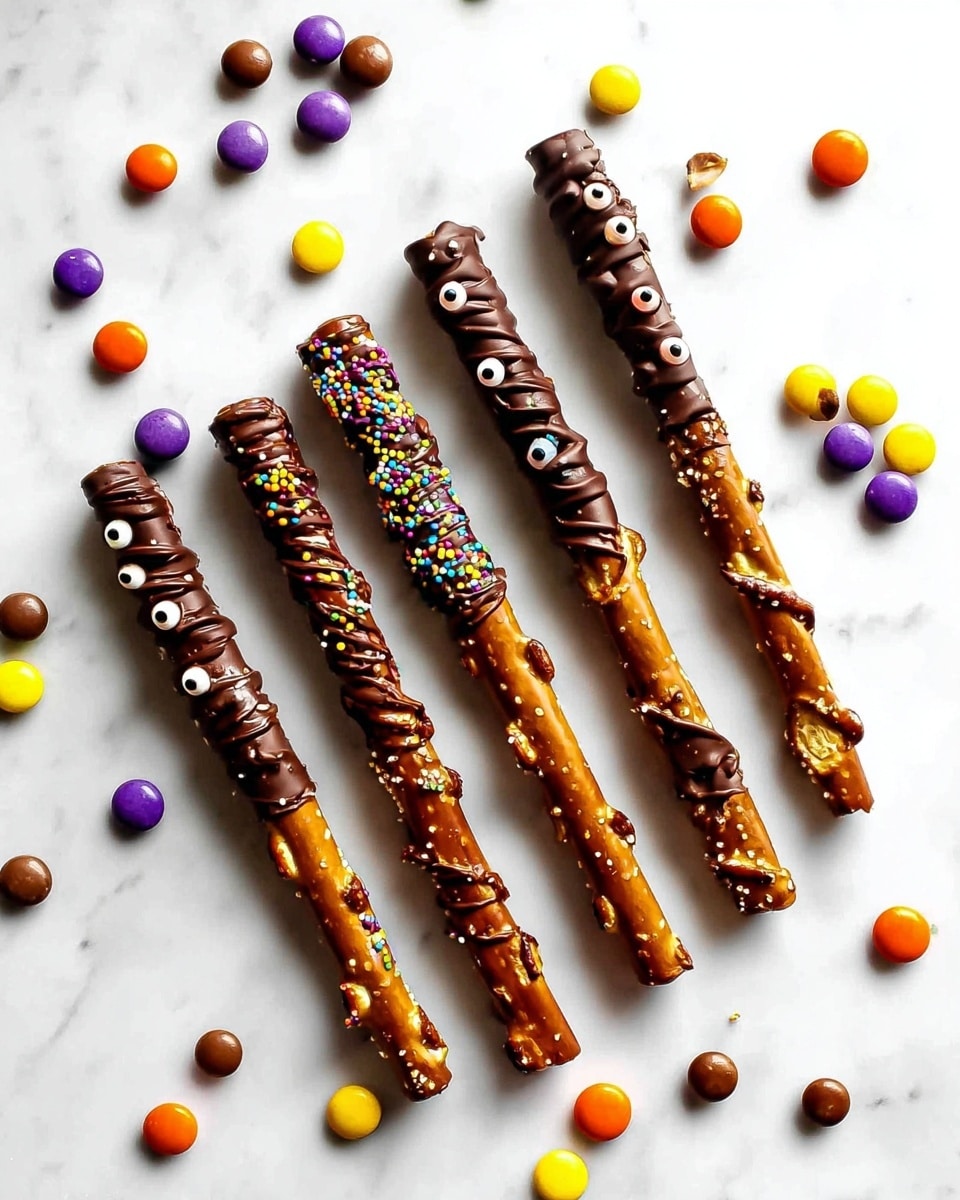
Chocolate Covered Pretzel Rods with Candy and Edible Eyes Recipe
If you’re looking for a fun, festive treat that’s as delightful to look at as it is to eat, you’re going to love this Chocolate Covered Pretzel Rods with Candy and Edible Eyes Recipe. It’s a crowd-pleaser that’s perfect for parties, holidays, or just a sweet weekend project. I’ve made these more times than I can count, and every time they bring such a smile – especially when those adorable edible eyes start staring back at you. Stick around, because I’ve packed this recipe with tips and tricks to make sure your chocolate covered pretzel rods come out perfectly every time.
Why This Recipe Works
- Simple, Quality Ingredients: Few ingredients are needed, so each one really shines – like the smooth semi-sweet chocolate and salty pretzel rods.
- Crunch and Sweetness Balance: Crushed candy adds a variety of textures and bursts of flavor, perfectly complementing the chocolate and salty pretzel.
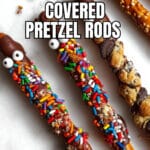
- Fun Decorative Touch: The edible eyes bring these treats to life, making them especially wonderful for Halloween or kids’ parties.
- Easy Clean-up: Using parchment or foil saves you time afterward, and dipping the rods by hand keeps things mess-free.

Ingredients & Why They Work
This recipe’s ingredients come together in a way that’s just plain fun, and every bite has a mix of flavors that keep you coming back. When you shop, look for good quality chocolate and crisp pretzels – they make a huge difference. And the candy? Pick your favorites that are easy to crush and won’t get too sticky.

- Semi-sweet chocolate bar: It melts smoothly and provides the perfect bittersweet base that balances the salty pretzels and candies.
- Pretzel rods: These are sturdy and offer the crunch, plus a salty contrast to the chocolate’s sweetness.
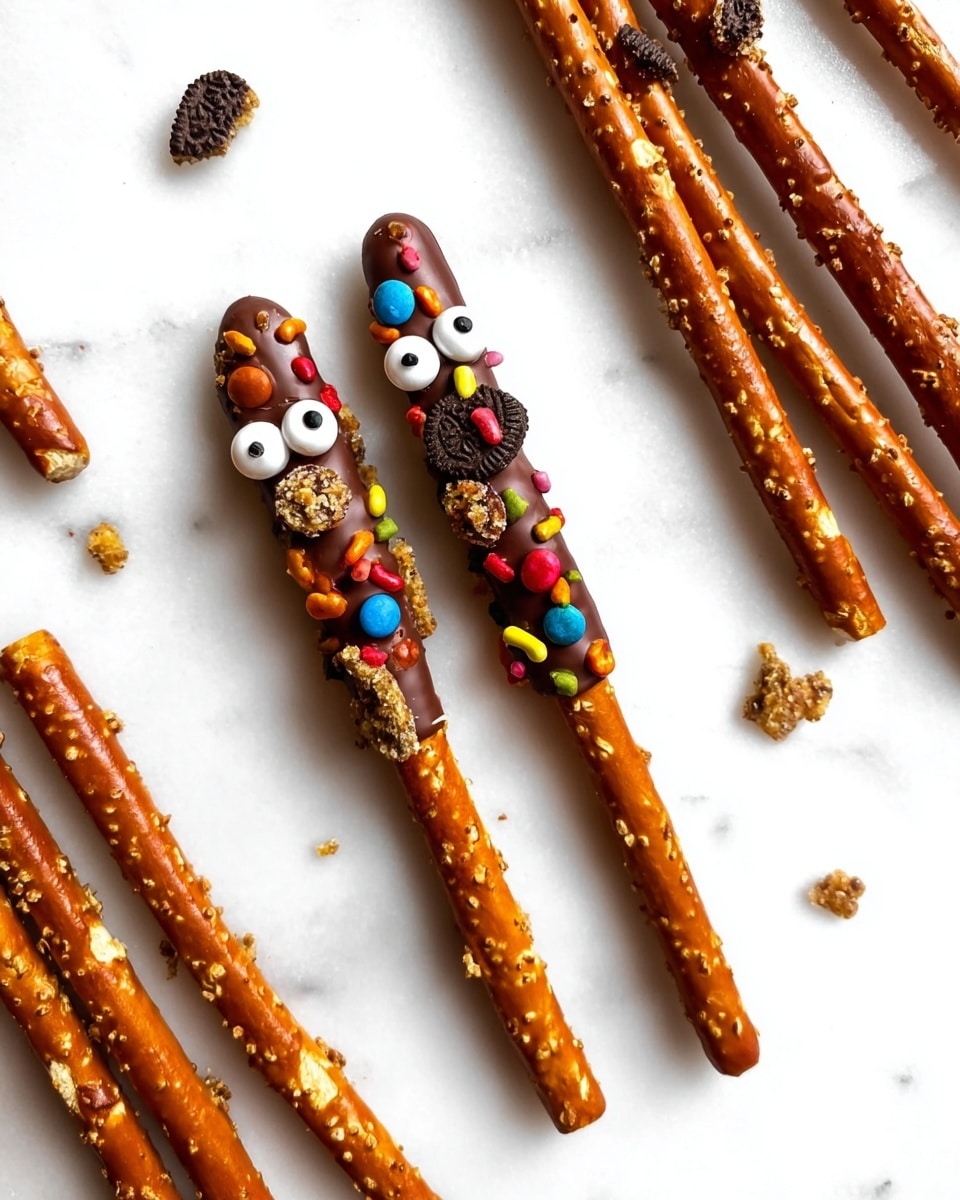
- Crushed candy (like M&M’s, Butterfinger): Adding variety in color, texture, and flavor, crushed candy makes each rod unique and fun.
- Candy eyes (optional): These bring a whimsical, playful element to your treats that kids (and adults) adore.
Tweak to Your Taste
I love how versatile this Chocolate Covered Pretzel Rods with Candy and Edible Eyes Recipe is – it’s easy to switch out candies or add your little twists. Don’t hesitate to make it your own; that way, you’ll keep coming back to it for new occasions or just because.
- Variation: I once swapped crushed Reese’s Pieces for the M&M’s and loved the peanut butter flavor – it added a creamy, nutty vibe that was just magic.
- Dietary tweak: For a dairy-free option, try using vegan semi-sweet chocolate; just make sure the candy is free of milk too.
- Seasonal flair: Switch the candy colors to match holidays – red and green for Christmas, or pastels for Easter – and those edible eyes can become fun characters.
Step-by-Step: How I Make Chocolate Covered Pretzel Rods with Candy and Edible Eyes Recipe
Step 1: Crush Your Candy Ahead of Time
First up, grab your favorite candies (I like M&M’s and Butterfinger bars) and crush them coarsely with the back of a large spoon or a ladle. Doing this before you melt your chocolate is a game changer – when it’s time to decorate, everything’s ready and waiting, which keeps the chocolate from setting before you’re done. I’ve learned that crushing candy that’s too sticky (like caramel) isn’t the best idea here, so avoid that to save frustration.
Step 2: Prep Your Space with Parchment or Foil
Cover your baking pan and work surface with parchment paper or foil. Trust me on this – it makes clean-up a breeze and helps keep your pretzels from sticking later. Plus, you want a neat spot to place those chocolate-dipped rods to chill.
Step 3: Melt the Chocolate Slowly and Smoothly
Pop your semi-sweet chocolate into a microwave-safe dish and heat in short bursts – start with 30 seconds, stir, then add 15-second increments if needed. The goal is a smooth, thin consistency that’s perfect for dipping. Stirring is key here to avoid burning the chocolate and to get it silky. If you’ve ever scorched chocolate before, you know how important patience is!
Step 4: Dip Your Pretzels and Decorate
Dip each pretzel rod into the melted chocolate, turning it so every side gets coated. If some parts aren’t covered enough, the back of a spoon helps spread the chocolate evenly – I like to hold the pretzel by the end that’s not dipped to keep my fingers clean. Then, sprinkle your crushed candy pieces over the chocolate while it’s still wet, turning the pretzel so it’s fully covered in colorful crunch.
If you’re using edible eyes (and I totally recommend it for that fun, playful touch), press them gently onto the chocolate-covered pretzel at this stage. They stick beautifully before the chocolate sets.
Step 5: Chill Until Set
Place your decorated pretzels on the prepared pan and pop them into the fridge for about an hour. This step helped me avoid smudging or losing any candy pieces that might fall off as the chocolate firms up. Once set, they’re ready for snacking or gifting!
Pro Tips for Making Chocolate Covered Pretzel Rods with Candy and Edible Eyes Recipe
- Room Temperature Pretzels: Always use pretzels that are at room temperature to prevent chocolate from seizing or clumping on contact.
- Use a Spot for Dripping: Tap off excess chocolate over the bowl to avoid thick clumps, giving your rods a smooth, even coating.
- Work Quickly But Calmly: Chocolate sets fast, so plan your dipping and decorating efficiently, but take your time so it looks neat.
- Chill Without Crowding: Give each pretzel rod plenty of space on the baking pan to avoid sticking together as they chill.
How to Serve Chocolate Covered Pretzel Rods with Candy and Edible Eyes Recipe
Garnishes
I love adding a sprinkle of festive colored sugar or tiny edible glitter dust on top of the candy-covered chocolate just before chilling. It adds extra sparkle and makes these rods pop visually – especially when you’re making them for parties or kids’ treats.
Side Dishes
These pretzel rods pair really well with warm drinks like hot chocolate or spiced cider. I’ve also served them alongside fruit platters at gatherings; the salty-sweet combo complements juicy berries beautifully.
Creative Ways to Present
For Halloween, I arrange these rods sticking out of a tall jar filled with candy corns or popcorn to look like spooky fingers. At birthday parties, tie each rod with a little colored ribbon and package them individually, which makes for such a cute take-home gift. It’s always a hit!
Make Ahead and Storage
Storing Leftovers
I store leftover chocolate covered pretzel rods in an airtight container at room temperature if it’s cool, or in the fridge if it’s warm out. They keep their crunch well this way for up to a week, so you can enjoy them a little bit at a time.
Freezing
Freezing these is totally possible! Just make sure they’re wrapped well individually or separated by parchment paper in an airtight container. When you thaw them, do it slowly in the fridge to avoid condensation that could make the chocolate bloom or the pretzels soggy.
Reheating
Reheating isn’t necessary since these are best served cold or at room temperature. But if you want to soften the chocolate slightly, a few seconds in a warm (not hot) oven or on a low-power microwave setting can help – just watch closely.
FAQs
-
Can I use white chocolate instead of semi-sweet chocolate?
Absolutely! White chocolate melts nicely and pairs deliciously with the salty pretzels and candy. Just keep in mind white chocolate can be a bit more sensitive to heat, so melt it gently and stir often to keep it smooth.
-
What’s the best way to prevent the candy from falling off?
Sprinkle and gently press the crushed candy and edible eyes onto the pretzels while the chocolate is still wet, then refrigerate promptly so the chocolate sets quickly and locks everything in place.
-
Can I make these ahead of time for a party?
Yes! They’re perfect make-ahead treats. Make them a day or two in advance and store refrigerated in an airtight container to keep them fresh and crunchy.
-
Are there any candy types I should avoid?
Try to avoid sticky or gooey candies like those with caramel centers, as they don’t crush well and can make your chocolate coating messy or soggy.
Final Thoughts
This Chocolate Covered Pretzel Rods with Candy and Edible Eyes Recipe has become one of my go-to treats when I want something that’s easy, fun, and full of personality. Whether you’re making them for a party, a gift, or just because you deserve a sweet little pick-me-up, these are sure to delight kids and adults alike. Don’t be shy about playing with the decorations or candy combos — I promise you’ll find your own favorite version. Give it a try and watch those smiles grow!
Print
Chocolate Covered Pretzel Rods with Candy and Edible Eyes Recipe
- Prep Time: 40 minutes
- Cook Time: 10 minutes
- Total Time: 1 hour 50 minutes
- Yield: 16 servings
- Category: Snack
- Method: No-Cook
- Cuisine: American
Description
Delicious and fun Chocolate Covered Pretzel Rods dipped in semi-sweet chocolate and sprinkled with crushed candy pieces, perfect for a sweet and salty treat or party snack.
Ingredients
Chocolate Coating
- 4 ounce Bakers Semi-Sweet Chocolate Bar
Pretzels
- 16 pretzel rods
Toppings
- 1 cup crushed candy (such as M&M’s and Butterfinger bars)
- Candy eyes, optional
Instructions
- Crush Candy: Coarsely crush the candy pieces using the back of a large spoon or ladle. Place each type of crushed candy in separate bowls and set aside.
- Prepare Work Area: Cover a baking pan and your work surface with parchment paper or foil for easy cleanup, then set aside.
- Melt Chocolate: Place the chocolate bar in a microwave-safe dish and microwave for 30 seconds. Stir and if not fully melted, microwave in 15-second increments, stirring after each, until the chocolate reaches a smooth, thin consistency.
- Dip Pretzels: Pour the melted chocolate into a Pyrex measuring cup or coffee mug. Dip each pretzel rod into the chocolate, turning it to coat all sides evenly. Use the back of a spoon to spread the chocolate down the pretzel if needed. Tap off excess chocolate.
- Add Toppings: Hold the chocolate-coated pretzel by the uncoated end and sprinkle crushed candy pieces over the chocolate, turning the pretzel to cover all sides. Gently press candy eyes onto the chocolate if using.
- Set Pretzels: Place the coated pretzels on the prepared baking pan and refrigerate for 1 hour or until the chocolate sets completely.
- Store: Once set, store the chocolate covered pretzel rods in an airtight container to maintain freshness.
Notes
- Suggested candies include M&M’s, Reese’s Pieces, Heath Bars, and Butterfinger bars. Avoid caramel candies as they are too sticky to crush properly.
- Crush the candy before melting the chocolate to ensure a smooth workflow.
- Use the back of a large spoon or ladle for crushing the candy evenly.
- Cover your baking pan and work area with parchment paper or foil to make cleanup easier.
- Nutrition information is approximate and should be used only as a guideline.
Nutrition
- Serving Size: 1 pretzel rod
- Calories: 150 kcal
- Sugar: 12 g
- Sodium: 300 mg
- Fat: 8 g
- Saturated Fat: 4 g
- Unsaturated Fat: 3 g
- Trans Fat: 0 g
- Carbohydrates: 18 g
- Fiber: 1 g
- Protein: 2 g
- Cholesterol: 0 mg