Chocolate Hazelnut Yule Log Recipe
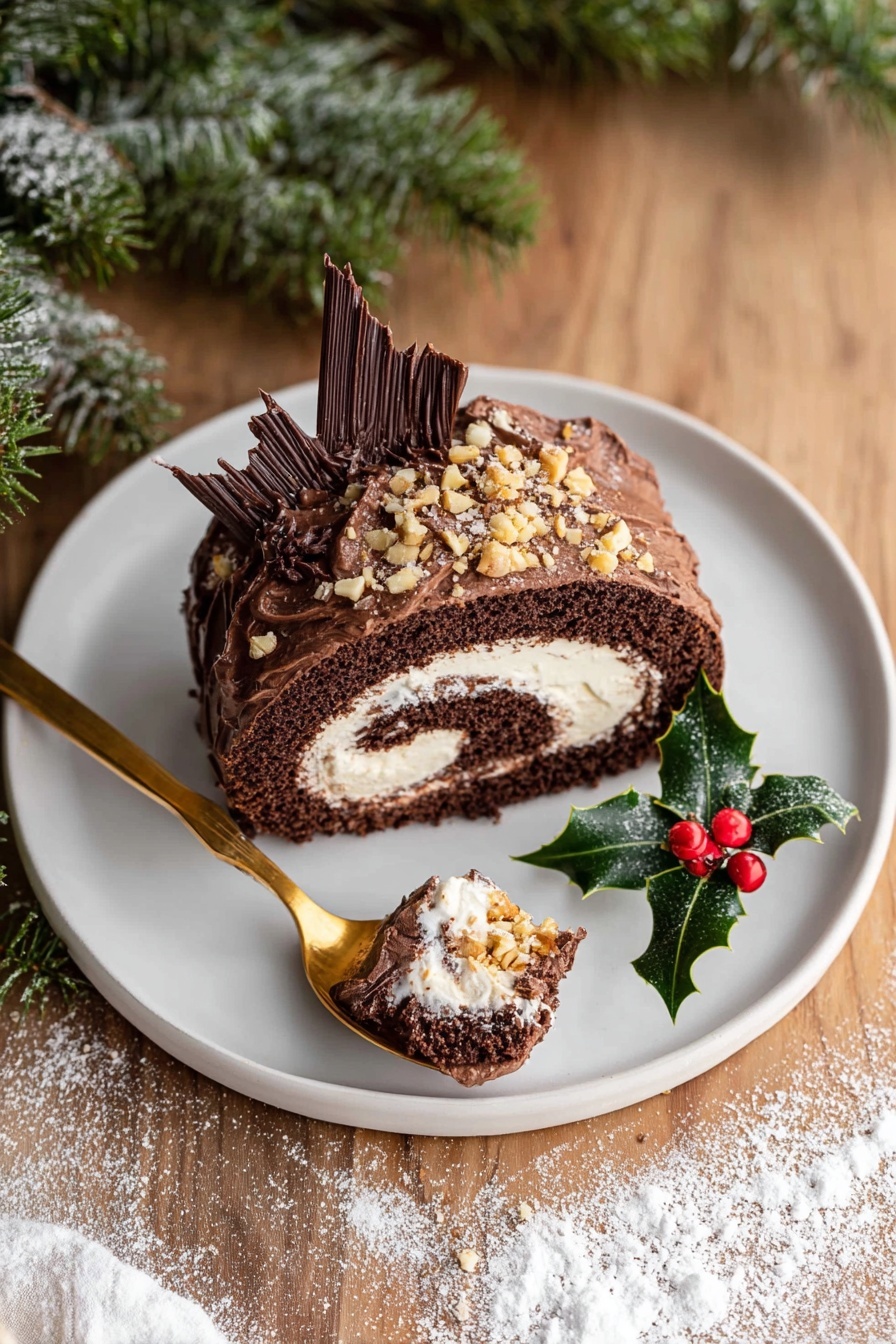
If you’re dreaming of a festive centerpiece that tastes as incredible as it looks, I’ve got just the thing for you. This Chocolate Hazelnut Yule Log Recipe is my absolute favorite holiday treat—airy chocolate sponge cake rolled with a luscious chocolate hazelnut cream, finished with crunchy chocolate shards and toasted hazelnuts. Trust me, once you try this, you’ll want to make it every winter. So grab your apron, and let me guide you through the steps to make it flawless and fabulous for your holiday table.
Why This Recipe Works
- Light & Airy Sponge: Folding egg whites carefully keeps the sponge fluffy and crack-free—no one likes a broken log!
- Rich Hazelnut Cream: The combo of chocolate hazelnut spread and whipped cream gives you smooth, dreamy filling that’s not too heavy.
- Crunchy Chocolate Bark: Adding shards made from tempered chocolate adds texture and makes your log look professionally finished.
- Simple Yet Stunning: With just a handful of quality ingredients and straightforward steps, you get an impressive dessert that’ll wow your guests.

Ingredients & Why They Work
This Chocolate Hazelnut Yule Log Recipe carefully balances lightness and indulgence, blending rich cocoa, fresh cream, and toasted hazelnuts to create textures and flavors that complement each other beautifully. Here’s a quick rundown of why I love each main ingredient and some shopping tips to keep in mind.

- Eggs: They’re the backbone of the sponge. Using room temperature eggs helps the batter rise better for that light, fluffy texture.
- Caster sugar: Super fine sugar dissolves more easily into the batter, keeping the sponge smooth and tender.
- Vanilla extract: Adds warm, subtle sweetness to balance the chocolate’s intensity.
- Plain flour: Choosing all-purpose flour gives the right structure without heaviness.
- Cocoa powder: Use a good-quality unsweetened cocoa for that rich chocolate flavor—don’t skip the espresso powder as it brightens the cocoa notes.
- Baking powder: Helps the sponge bloom nicely, creating those delicate airy pockets.
- Fine salt: A pinch enhances all the other flavors—it’s amazing what salt does in desserts!
- Double/heavy cream: Cold cream whips up beautifully, giving you that perfect fluffy texture for the filling and topping.
- Powdered sugar: Makes the cream sweet without grittiness.
- Vanilla bean paste: Gives those pretty vanilla flecks plus an authentic flavor punch; vanilla extract works fine if you don’t have the paste.
- Chocolate hazelnut spread: Opt for a creamy spread like Nutella; warming it slightly makes spreading easier and mess-free.
- Dark chocolate (70%): Use good-quality for the shards—it adds a beautiful bittersweet crunch that cuts through sweetness.
- Whole hazelnuts: Toasted for crunch and that amazing nutty aroma that screams festive.
Tweak to Your Taste
I love how flexible this Chocolate Hazelnut Yule Log Recipe is. While it’s incredible as is, feel free to customize it based on what you like or what you have on hand.
- Nut-Free Variation: Swap out hazelnut spread for a chocolate caramel or plain chocolate ganache if you or your guests have nut allergies—I’ve done this for friends, and it’s still a hit.
- Spiced Version: Adding a pinch of cinnamon or orange zest into the whipped cream gives a festive warm twist that deeply complements the chocolate and hazelnuts.
- Vegan Adaptation: Though not tried this one myself yet, using aquafaba for the egg whites and coconut cream whipped with powdered sugar can work well with some testing.
Step-by-Step: How I Make Chocolate Hazelnut Yule Log Recipe
Step 1: Prep Your Pan and Ingredients with Love
Start by preheating your oven to 180°C (350°F). Trust me, this makes all the difference in baking times. Next, grease your 25x38cm jelly roll pan thoroughly, then line it with parchment paper leaving an overhang on the sides—this is my go-to trick to easily lift the sponge out without cracks. Don’t forget to butter the parchment too, so it peels off clean later. While the oven warms, gather your eggs at room temperature and have all your dry ingredients sifted. Organization at this stage saves headaches later.
Step 2: Whisk and Fold for That Perfect Sponge
Whisk your egg whites until soft peaks form—that’s when they hold their shape but still look silky. In a separate bowl, whip your egg yolks with the caster sugar and vanilla extract until pale and fluffy; I usually test by lifting the whisk and checking for trails that linger a moment. Then sift together your flour, cocoa powder, espresso powder, baking powder, and salt. Now the folding magic begins: gently fold half of the dry ingredients into the yolk mixture, then add half of the whites. This alternating method keeps the batter light. Finish by folding in the remaining dry ingredients and egg whites just until you can’t see flour anymore—overmixing here loses that precious airiness, so keep it gentle!
Step 3: Bake and Roll for the Classic Shape
Pour your batter evenly into the prepared pan, and give the pan a gentle shake to settle the batter into every corner. Bake for 10-12 minutes—keep a close watch as ovens vary; the sponge should spring back gently when pressed and a toothpick inserted should come out clean. Once out, set the pan on a rack for 10 minutes to cool till just warm. Meanwhile, dust a clean tea towel generously with cocoa powder—this helps the sponge roll without sticking or tearing. Invert the sponge onto the towel, peel off the bottom parchment paper carefully, then roll the sponge up snugly in the towel from the short end. This initial roll shapes your cake while warm and prevents cracking when you fill it later.
Step 4: Whip Up the Heavenly Cream Filling
While the sponge cools, it’s time for the cream. Whip your cold double cream until soft peaks, then add powdered sugar, vanilla bean paste, and fold in cocoa powder for the chocolate cream. Divide the cream: half stays as-is for the filling, while the other half gets sifted cocoa to create the chocolate exterior frosting. Pro tip—make sure to whip cream until firm peaks for stability. I once under-whipped and ended up with a runny mess, so don’t rush this!
Step 5: Fill, Reroll, and Chill
Unroll your cooled sponge gently, spread a smooth layer of warmed chocolate hazelnut spread to loosen it up if needed, then dollop on a thick layer of firm whipped cream. Using an offset spatula helps get an even coating. Roll it back up carefully from the short end, keeping that seam tucked underneath. Wrap it tightly with plastic wrap and baking paper to keep the shape and refrigerate at least 2 hours or overnight if you can—that rest period helps the flavors meld and the log hold together perfectly when decorated.
Step 6: Create and Add the Chocolate Bark
Melt your chopped dark chocolate gently over a bain-marie until smooth. Spread it thinly onto parchment paper, cover with another sheet, and roll it tightly into a tube to create thin shards once hardened. Refrigerate until set, then unroll carefully—you’ll hear it crack and see beautiful shard textures. Scatter these shards all over the chocolate cream-covered log, pressing gently on the sides and top to mimic the rugged bark of a Yule log. Finally, sprinkle toasted hazelnuts in the cracks and around the base for a festive nutty crunch.
Pro Tips for Making Chocolate Hazelnut Yule Log Recipe
- Don’t Overbake the Sponge: Overbaking causes cracks and dryness; start checking at 10 minutes and remove as soon as a toothpick comes out clean.
- Use a Digital Scale: Measuring flour and cocoa by weight makes a huge difference in consistency, especially for delicate sponge cakes like this.
- Roll While Warm: Rolling the sponge as soon as it’s just cool enough prevents cracking and helps it “remember” the rolled shape.
- Firm Whipped Cream Matters: Under-whipping cream leads to saggy filling; watch for firm peaks that hold shape when you lift the whisk.
How to Serve Chocolate Hazelnut Yule Log Recipe

Garnishes
I like to keep garnishes simple so the texture and flavor of the Yule log can shine. A sprinkle of powdered sugar over the finished log gives it a “fresh snow” effect that’s just magical. Adding a few sprigs of holly or even edible gold leaf makes it festive and fancy without too much fuss. Toasted hazelnuts add a rustic crunch that pairs perfectly with the creamy filling and crisp chocolate shards.
Side Dishes
I usually serve this Chocolate Hazelnut Yule Log Recipe with a simple glass of cold milk or a dollop of fresh whipped cream on the side for extra indulgence. Sometimes, a fresh fruit compote—like raspberries or cherries—brings a lovely tart contrast that balances all that rich chocolate and nuts.
Creative Ways to Present
For special celebrations, I’ve wrapped the finished Yule log with a rustic burlap ribbon and placed some cinnamon sticks and dried orange slices around it on the serving platter. It makes a stunning presentation if you’re serving a crowd. I’ve also piped little whipped cream “mushrooms” on the side to create a woodland theme that guests love, especially if you have kids around!
Make Ahead and Storage
Storing Leftovers
Once your Yule log is decorated, store it in an airtight container or cake dome in the fridge. I’ve kept mine fresh and delicious for up to 5 days, and it tastes even better after the flavors have had time to meld. Just be sure it’s well covered so it doesn’t absorb any fridge odors.
Freezing
If you want to prep in advance, the sponge can be baked and rolled without filling, then wrapped tightly in plastic wrap and foil before freezing for up to 2 months. When you’re ready to assemble, thaw it slowly overnight in the fridge. This is a lifesaver for busy holiday schedules!
Reheating
Since this dessert is best served chilled, I don’t recommend reheating. However, if you want to soften the chocolate hazelnut spread before spreading, zap it in the microwave for around 10 seconds—just enough to loosen it, not melt it completely.
FAQs
-
Can I make the Chocolate Hazelnut Yule Log Recipe gluten-free?
Yes! You can substitute the plain flour with a 1:1 gluten-free baking flour blend. Just make sure it contains xanthan gum or another binder to keep the sponge structure. The texture might be slightly different, but it’s still delicious.
-
What’s the best way to avoid cracking when rolling the sponge?
The key is rolling the sponge gently while it’s still warm and pliable, immediately after baking. Also, dusting the towel or parchment with cocoa powder or sugar prevents sticking, so the sponge rolls smoothly without pulling or tearing.
-
Can I prepare the chocolate bark ahead of time?
Absolutely! Prepare the chocolate bark shards a day or two in advance and store them in an airtight container in the fridge. This makes decorating quick and stress-free on the assembly day.
-
How do I make sure the whipped cream is firm enough?
Chill your bowl and beaters in the fridge before whipping cream, use cold cream, and whip on medium-high speed until the cream holds stiff peaks that stand up when you lift the whisk. Be careful not to overwhip, or it will turn grainy and butter-like.
-
Can I swap the hazelnut spread for another filling?
Yes, feel free to experiment with fillings like raspberry jam, coffee buttercream, or even salted caramel for different flavor profiles—all delicious in their own right!
Final Thoughts
This Chocolate Hazelnut Yule Log Recipe is more than just a dessert to me—it’s a tradition that turns busy holiday mornings into moments of calm joy. The first time I made it, I was nervous about rolling the sponge without cracking, but the simple tips and method here helped me nail it. I love sharing this festive recipe with friends because it’s showstopping yet approachable. Give it a try—in your kitchen, with a cup of tea or a glass of wine, you’ll savor every bite and maybe start a new holiday tradition yourself!
Print
Chocolate Hazelnut Yule Log Recipe
- Prep Time: 30 minutes
- Cook Time: 12 minutes
- Total Time: 3 hours 30 minutes
- Yield: 12 slices
- Category: Dessert
- Method: Baking
- Cuisine: French
- Diet: Vegetarian
Description
This Chocolate Hazelnut Bûche de Noël is a festive and elegant Yule log cake featuring a light and airy chocolate sponge rolled with a rich hazelnut spread and sweetened whipped cream. Topped with chocolate shards and toasted hazelnuts, it’s a show-stopping dessert perfect for holiday celebrations.
Ingredients
Chocolate Sponge
- 4 large eggs, room temperature
- 100 g caster sugar (super-fine)
- 1 teaspoon vanilla extract
- 65 g plain flour (all-purpose)
- 35 g cocoa powder, plus extra for dusting
- 1 teaspoon espresso powder
- 1 teaspoon baking powder
- ¼ teaspoon fine salt
Sweetened Whipped Cream
- 480 ml double cream (heavy cream), cold
- 45 g powdered icing sugar (confectioners’ sugar)
- 1 teaspoon vanilla bean paste (or extract)
- 10 g cocoa powder
- 210 g chocolate hazelnut spread
Chocolate Shards
- 100 g dark chocolate 70%, finely chopped
To Serve
- 35 g whole hazelnuts, toasted, optional
Instructions
- Prepare Chocolate Sponge: Preheat oven to 180°C (350°F). Grease a 25×38 cm (10×15 inch) baking pan and line with parchment paper, greased with butter. Whisk egg whites with an electric mixer until soft peaks form. In another bowl, whip egg yolks, sugar, and vanilla extract on medium-high speed for 5 minutes until pale and creamy.
- Sift and Fold Dry Ingredients: Sift flour, cocoa powder, espresso powder, baking powder, and salt together. Add half of this dry mix into the egg yolk mixture, then fold in half the egg whites gently to maintain airiness. Repeat with remaining dry ingredients and egg whites, folding until just combined.
- Bake Sponge: Pour batter into prepared pan, smooth surface, and bake for 12 minutes or until a toothpick inserted comes out clean and sponge springs back lightly when pressed. Cool for 10 minutes in pan on wire rack.
- Roll Sponge: While baking, dust a tea towel with cocoa powder. Invert warm sponge onto the towel, peel off parchment paper carefully, and roll sponge gently with towel from short end. Set the rolled sponge seam side down to cool completely.
- Make Sweetened Whipped Cream: Whisk cold cream until soft peaks form. Add powdered sugar and vanilla bean paste, then whisk to firm peaks. Divide cream in half; into one half fold cocoa powder gently to create chocolate whipped cream. Refrigerate both creams.
- Fill and Re-roll Cake: Loosen chocolate hazelnut spread by microwaving briefly if needed. Unroll sponge and evenly spread hazelnut spread. Spread firm whipped cream over the spread, then re-roll sponge carefully to avoid squeezing out filling. Wrap in baking paper and plastic wrap. Refrigerate for at least 2 hours.
- Make Chocolate Bark: Melt chopped dark chocolate over a pan of boiling water until smooth. Spread thinly on parchment paper slightly larger than cake roll. Cover with another parchment and roll parchment tightly into a tube; wrap to secure and refrigerate until solid.
- Create Chocolate Shards: Unroll parchment gently once chocolate is firm to produce bark shards. Break any large pieces into smaller shards.
- Decorate Cake: Unwrap chilled roll and coat all over with chocolate whipped cream. Attach chocolate shards irregularly all around the roll except at the ends. Sprinkle toasted hazelnuts into cracks and around base. Dust with icing sugar and optionally garnish with a sprig of holly. Refrigerate until serving.
Notes
- Step-by-step photos are available on the original blog post to guide you through the process.
- Store the Yule log in an airtight container in the refrigerator for up to 5 days.
- Freeze unfilled, rolled sponge wrapped in plastic and foil for up to 2 months; thaw overnight in refrigerator before filling.
- Use digital scales for accurate measurement of flour and cocoa powder.
- Do not overbake the sponge to avoid cracks.
- Allow sponge to cool 10 minutes before rolling to prevent sticking.
- Whip cream until firm peaks to avoid filling collapse during rolling.
- Chill roll before decorating to help set the cream and keep its shape.
Nutrition
- Serving Size: 1 slice
- Calories: 350 kcal
- Sugar: 30 g
- Sodium: 100 mg
- Fat: 22 g
- Saturated Fat: 12 g
- Unsaturated Fat: 8 g
- Trans Fat: 0 g
- Carbohydrates: 30 g
- Fiber: 3 g
- Protein: 5 g
- Cholesterol: 110 mg


