Chocolate Madeleine Mummies Recipe
If you’re looking to surprise your friends or family with a Halloween treat that’s as adorable as it is delicious, I’ve got just the thing for you. This Chocolate Madeleine Mummies Recipe is my go-to for combining festive fun with rich, chocolatey goodness. It’s surprisingly simple, yet the end result looks like you spent hours crafting each spooky little treat. Trust me, you’ll want to keep these in your regular fall baking rotation!
Why This Recipe Works
- Rich, Moist Texture: The combination of dark chocolate, butter, and almond flour gives the madeleines a soft, melt-in-your-mouth feel that’s impossible to resist.
- Perfectly Balanced Sweetness: Using honey alongside sugar adds depth and warmth, avoiding that overly sweet taste you sometimes get in Halloween treats.
- Easy Yet Impressive Decoration: The white chocolate mummy wrappings and candy eyes transform simple madeleines into festive masterpieces without a lot of fuss.
- Make-Ahead Friendly: You can prep and bake these in batches and store them, making party prep stress-free.

Ingredients & Why They Work
Each ingredient in this Chocolate Madeleine Mummies Recipe has a special role, creating that irresistible flavor and texture you’ll love. Plus, I’ve dropped a few personal tips on picking the right ingredients so your madeleines come out perfect every time.
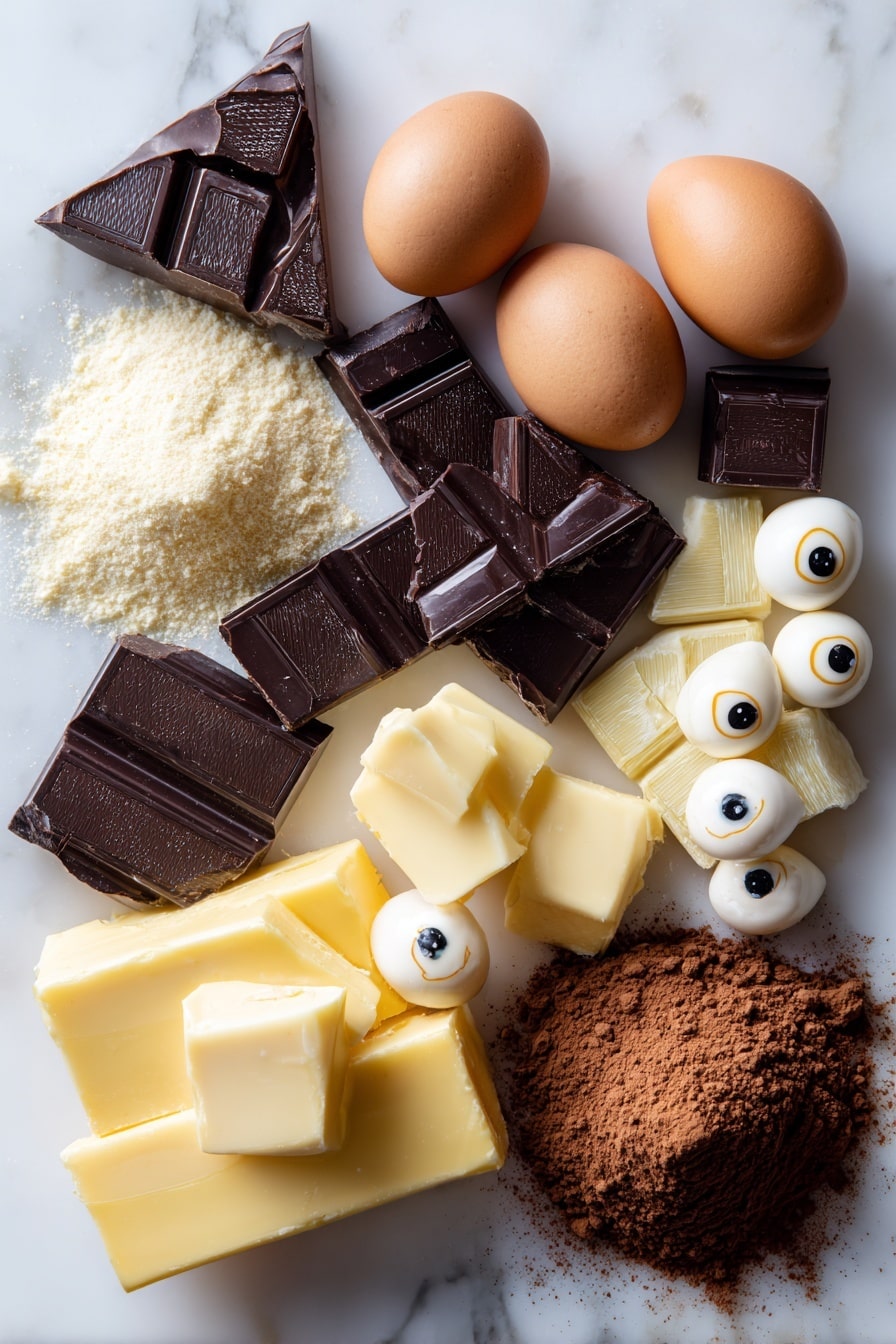
- Unsalted Butter: Use high-quality butter to get that rich, creamy base—it helps the madeleines stay tender and moist.
- Dark Chocolate: Chopped finely, it melts smoothly into the batter adding a deep cocoa flavor; choose something around 60-70% cocoa for balance.
- Vanilla Extract: Just a splash adds a warm undertone that complements the chocolate beautifully.
- Eggs: They provide structure and help the batter rise gently for that classic madeleine hump.
- Honey: Adds subtle sweetness and a touch of moisture—don’t skip it! It keeps the texture lovely.
- Granulated Sugar: Balances the honey with a clean, sweet taste and helps with the classic madeleine crisp edges.
- Whipping Cream: Adds richness and a silky consistency to the batter.
- Pastry Flour: Its lower protein content than all-purpose flour gives you a delicate, tender crumb.
- Almond Flour: Adds a gentle nuttiness and extra moisture, making your madeleines more complex in flavor.
- Cocoa Powder: Provides that quintessential chocolate taste and beautiful dark color.
- Baking Powder: Small but mighty, it helps your madeleines get that iconic little “belly” by giving a nice lift.
- White Chocolate: For piping on fun mummy wrappings – be sure to melt it slowly for smooth decorating.
- Candy Eyes: They’re the cutest touch and totally nail the Halloween vibe; if you can’t find these, I’ll share a fun tip below for making your own!
Tweak to Your Taste
I love how flexible this Chocolate Madeleine Mummies Recipe is. Sometimes I swap out the almond flour for hazelnut flour or add a pinch of cinnamon for an autumnal twist. You should absolutely feel free to make it your own—after all, that’s half the fun in baking, right?
- Add a Spice Kick: Sprinkle a bit of ground cinnamon or pumpkin spice into the batter for a cozy fall vibe—I swear it adds just the right warmth.
- Dairy-Free Swap: Use coconut oil instead of butter and a non-dairy cream like oat cream, and you’re good to go for a vegan-ish twist (just switch the white chocolate for a dairy-free version too!).
- Make It Minty: Add a drop of peppermint extract to your melted butter-chocolate mixture for some unexpected holiday flair that’s always a hit.
- Extra Boo Factor: Try red or orange candy eyes for a spooky twist, or drizzle a little colored white chocolate as “blood spatters” for a Halloween party spectacle.
Step-by-Step: How I Make Chocolate Madeleine Mummies Recipe
Step 1: Melt Your Chocolate and Butter the Easy Way
Start with a small bowl over a water bath (double boiler style). I melt the dark chocolate and butter together slowly until silky smooth—this should be fluid but not hot. Stir in the vanilla extract while it’s still warm, then set it aside. This forms that rich chocolate base that makes the madeleines so irresistible.
Step 2: Whisk Your Eggs and Sugar Until Just Right
In a large bowl, whisk together your eggs and sugar. Then add the whipping cream and honey, whisking over a gentle water bath again for about a minute until the sugar completely dissolves. Don’t overdo it here—you don’t want scrambled eggs! This creates a glossy, smooth mixture that contributes to your madeleine’s tender crumb.
Step 3: Sift and Fold Your Dry Ingredients
Sift together the pastry flour, almond flour, cocoa powder, and baking powder. Gently fold these dry ingredients into your wet batter, being careful not to overmix. You want a nice, smooth mix but still light. Once that’s done, fold in your melted chocolate butter in three batches until everything is just combined.
Step 4: Chill the Batter and Prep Your Pan
Cover your batter and let it chill in the fridge for at least 30 minutes – this helps develop flavor and firms up the batter so it holds shape better while baking. Meanwhile, brush your madeleine pan lightly with butter, dust with cocoa powder, and tap out excess. I always pop the pan in the fridge during this step—cold pans make the madeleines puff up beautifully.
Step 5: Pipe Your Batter and Bake
Transfer your batter into a pastry bag (this part always makes me feel fancy!). Pipe the batter into each madeleine well, filling about 3/4 full. If you want, cover them again and chill for another 30 minutes — cold batter equals better rise. Then bake at 340°F for 8-10 minutes, but hold off on opening the oven door early or you could flatten those delicate mounds.
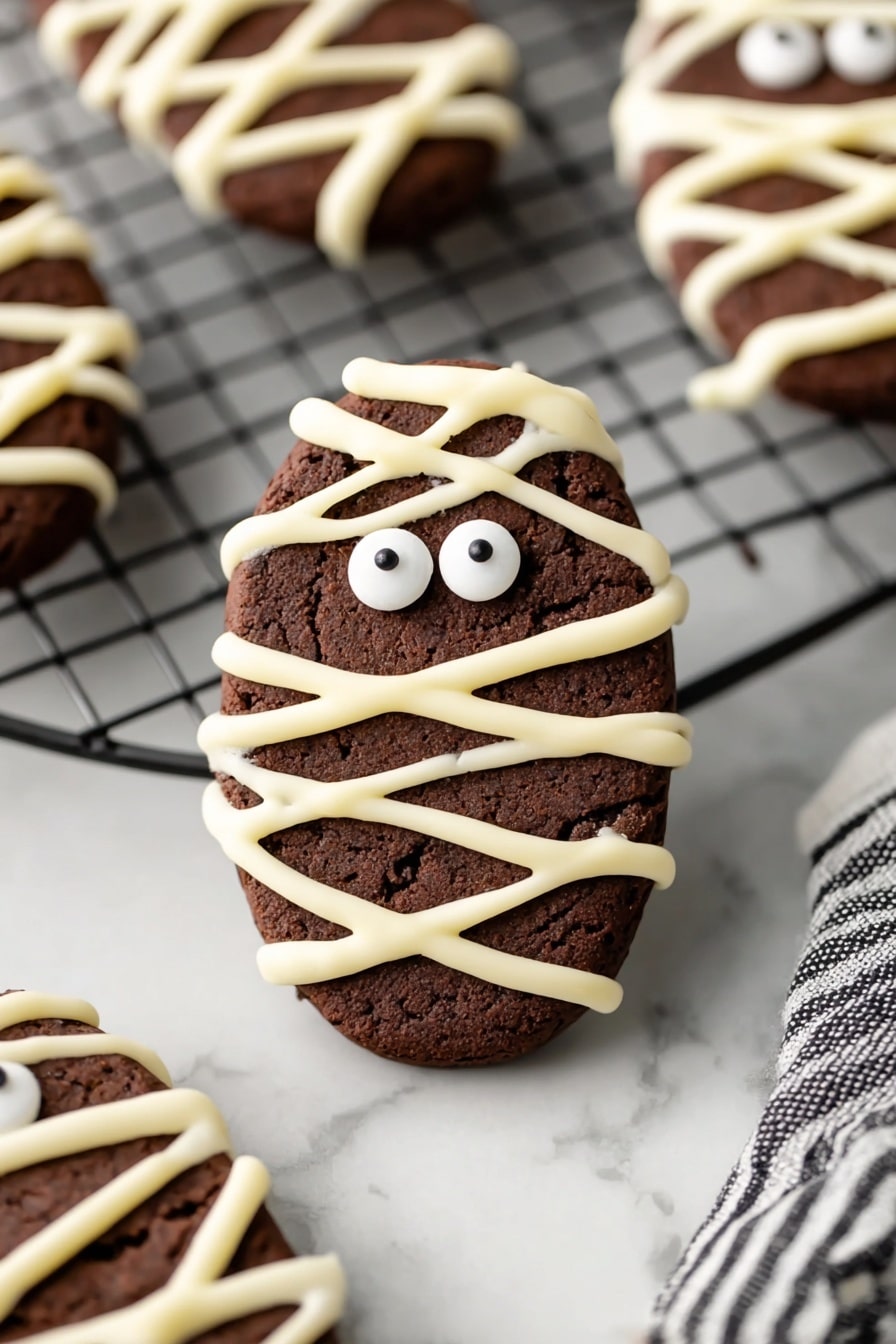
Step 6: Cool and Decorate Your Mummies
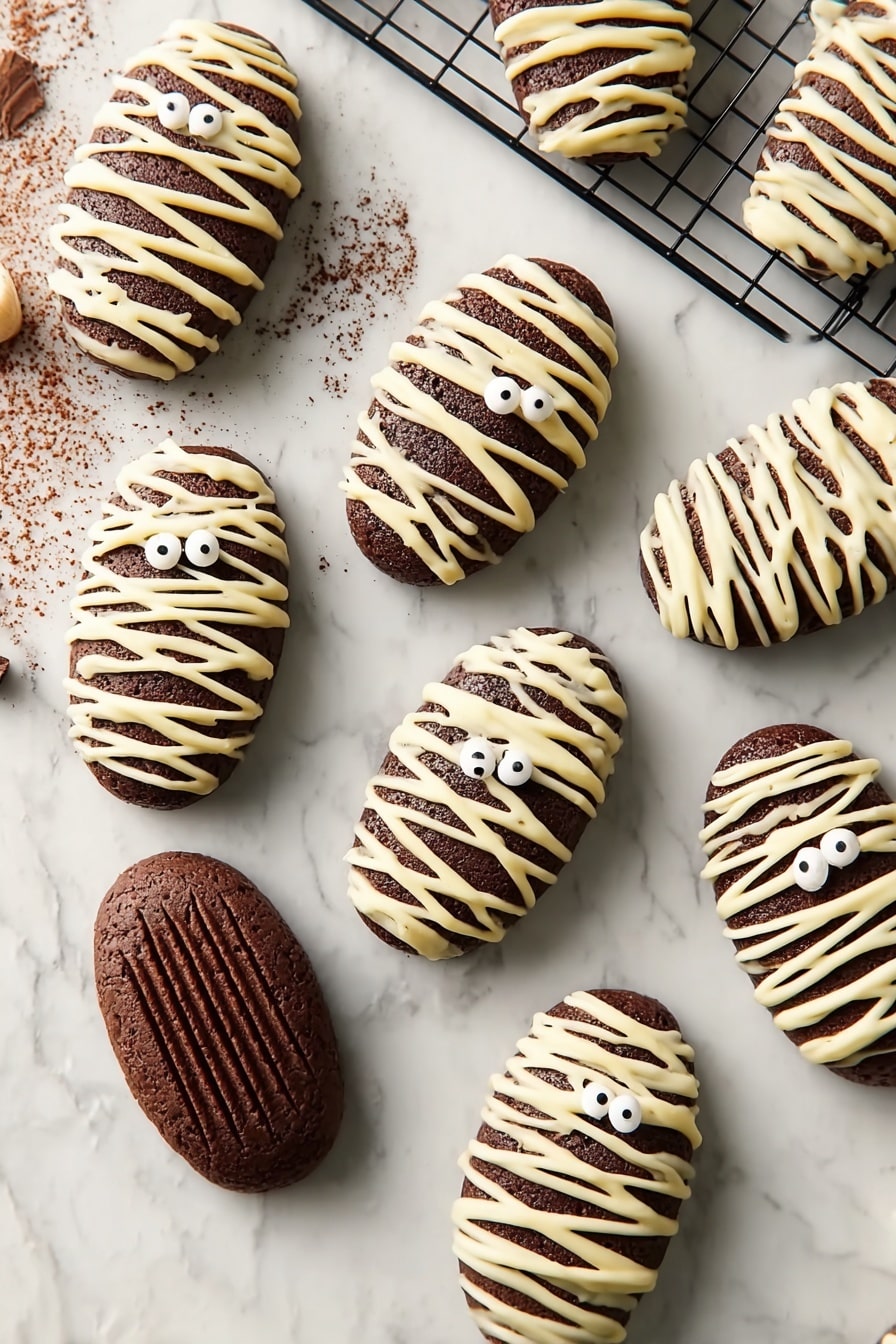
Once baked, tap the pan gently to release the madeleines, then cool them completely on a wire rack. For decorating, melt white chocolate and pipe messy, crisscross “bandages” over each madeleine, leaving spots for the candy eyes. Attach those adorable little eyes with a dab of melted white chocolate and voilà — your mummies come to life!
Pro Tips for Making Chocolate Madeleine Mummies Recipe
- Gentle Folding: Overmixing your batter will make the madeleines tough—fold just enough to combine for a tender crumb.
- Use a Cold Pan: Chilling the madeleine pan before baking helps the batter puff up into that classic hump.
- Patience with Piping: Your piping doesn’t have to be perfect—madeleine molds are forgiving, so just aim for roughly filling the wells without overflowing.
- DIY Candy Eyes: No eyes? No problem. Pipe small dots of white chocolate on parchment, then add tiny dark chocolate pupils before they set, and use these homemade googly eyes for decorating.
How to Serve Chocolate Madeleine Mummies Recipe
Garnishes
I like to keep garnishes simple but impactful. A dusting of powdered sugar over the mummies adds a frosty contrast to their dark cocoa base. Sometimes I sprinkle a few edible glitter flakes for a magical shimmer that kids absolutely love.
Side Dishes
These chocolate madeleine mummies pair beautifully with a warm cup of spiced chai, hot apple cider, or even a creamy pumpkin latte. For a party spread, I add a bowl of fresh berries and some lightly salted nuts to balance the sweetness.
Creative Ways to Present
I’ve had lots of fun arranging these madeleine mummies standing up on trays surrounded by “cobweb” spun from spun sugar or thin threads of white chocolate. For Halloween parties, placing them tucked into small “coffin” boxes or on spooky-themed platters really amps up the fun factor.
Make Ahead and Storage
Storing Leftovers
I store leftover madeleine mummies in an airtight container at room temperature, ideally in a cool place, for up to 3 days. The white chocolate wrappings keep their texture pretty well, but if your kitchen tends to be warm, refrigeration can help—just bring them back to room temperature before serving.
Freezing
Freezing works great if you want to prep early: I freeze the baked, cooled madeleines without decoration on a baking sheet, then transfer them to a freezer bag. Defrost completely before decorating. Decorating takes a bit of time, but prepping in advance saves loads of stress on the day of your party!
Reheating
To refresh your madeleines, pop them in a warm oven (about 300°F) for 3-4 minutes—just enough to warm through without melting the white chocolate decoration. This little trick brings back that fresh-from-the-oven feel and makes them taste like a dream.
FAQs
-
Can I make these madeleines without almond flour?
Absolutely! Almond flour adds moisture and flavor, but you can substitute with more pastry flour or even finely ground oats if you have dietary restrictions. Just be aware that the texture might be a little less tender and nutty.
-
What if I don’t have a madeleine pan?
If you don’t have a madeleine pan, mini muffin tins can work as a backup, though the shape won’t be quite the same. The baking time might vary, so check for doneness a bit earlier to avoid overbaking.
-
How do I store decorated Chocolate Madeleine Mummies?
Store them in a cool, dry place in an airtight container. If it’s warm, refrigeration helps prevent melting, but bring them to room temperature before eating for best flavor and texture.
-
Can I prepare the batter ahead of time?
Yes! The batter can be refrigerated for up to 24 hours, which actually enhances the flavor and texture. Just give it a gentle stir before piping into the pan.
Final Thoughts
This Chocolate Madeleine Mummies Recipe is truly one of my favorite seasonal treats to bake because it combines both charm and flavor without fussing over complicated technique. Plus, seeing the delight on kids’ and adults’ faces when you hand over these little “mummy snacks” is priceless. So, put on your apron, get that white chocolate melting, and have a blast making these spooky yet sweet bites—you’re going to love every step of the process and every bite afterward!
Print
Chocolate Madeleine Mummies Recipe
- Prep Time: 45 minutes
- Cook Time: 10 minutes
- Total Time: 55 minutes
- Yield: 16 halloween mummy madeleines
- Category: Dessert
- Method: Baking
- Cuisine: French
- Diet: Vegetarian
Description
Delightfully spooky and delicious, these Chocolate Madeleine Mummies are perfect for Halloween. Rich chocolate madeleines are baked to perfection, then decorated with white chocolate mummy wrappings and candy eyes for a fun and festive treat everyone will love.
Ingredients
Chocolate Madeleines
- ⅝ cup unsalted butter (140 grams)
- ⅕ cup dark chocolate, chopped (34 grams)
- 1 teaspoon vanilla extract
- 2 large eggs
- 1 ½ tablespoons honey (30 grams)
- ½ cup granulated white sugar (80 grams)
- 2 ½ tablespoons whipping cream
- ½ cup pastry flour, sifted (56 grams)
- ⅓ cup almond flour, sifted (30 grams)
- ⅓ cup cocoa powder (30 grams)
- 1 teaspoon baking powder (8 grams)
Halloween Madeleine Mummy Decorations
- ½ cup white chocolate, melted
- 32 small candy eyes
Instructions
- Melt Chocolate and Butter: In a small bowl over a water bath, melt the dark chocolate and butter together until fairly fluid. Stir in vanilla extract and set aside.
- Prepare Egg Mixture: In a large bowl, whisk eggs and sugar together. Add whipping cream and whisk again. Add honey and continue whisking over the water bath for about 1 minute until sugar has melted and ingredients are fully incorporated.
- Combine Dry Ingredients: Sift pastry flour, almond flour, cocoa powder, and baking powder into the bowl. Gently fold the dry ingredients into the wet mixture to form the madeleine batter.
- Incorporate Melted Chocolate: Gradually mix the melted chocolate and butter mixture into the madeleine batter in three parts until fully combined.
- Chill Batter: Cover the batter and refrigerate for at least 30 minutes. Meanwhile, preheat the oven to 340 degrees Fahrenheit.
- Prepare Madeleines Pan: Lightly butter the madeleine pan and dust with cocoa powder, tapping out excess.
- Pipe Batter: Transfer the chilled batter into a pastry bag and pipe it into the wells of the madeleine pan. Optionally, refrigerate the pan with batter for another 30 minutes for a better rise.
- Bake: Bake the madeleines for 10 minutes without opening the oven door early to avoid deflation.
- Cool Madeleines: Remove from oven, tap to release madeleines from pan, and cool completely on a wire rack before decorating.
- Decorate Mummies: Place melted white chocolate in a pastry bag with a small tip and pipe messy crosshatch lines over each madeleine to create mummy wrappings, leaving space for eyes.
- Add Eyes: Stick candy eyes onto each madeleine using a small dab of white chocolate as glue if needed.
- Store and Serve: Store the finished madeleine mummies in a cool place and enjoy your spooky treat.
Notes
- A simple water bath for melting sugar and combining egg mixture is sufficient; avoid overheating to prevent scrambling the eggs.
- The chilled batter may be stiff; gently stir it before piping for easier handling.
- Don’t worry too much about perfectly piping the batter into the madeleine molds; the wells are forgiving.
- Chilling the madeleine pan helps the batter stay cold and produces a nice muffin top or ‘belly’ on the madeleines.
- Baking time may vary slightly depending on the type of madeleine pan; darker pans might require slightly longer baking.
- If candy eyes are unavailable, make your own using piped white chocolate dots with a smaller dark chocolate dot in the center; store cooled to prevent melting.
Nutrition
- Serving Size: 1 madeleine
- Calories: 180 kcal
- Sugar: 12 g
- Sodium: 45 mg
- Fat: 12 g
- Saturated Fat: 7 g
- Unsaturated Fat: 4 g
- Trans Fat: 0 g
- Carbohydrates: 18 g
- Fiber: 2 g
- Protein: 3 g
- Cholesterol: 65 mg


