
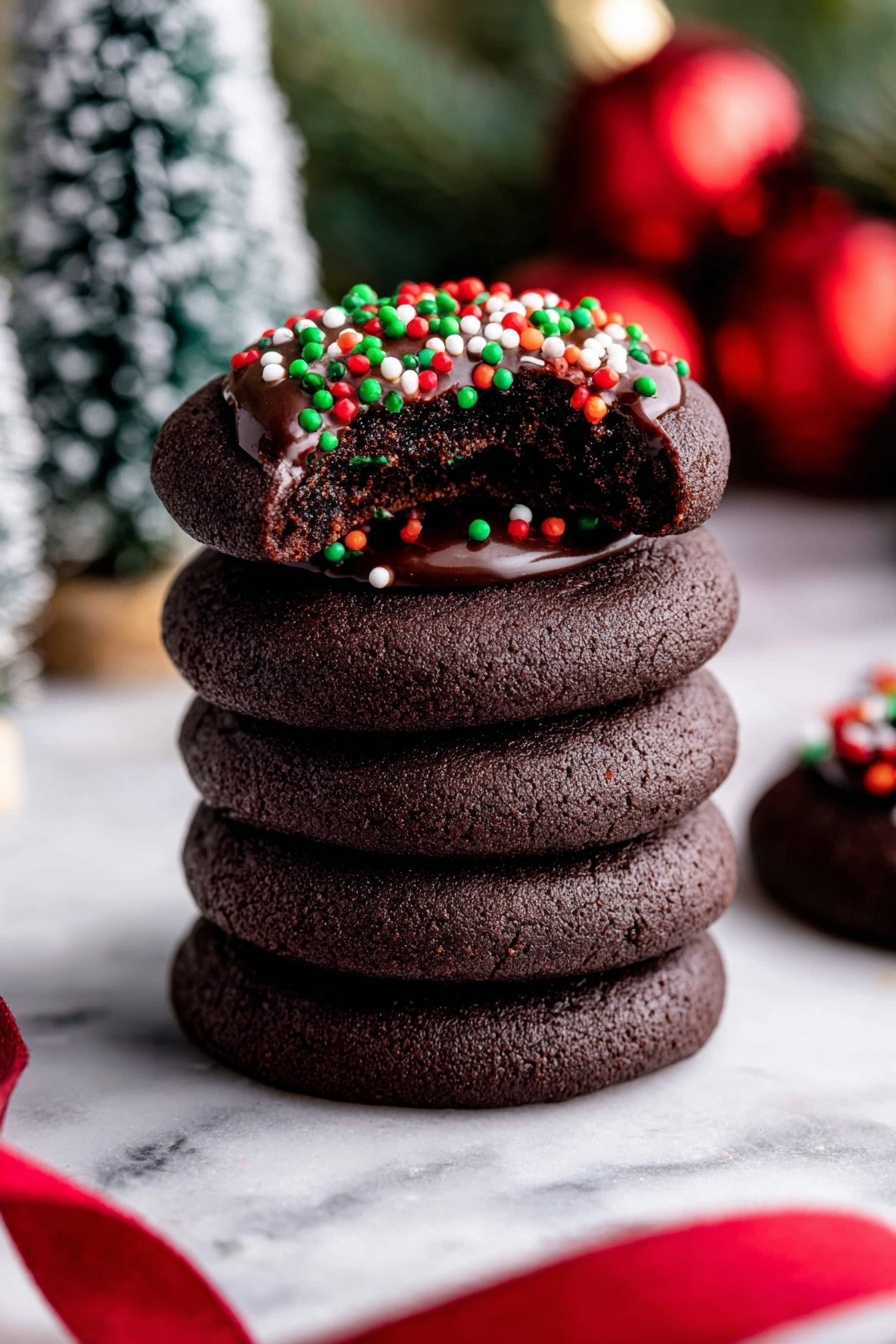
Chocolate Thumbprint Cookies with Ganache Recipe
If you’re craving a cookie that’s rich, chocolatey, and just a little fancy, you’re going to love this Chocolate Thumbprint Cookies with Ganache Recipe. These cookies have a soft, cocoa-infused base with a silky chocolate ganache nestled right in the center—it’s like the best kind of chocolate hug in cookie form. I’ve made these for friends and family, and trust me, they vanish faster than you can say “pass me another!” So stick around, because I’ll walk you through every step to nail these cookies perfectly.
Why This Recipe Works
- Perfect Texture: The cookies are soft and tender thanks to the blend of brown sugar and butter, while the cocoa keeps them decadently chocolaty without drying out.
- Rich Ganache Center: Using a simple ganache with heavy cream and chocolate chips gives you a smooth, creamy filling that contrasts beautifully with the cookie base.
- Customizable Size: You can make these cookies as big or as small as you want — I like a generous bite-sized cookie that fits nicely in the palm of your hand.
- Chilling for Success: Chilling the dough before baking locks in the shape and develops flavor, preventing any cookie spread and giving you those classic thumbprint indentations.

Ingredients & Why They Work
Every ingredient in this Chocolate Thumbprint Cookies with Ganache Recipe plays a starring role, creating a balance between rich chocolate and a tender, buttery cookie. Plus, I’ll share little tips on picking the best ingredients to make your cookies standout.
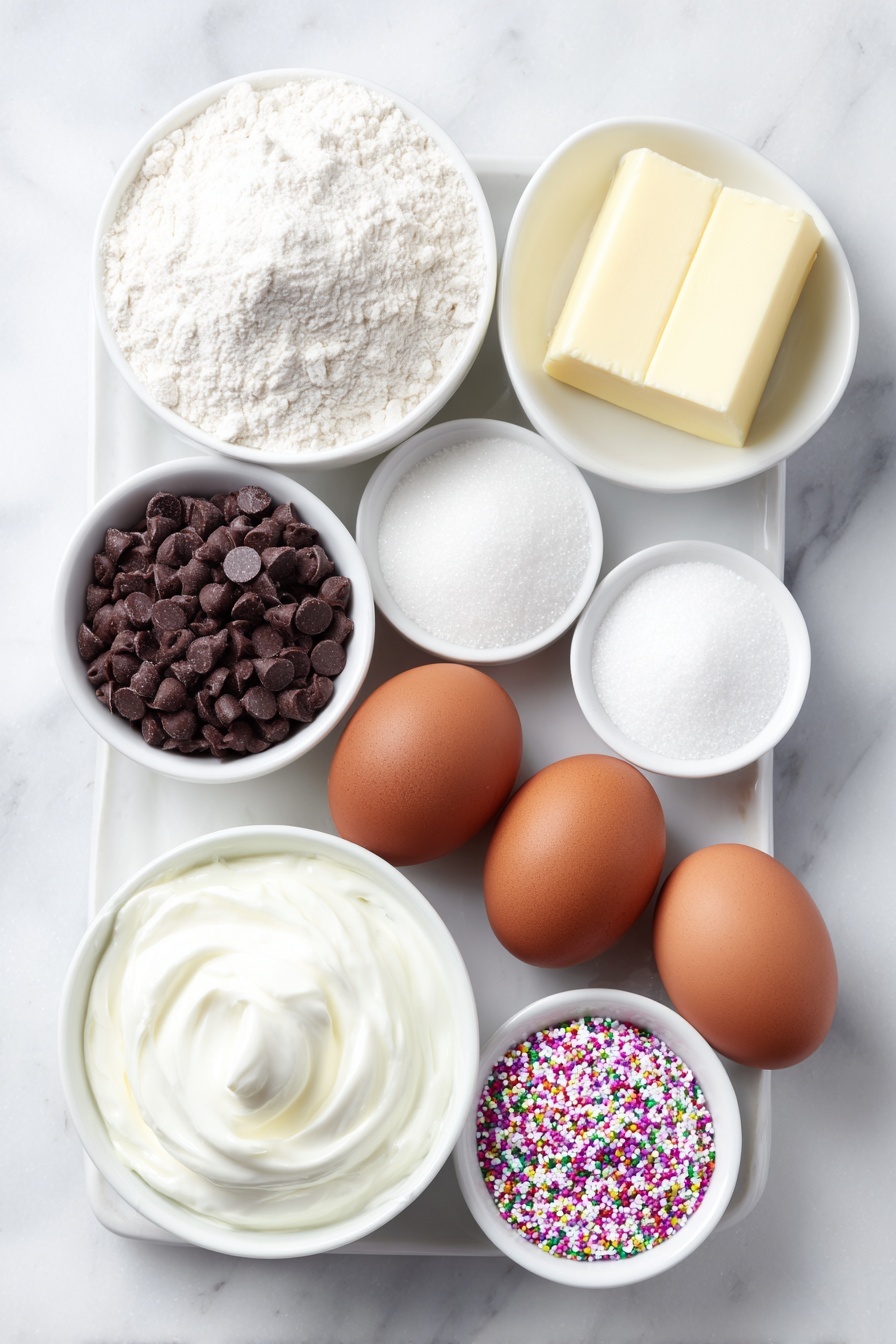
- All-purpose flour: Use spooned and leveled flour for accuracy—you don’t want dense cookies; too much flour messes with that delicate texture.
- Dutch-process cocoa powder: This gives a smooth, rich chocolate flavor that’s less acidic and more mellow, which I prefer over natural cocoa in this recipe.
- Salt: Enhances flavor and balances the sweetness so your cookies don’t taste flat.
- Baking powder: Just enough for a slight lift but won’t overpower the texture you want.
- Unsalted butter: Softened butter is key to creaming well with sugar, giving these cookies their tender crumb and subtle richness.
- Light brown sugar: Packed tightly for moisture and subtle caramel notes—it keeps the cookies soft.
- Granulated white sugar: Adds a little crunch and helps with browning, balancing out the brown sugar’s moisture.
- Egg yolks: They add richness and help with structure while keeping the dough tender.
- Vanilla bean paste or extract: A splash of vanilla rounds out all those chocolate flavors perfectly.
- Semi-sweet chocolate chips: The star of the ganache, melting smoothly and adding that luscious chocolate punch.
- Heavy whipping cream: Mixed with chocolate chips to make the ganache creamy and decadent.
- Nonpareils (optional): For a little festive crunch and color on top – pure joy if you’re serving these for a party.
Tweak to Your Taste
This recipe is a blast to personalize. I love experimenting with different chocolates or adding a little sea salt on top to make the flavors pop. Don’t be afraid to tweak it until it feels just right for you.
- White Chocolate Ganache: I once swapped out the semi-sweet chips for white chocolate and added a hint of orange zest in the ganache—such a delicious twist that surprised everyone at the holiday party!
- Nutty Touch: Adding finely chopped toasted pecans or hazelnuts into the dough gives a lovely crunch and earthy flavor layer that’s really addictive.
- Diet-Friendly: For a dairy-free version, try coconut cream instead of heavy cream and a good-quality dairy-free chocolate—still dreamy, just different.
- Boost the Cocoa: If you’re a hardcore chocolate lover like me, increase the cocoa powder by a tablespoon, but be careful not to dry out the dough. Add a splash extra vanilla to balance it.
Step-by-Step: How I Make Chocolate Thumbprint Cookies with Ganache Recipe
Step 1: Mix the Dry Ingredients Like a Pro
Start by whisking together the flour, Dutch-process cocoa powder, salt, and baking powder in a medium bowl. Getting these evenly combined upfront ensures every bite has balanced flavor. I usually whisk for about 30 seconds just to make sure there are no lumps. Set this mixture aside, your batter will thank you later!
Step 2: Cream Butter and Sugars Until Fluffy
This is where patience rewards you big time. In a large bowl, beat the softened butter with both brown and granulated sugar for about 2 minutes until pale and fluffy. I use my trusty electric mixer for this—trust me, the texture here will make or break your cookies’ softness. If your butter is too cold, the mix won’t fluff properly, so room temp is key!
Step 3: Add Egg Yolks and Vanilla
Pop in those two egg yolks and vanilla bean paste or extract. Beat again for 1-2 minutes until the mixture lightens and becomes airy. You’ll notice the color change—that’s when you know you’ve built a great base for your chocolate thumbprint cookies with ganache.
Step 4: Gently Combine Dry Ingredients
Next, add in the dry ingredients and stir just until combined. Resist the urge to overmix here because that can toughen up the dough — a few streaks of flour are okay. This cookie dough is a little soft but holds together well for shaping.
Step 5: Shape and Create Your Thumbprints
Scoop the dough into roughly 1 tablespoon portions—you’ll end up with about 34 cookies. Roll each into a smooth ball and place on parchment-lined baking sheets. Use the back of a 1/4 teaspoon measuring spoon to gently press an indent into the center of each ball. This thumbprint is what holds your luscious ganache later.
Step 6: Chill Like a Champ
Pop the whole tray (or divide onto two trays) into the fridge for at least an hour. I won’t lie, waiting is tough because you want to bake ASAP, but chilling helps the dough firm up and prevents spreading during baking. It really makes the difference between a flat cookie and a neat, rounded one.
Step 7: Bake and Perfect the Shape
Preheat your oven to 350°F (175°C). Space the chilled dough about 1 1/2 inches apart on the sheets and bake for 9–11 minutes—I find 10 minutes hits the perfect soft, chewy balance. When they come out hot, gently press the centers with your 1/4 teaspoon again if needed (sometimes they puff up while baking). If you want perfect rounded edges, I like to use a small round cookie cutter to go around each cookie while they’re warm. Let the cookies cool on the baking sheet for 5 minutes before transferring to a wire rack to cool completely.
Step 8: Make the Silky Chocolate Ganache
While cookies cool, add your semi-sweet chocolate chips to a bowl. Heat the heavy cream just until it’s about to boil—microwave works fine for me, or stove-top if you prefer. Pour hot cream over the chips and let them sit for one whole minute to soften the chocolate before stirring gently until you get a smooth glossy ganache.
Step 9: Fill and Chill Your Cookies
Spoon about 1 teaspoon of ganache into each cookie’s thumbprint well. If you want to get fancy, sprinkle nonpareils on top for a pop of color and texture—this always makes me smile. Finally, chill your cookies in the fridge for 10-15 minutes so the ganache sets into a luscious little pool. Store any leftovers in an airtight container for up to three days if they last that long!
Pro Tips for Making Chocolate Thumbprint Cookies with Ganache Recipe
- Measure Flour by Weight: I learned the hard way that scooping flour can mess up your cookie texture—always spoon and level or weigh your flour for consistent results.
- Don’t Skip Chilling: That chill time is essential, so don’t skimp on it—it keeps your cookies from spreading and helps develop deeper flavors.
- Press Indents Twice: Press the thumbprints right before and just after baking so they hold that perfect well for your ganache filling without cracking.
- Use Quality Chocolate: For the ganache, I always use good-quality semi-sweet chips — it makes a world of difference in smoothness and flavor.
How to Serve Chocolate Thumbprint Cookies with Ganache Recipe
Garnishes
I’m a sucker for a simple sprinkle of rainbow nonpareils on these cookies—they add just enough crunch and a festive touch without overpowering the chocolate. Sometimes I also dust a light shake of powdered sugar for a snow-kissed look when serving during winter holidays.
Side Dishes
These cookies are perfect alongside a cold glass of milk or a freshly brewed cup of coffee or espresso. Sometimes I serve them with a small bowl of fresh berries to balance their richness, which guests surprisingly love!
Creative Ways to Present
For special occasions, I’ve arranged these cookies on a tiered dessert stand, alternating with mini chocolate mousse cups. It makes the cookie tray feel extra special and inviting. You can also wrap a stack tied with twine for gifting—people always appreciate homemade, especially when it’s as good as these!
Make Ahead and Storage
Storing Leftovers
I store these cookies in an airtight container in the fridge because the ganache filling stays fresher longer and the cookies keep their texture. If you leave them out at room temp for a day, they’ll be fine too, but I prefer chilled for that perfect ganache consistency.
Freezing
Once the ganache has set, you can freeze these cookies on a baking sheet, then transfer them into a freezer-safe container or bag. When I defrost them, I let them soften in the fridge overnight. Freezing really helps if you want to prep for a party ahead of time without sacrificing freshness.
Reheating
If you want that warm, melty ganache experience after chilling or freezing, pop a cookie in the microwave for about 10 seconds—just enough to soften the ganache without melting it completely. It’s like a little indulgent moment to savor.
FAQs
-
Can I use natural cocoa powder instead of Dutch-process in this recipe?
Yes, you can substitute natural cocoa powder, but it may slightly affect the flavor and color. Dutch-process cocoa has a smoother, less acidic taste which pairs beautifully with the ganache. If using natural cocoa, consider adding a pinch of baking soda to balance acidity.
-
Why do I need to chill the cookie dough before baking?
Chilling the dough firms it up, preventing the cookies from spreading too much during baking. It also helps develop flavors, resulting in a more tender, flavorful cookie with a pronounced chocolate taste.
-
How do I fix cookies that spread too much and lose their thumbprints?
If your cookies flatten and the indent disappears, try chilling the dough longer next time and make sure butter is fully softened but not too warm. Right after baking, gently press the indent again with a small spoon or measuring spoon to restore the well.
-
Can I make the ganache ahead of time?
Absolutely! Ganache can be made a day or two ahead and kept covered in the fridge. Just gently warm it before filling cookies if it becomes too thick to spread.
Final Thoughts
I honestly can’t recommend this Chocolate Thumbprint Cookies with Ganache Recipe enough. They feel a little fancy but are so straightforward to make that even a beginner baker can knock them out of the park. Every time I make them, someone ends up asking for the recipe (or more cookies!). So, whether it’s a weekend treat or a last-minute gift, go ahead and make these—your kitchen will smell like happiness, and your friends will thank you endlessly.
Print
Chocolate Thumbprint Cookies with Ganache Recipe
- Prep Time: 15 minutes
- Cook Time: 11 minutes
- Total Time: 1 hour 26 minutes
- Yield: 34 cookies
- Category: Dessert
- Method: Baking
- Cuisine: American
Description
Delicious and rich Chocolate Thumbprint Cookies filled with smooth chocolate ganache. These cookies feature a tender cocoa-based dough with a soft center filled with a creamy semi-sweet chocolate ganache, perfect for chocolate lovers and special occasions.
Ingredients
For the Chocolate Thumbprint Cookies
- 1 1/2 cups (188 g) all-purpose flour, spooned and leveled
- 1/2 cup (40 g) cocoa powder, Dutch process
- 1/2 tsp salt
- 1/2 tsp baking powder
- 3/4 cup (168 g) unsalted butter, softened
- 3/4 cup (165 g) light brown sugar, packed
- 1/4 cup (50 g) granulated white sugar
- 2 egg yolks, at room temperature
- 1 1/2 tsp vanilla bean paste or extract
For the Chocolate Ganache
- 1 cup (200 g) semi-sweet chocolate chips
- 1/2 cup (120 ml) heavy whipping cream
- Nonpareils for sprinkling on top, optional
Instructions
- Prepare Dry Ingredients: In a medium bowl, whisk together the all-purpose flour, Dutch process cocoa powder, salt, and baking powder until fully combined. Set aside.
- Cream Butter and Sugars: Using an electric mixer, cream the softened unsalted butter with light brown sugar and granulated white sugar for 2 minutes until light and fluffy.
- Add Egg Yolks and Vanilla: Mix in the egg yolks and vanilla bean paste or extract, blending until the mixture is pale in color and fluffy, about 1-2 minutes.
- Combine Dry and Wet Ingredients: Gradually add the dry ingredients to the butter mixture and mix just until combined to form the cookie dough.
- Shape Dough Balls: Scoop the dough into 34 portions, approximately 1 tablespoon each, then roll each portion into a ball and place on prepared baking sheets lined with parchment paper.
- Create Indents: Using a 1/4 teaspoon, press down on each dough ball to create an indent for the ganache filling.
- Chill Dough: Refrigerate the dough balls on the baking sheets for at least 1 hour to firm up before baking.
- Preheat Oven: Set the oven to 350 degrees Fahrenheit and prepare for baking.
- Bake Cookies: Arrange dough balls about 1 1/2 inches apart on baking sheets and bake for 11 minutes until set.
- Repress Indents and Shape: While cookies are still warm, gently press down the centers again with a 1/4 teaspoon to deepen the indents. Optional: Use a circular cookie cutter to perfect the shape and size.
- Cool Cookies: Let the cookies cool on the baking sheets for 5 minutes; then transfer to a wire rack to cool completely.
- Prepare Ganache: Place chocolate chips in a small bowl. Heat heavy cream until just about boiling, pour over chocolate, and let sit for 1 minute. Stir until smooth and combined.
- Fill Cookies: Spoon about 1 teaspoon of the chocolate ganache into the center indent of each cookie. Add nonpareils sprinkles on top if desired.
- Set Ganache: Chill the filled cookies in the refrigerator for 10-15 minutes to allow the ganache to set properly.
- Store Cookies: Store leftover cookies in an airtight container for up to three days to maintain freshness.
Notes
- Measure flour properly by spooning into the cup and leveling with a knife or weighing it for accuracy to avoid dense cookies.
- You can chill all dough balls together on one baking sheet and separate them on multiple sheets before baking to save time and space.
- If you don’t have Dutch process cocoa powder, you can substitute with natural cocoa powder but expect a slightly different flavor.
- Make sure the egg yolks and butter are at room temperature to ensure proper mixing and texture.
- For a more intense chocolate flavor, use semi-sweet or dark chocolate chips in the ganache.
Nutrition
- Serving Size: 1 cookie
- Calories: 150 kcal
- Sugar: 12 g
- Sodium: 50 mg
- Fat: 9 g
- Saturated Fat: 5 g
- Unsaturated Fat: 3 g
- Trans Fat: 0 g
- Carbohydrates: 18 g
- Fiber: 2 g
- Protein: 2 g
- Cholesterol: 40 mg


