
Christmas Magic Layer Brownie Bars Recipe
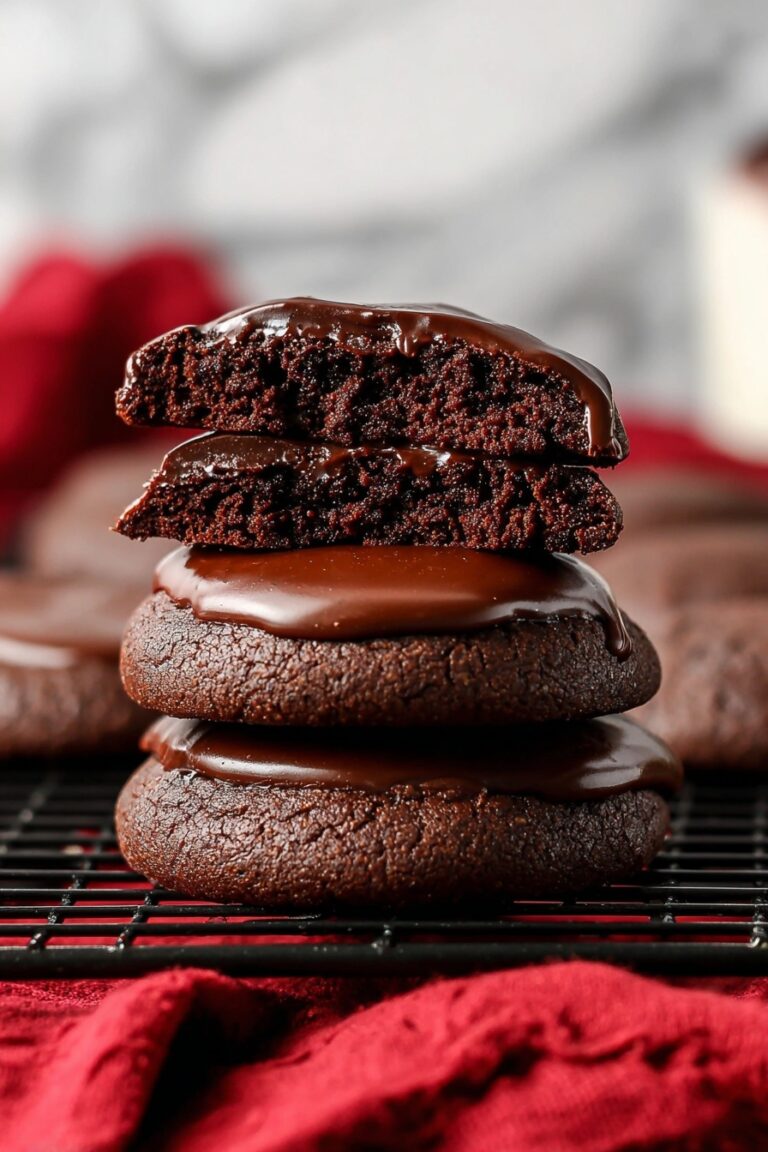
If you’re looking for a show-stopping dessert that truly captures the spirit of the season, you’re going to love this Christmas Magic Layer Brownie Bars Recipe. Trust me, these bars are nothing short of fan-freaking-tastic — layers of fudgy brownie, nuts, coconut, chocolate chips, and festive M&Ms all brought together with a sweetened condensed milk topping that bakes up golden and irresistible. Stick around, because I’ll walk you through every step so you can wow your friends and family with these holiday treats that taste as magical as they look.
Why This Recipe Works
- Layered Texture: The combination of fudgy brownie base, crunchy nuts, and chewy coconut creates an irresistible bite every time.
- Festive Flavors: Holiday M&Ms and sprinkles bring vibrant color and that sweet holiday vibe.
- Simple Yet Impressive: No complicated techniques here—just mixing, layering, and baking to perfection.
- Make-Ahead Friendly: These bars store well and freeze beautifully, so you can prepare ahead for your celebrations.

Ingredients & Why They Work
Getting the layers right is key, and these ingredients just sing together. Each element has its role—from rich chocolate to sweetened condensed milk binding the layers with a melty goodness—so choosing good quality ingredients will make a huge difference in your final bars.

- Semi-sweet chocolate chips: Using semi-sweet balances the sweetness and gives that iconic brownie chocolate flavor.
- Salted butter: Adds richness and a touch of saltiness that enhances the chocolate.
- Granulated sugar: Sweetens the base and helps give those brownies a nice chew.
- Eggs (large and yolk): Eggs bind the batter and create that fudgy texture I love.
- All-purpose flour: Just enough to hold everything together without being cakey.
- Vanilla extract: A splash makes all the flavors pop and round out.
- Nuts (optional): Chopped walnuts or pecans add crunch—choose your favorite or skip if nut allergies are a concern.
- Mini and regular holiday M&Ms: These festive candies are not only colorful but melt into slight pockets of chocolatey yum.
- Sweetened flaked coconut: Adds texture and a touch of tropical sweetness that’s perfect with chocolate.
- Sweetened condensed milk: This is the magical binder that gives the top layer a luscious, gooey finish.
- Holiday sprinkles: For that final sparkle—trust me, the kids (and adults!) adore this festive touch.
Tweak to Your Taste
One of the best parts about this Christmas Magic Layer Brownie Bars Recipe is how easy it is to make it your own. Over the years, I’ve tried a few different twists, and you can totally swap or omit ingredients depending on what you’re craving or what you have on hand.
- Nut-free version: My sister is allergic to nuts, so I skip them and add extra coconut and M&Ms instead — still delicious and festive!
- Extra fudgy brownies: Adding a little espresso powder to the brownie batter gives a deeper chocolate flavor without tasting like coffee.
- White chocolate swap: Try white chocolate chips in place of semi-sweet for a sweeter, creamier top layer that looks beautiful with the sprinkles.
- Gluten-free option: Use your favorite gluten-free flour blend to make sure everyone at the party can enjoy these bars.
Step-by-Step: How I Make Christmas Magic Layer Brownie Bars Recipe
Step 1: Melting the Chocolate and Butter to Set the Base
Start by preheating your oven to 350°F and lining a 9-inch pan with foil or parchment—this makes cleanup a breeze. I like to microwave the butter and chocolate chips together in 30-second bursts, stirring each time until smooth. Be careful not to overheat; chocolate can seize if you’re not watching. Once glossy and melted, let it cool slightly before the next step.
Step 2: Mixing Up the Fudgy Brownie Batter
Next, stir in the sugar, vanilla, eggs, and egg yolk until everything is well combined. Then fold in the flour just until you don’t see any streaks—don’t overmix or your brownies will be cakey instead of chewy and fudgy. Pour that beautiful batter into your prepared pan, smoothing it out for an even layer.
Step 3: Bake, Layer, and Create Christmas Magic
Bake your brownie layer for 20 minutes—when you take it out, it’ll jiggle slightly but the top should look set. Now for the fun part: sprinkle half the nuts, half the chocolate chips, half the M&Ms, then all the shredded coconut evenly over the top. Pour the sweetened condensed milk slowly and spread it gently to cover everything, but don’t mix it in. Finish with the remaining chocolate chips, M&Ms, and a generous sprinkle of holiday sprinkles for that color pop.
Step 4: Final Bake and Cooling
Bake for another 25 minutes, or until the edges turn golden and the middle looks set and just starts to brown. If the top looks like it’s getting too dark before the center is done, tent it loosely with foil to protect the colors and prevent burning. When it’s out of the oven, cool completely before cutting into squares—this helps the layers hold together beautifully.
Pro Tips for Making Christmas Magic Layer Brownie Bars Recipe
- Even Layering: Taking your time to spread the condensed milk gently ensures every bite is perfectly gooey and holds the toppings in place.
- Don’t Overbake: I always check at 20 minutes for the base and at 25 minutes for the final bake—oven temps vary, and you want that soft center, not dry bars.
- Use Foil/Parchment Lining: This saves you from the dreaded stuck-to-the-pan moment and helps you remove bars easily for neat squares.
- Sharp Knife for Cutting: Clean your knife with a warm damp cloth between cuts to keep edges tidy and prevent crumbling.
How to Serve Christmas Magic Layer Brownie Bars Recipe

Garnishes
I love topping these bars with extra holiday sprinkles or a light dusting of powdered sugar just before serving—it makes them pop on the plate and adds an extra festive touch. Sometimes, I add a few whole nuts or a drizzle of melted chocolate to make them look extra special if it’s a party.
Side Dishes
Pair these sweet bars with a scoop of vanilla bean ice cream for an indulgent treat, or serve alongside a warm cup of spiced chai or rich coffee to balance all that sweetness. For holiday gatherings, I like placing them on a dessert platter with candy canes and fresh cranberries for extra cheer.
Creative Ways to Present
For gifting or holiday parties, I’ve wrapped individual squares in festive parchment paper tied with twine. For buffet-style serving, stacking bars on a tiered tray with playful Christmas decorations instantly makes your dessert table feel magical.
Make Ahead and Storage
Storing Leftovers
I store leftover bars in an airtight container at room temperature for up to a week, layering parchment paper between them to keep them from sticking. If you refrigerate, they’ll last slightly longer but bring them back to room temp before serving to enjoy the best texture.
Freezing
Freezing works like a charm! I carefully lift the entire batch out of the pan, wrap it tightly in plastic wrap and then aluminum foil, and freeze for up to three months. You can also freeze individual squares for quick grab-and-go treats — they thaw wonderfully at room temperature.
Reheating
When enjoying leftovers, I prefer to bring the bars to room temperature for a soft texture. If you’re craving a warm treat, a quick 10-15 second zap in the microwave does wonders without drying them out.
FAQs
-
Can I use other types of chocolate instead of semi-sweet chips?
Absolutely! While semi-sweet chocolate chips work perfectly here, you can substitute with milk chocolate for a sweeter flavor or dark chocolate for a richer, more intense chocolate experience. Just keep in mind that darker chocolates tend to be less sweet.
-
Do I have to use sweetened condensed milk?
Sweetened condensed milk plays an essential role in binding the toppings and creating that luscious gooey layer. If you want to skip it, the texture and flavor will be quite different, so I recommend sticking to it for the authentic Christmas Magic Layer Brownie Bars Recipe experience.
-
How do I prevent the top layer from browning too quickly?
If you notice the bars are browning too fast during the second baking phase, tent a piece of aluminum foil loosely over the pan. This shields the toppings while allowing the bars to finish baking evenly.
-
Can I prepare this recipe ahead of time?
Yes! You can assemble the bars a day ahead and refrigerate them before baking, but keep in mind baking times might need slight adjustment. They also freeze beautifully, making it easy to prep weeks in advance and serve fresh for your holiday gatherings.
Final Thoughts
This Christmas Magic Layer Brownie Bars Recipe has quickly become one of my favorite holiday go-tos because it combines everything I adore about festive baking in one decadent treat. It’s approachable, adaptable, and always impresses a crowd. Seriously, once you bake these, you’ll hear “Can you make these again?” at every holiday gathering—and that’s the kind of magic I’m all about. Give it a try, and I’m betting this will become a new tradition in your kitchen too.
Print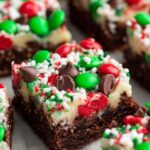
Christmas Magic Layer Brownie Bars Recipe
- Prep Time: 15 minutes
- Cook Time: 45 minutes
- Total Time: 1 hour
- Yield: 9 bars
- Category: Dessert
- Method: Baking
- Cuisine: American
Description
Delight in the festive flavors of Christmas Magic Layer Brownie Bars, featuring a rich and fudgy brownie base topped with layers of nuts, holiday M&Ms, shredded coconut, and sweetened condensed milk, making for a perfect holiday treat that’s both colorful and indulgent.
Ingredients
Brownie Layer:
- 1½ cups semi-sweet chocolate chips
- ½ cup salted butter (1 stick)
- 1 cup granulated sugar
- 2 large eggs
- 1 large egg yolk
- 1 cup all-purpose flour
- ½ teaspoon vanilla extract
Toppings Layer:
- ¾ cup nuts (optional, divided)
- ¼ cup mini holiday M&Ms (divided)
- ¾ cup regular holiday M&Ms (divided)
- ½ cup semi-sweet chocolate chips (divided)
- 1 cup sweetened flaked coconut
- ¾ cup sweetened condensed milk (from a 14-ounce can)
- ¼ cup holiday sprinkles
Instructions
- Preheat and Prepare Pan: Preheat your oven to 350 degrees F. Line a 9-inch baking pan with foil or parchment paper, then spray with nonstick cooking spray to ensure easy removal of the brownies.
- Melt Chocolate and Butter: Place the butter and semi-sweet chocolate chips in a large, microwave-safe bowl. Microwave on high for 30 seconds, then stir. Continue microwaving in 30-second intervals, stirring in between, until the mixture is completely melted and smooth.
- Mix Wet Ingredients: Beat granulated sugar into the chocolate mixture. Then add the vanilla and eggs (two whole eggs plus one yolk), beating until the mixture is well combined and smooth.
- Add Flour: Stir in the all-purpose flour just until combined; avoid overmixing to keep the brownies tender. Pour the batter into the prepared baking pan, spreading evenly.
- Bake the Brownie Base: Bake in the preheated oven for 20 minutes. The brownies will still jiggle slightly but will be set on top.
- Add Toppings Layer: Remove the pan from the oven. Evenly layer half of the nuts, half of the chocolate chips, half of the mini and regular holiday M&Ms, and then all the sweetened shredded coconut over the brownie base. Pour the sweetened condensed milk evenly over the toppings and gently spread to distribute it evenly. Sprinkle the remaining chocolate chips, M&Ms, nuts, and finally the holiday sprinkles on top.
- Finish Baking: Return the pan to the oven and bake for an additional 25 minutes, or until the edges turn golden and the center is set and beginning to brown. If the top starts browning too quickly, loosely cover with foil to prevent burning.
- Cool and Serve: Remove from oven and allow the bars to cool completely in the pan before cutting into 9 squares with a sharp knife.
- Store Properly: Store the cooled bars in a tightly sealed container at room temperature for up to one week to maintain freshness.
Notes
- Store at room temperature in an airtight container for up to one week; add parchment paper between layers to prevent sticking.
- Refrigerate for up to 2 weeks for longer freshness.
- For freezing, remove the brownies from the pan and wrap them tightly with plastic wrap and aluminum foil; freeze for up to 3 months. Individual squares can be wrapped and frozen for convenient treats. Thaw at room temperature for about an hour before enjoying.
- If the top browns too fast during baking, tent the pan with foil to prevent burning.
Nutrition
- Serving Size: 1 bar
- Calories: 420 kcal
- Sugar: 38 g
- Sodium: 140 mg
- Fat: 24 g
- Saturated Fat: 14 g
- Unsaturated Fat: 8 g
- Trans Fat: 0 g
- Carbohydrates: 50 g
- Fiber: 3 g
- Protein: 5 g
- Cholesterol: 85 mg
