
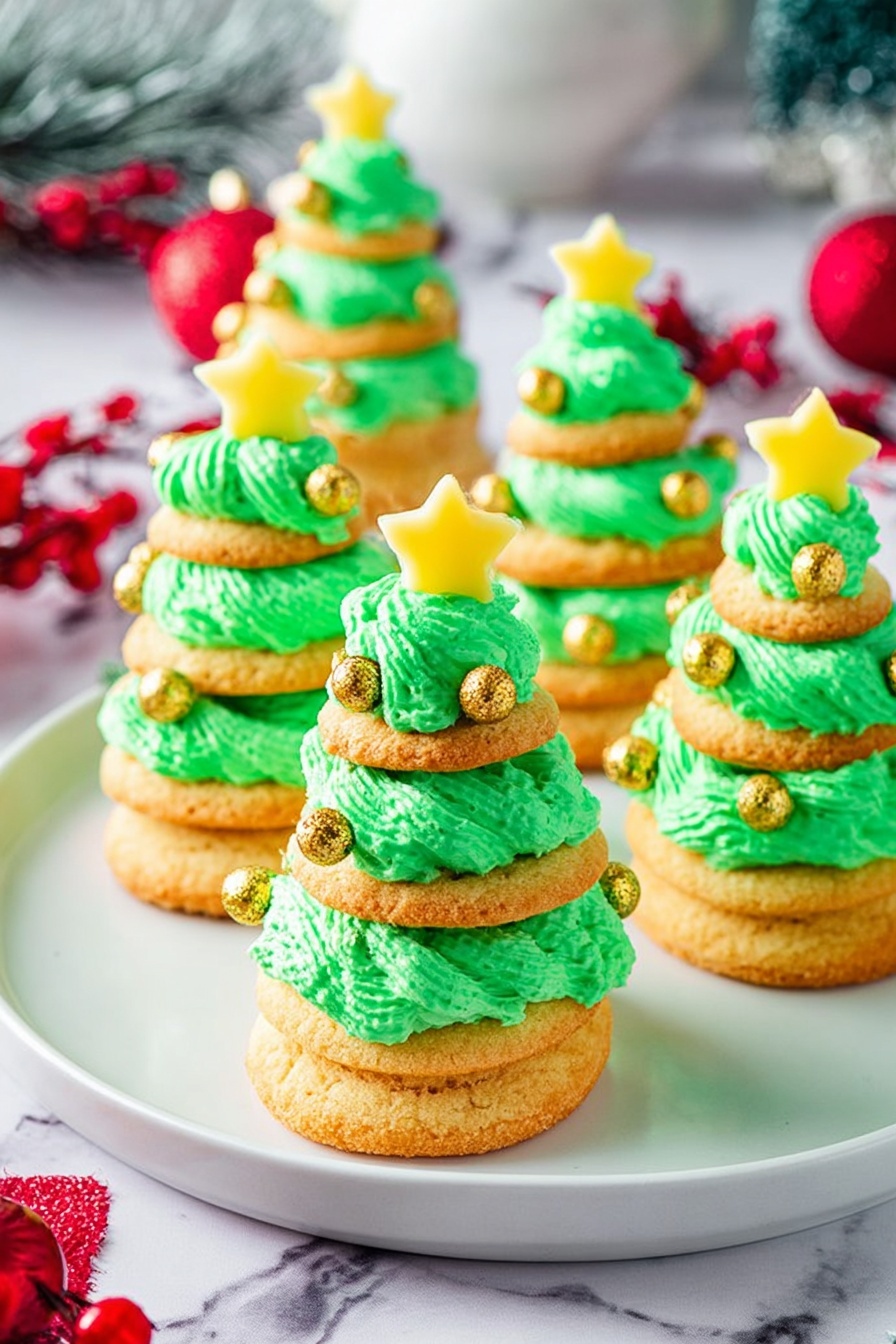
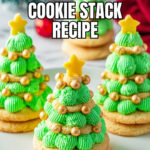
Christmas Tree Cookie Stacks with Buttercream Frosting Recipe
There’s something so magical about the holidays that makes me want to bake all things sweet and festive, and that’s exactly how my Christmas Tree Cookie Stacks with Buttercream Frosting Recipe was born. These adorable little stacks not only taste like a dream with that rich buttercream frosting, but they also turn your cookie platter into a winter wonderland centerpiece. Trust me, once you try this recipe, you’ll see why it’s become one of my all-time favorites for holiday gatherings, gifting, or just treating yourself!
Why This Recipe Works
- Perfectly Layered Texture: Using three sizes of cookies stacked together creates a delightful bite that’s both soft and sturdy.
- Classic Buttercream Frosting: The silky, rich frosting binds the cookie layers and adds a creamy sweetness that complements the buttery cookies.
- Festive Aesthetic: Decorating with star sprinkles and pearl-shaped toppings gives your cookie stacks a charming Christmas tree vibe that’s sure to impress.
- Flexible and Fun: From adjusting the cookie sizes to experimenting with your favorite sprinkles, this recipe invites customization without losing its festive charm.

Ingredients & Why They Work
Every ingredient in this Christmas Tree Cookie Stacks with Buttercream Frosting Recipe plays a specific role to give your cookies the perfect structure, flavor, and look. I always pay attention to the quality of butter and vanilla — it truly makes a difference in these simple, buttery cookies and silky frosting. Plus, using confectioners’ sugar both in cookies and frosting keeps everything tender and melt-in-your-mouth.
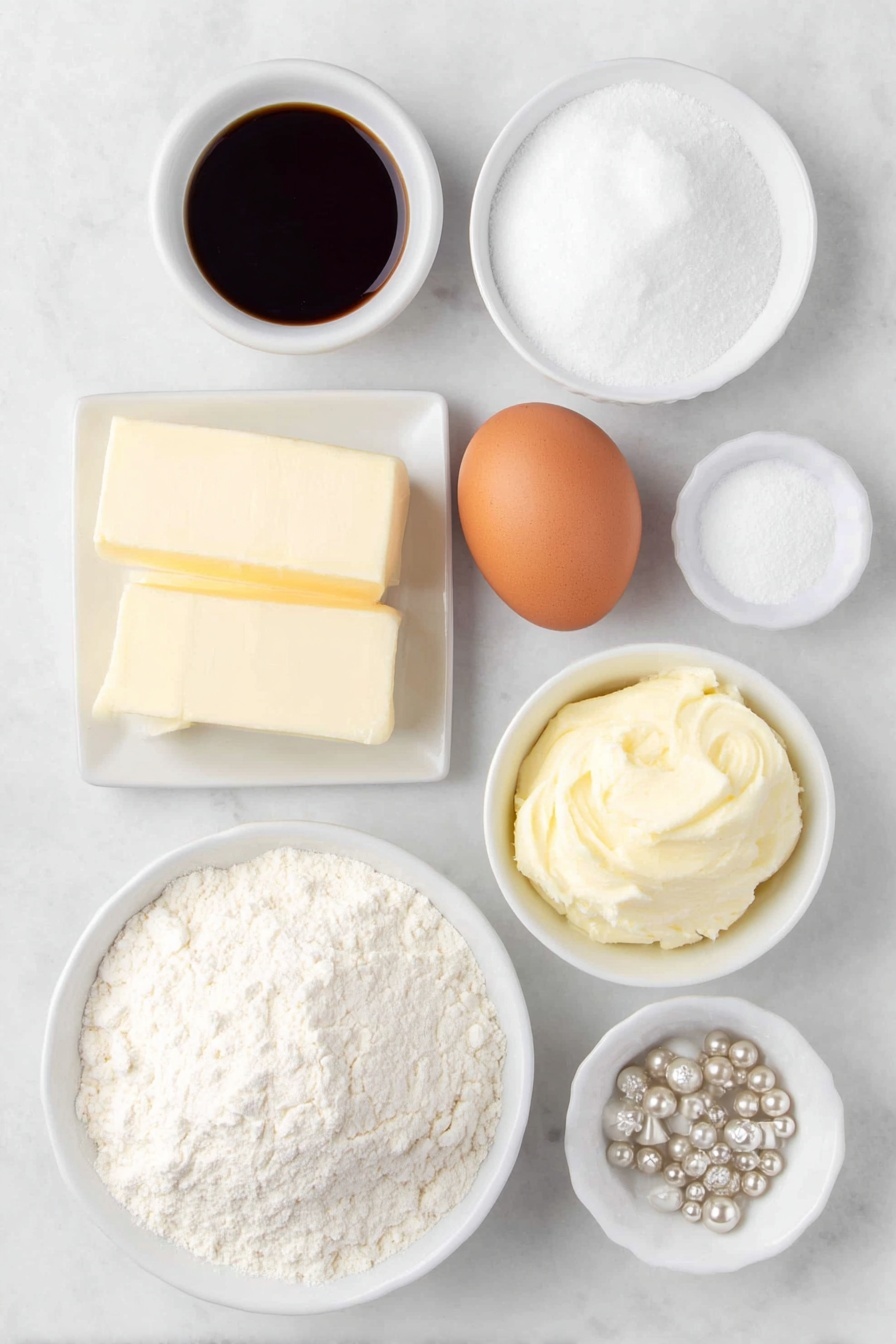
- Unsalted butter: Using unsalted butter lets you control the salt in the recipe and gives a rich, creamy base to both cookies and frosting.
- Confectioners’ sugar: This fine sugar smooths out the frosting and sweetens the cookies without grittiness.
- Egg: Acts as a binder to give the cookie dough structure and moisture.
- Vanilla extract: Adds warm, classic flavor that enhances the buttery richness.
- All-purpose flour: The foundation of the cookie’s texture; balances softness and structure.
- Baking soda: Helps the cookies rise just right for a tender crumb.
- Salt: Enhances the sweetness and balances the flavors.
- Green food coloring: Brings that beloved Christmas tree vibe to your frosting, adjustable to your desired shade.
- Yellow star sprinkles: Perfect for topping the cookie trees and adding festive sparkle.
- Silver and gold pearl-shaped sprinklers: These give your trees an elegant, magical finish.
Tweak to Your Taste
One thing I love about this Christmas Tree Cookie Stacks with Buttercream Frosting Recipe is how you can easily customize it to fit your taste or occasion. I often play around with the frosting color — sometimes going for a minty green, other times a deeper forest green. You can even add festive spices to the cookie dough or master your own decorating flair!
- Flavor twists: Adding a pinch of cinnamon or nutmeg to the cookie dough gives a cozy holiday warmth that I adore.
- Dietary tweaks: You can swap out butter for a plant-based alternative if needed; just be sure to adjust for texture and flavor.
- Decor variations: Swap the pearl sprinkles with tiny edible glitter or red and green jimmies to match your party theme.
Step-by-Step: How I Make Christmas Tree Cookie Stacks with Buttercream Frosting Recipe
Step 1: Cream Butter and Sugar
I start by beating the softened unsalted butter on high speed until it’s beautifully creamy and light—about 2 to 3 minutes. Don’t rush this; a good creaming ensures your cookies turn out tender and with the perfect crumb. Then, I add the confectioners’ sugar and continue beating until the mixture is fluffy and fully blended. One tip I found helpful: scraping down the sides of the bowl between steps keeps everything smooth and well combined, which makes mixing easier in the next steps.
Step 2: Add Egg and Vanilla
Next, I pop in the egg and pure vanilla extract. Beat everything together until it all looks beautifully combined — those rich scents start to make the kitchen smell like the holidays already. This step adds moisture and helps bind the dough together, so don’t skip or replace the egg without adjusting accordingly.
Step 3: Mix in Dry Ingredients
Now for the flour, baking soda, and salt—add these all at once and stir just until incorporated. Be gentle here! Overmixing can lead to tough cookies, and we want them soft and tender. I usually stop mixing the moment I see no more dry flour, then call it a day.
Step 4: Shape and Bake the Cookies
This is where the magic starts to take shape — literally! I divide the dough into three different ball sizes using spoons: 3 teaspoons (large), 2 teaspoons (medium), and 1 teaspoon (small). You’ll want about 20 balls of each size to make enough stacked trees. Carefully place them on lined baking sheets. For baking, I recommend doing one size at a time for the best oven control. The big ones bake around 10 minutes, the medium about 7-8, and the small only 5-6 minutes. When they look set and the edges are just firm, take them out—centers might look soft but will firm up as they cool. I learned early on that rotating the baking sheet halfway through in the center of the oven gives even browning and saves me from disappointment.
Step 5: Prepare the Buttercream Frosting
While the cookies cool, I whip up the buttercream frosting. Starting with softened butter, I beat it smooth and creamy for about 3-4 minutes. Then add the confectioners’ sugar in two parts, beating until each addition is fully incorporated. Vanilla and a pinch of salt come next, and finally, I add green food coloring drop by drop, mixing until I reach the perfect Christmas tree shade. This frosting is thick enough to hold the stack together beautifully, but still silky and spreadable.
Step 6: Decorate and Assemble the Cookie Stacks
Get your piping bag ready with a star tip (I usually go with the 1M, but any medium star tip works). Start by piping frosting onto the largest cookies, then the medium ones, and add a small swirl on the tiny cookies that will top your tree. Add a yellow star sprinkle at the very top, and decorate the sides with silver and gold pearl sprinkles or festive toppings of your choice. Stack them carefully — large base first, topped with medium, then small. You’ll feel so proud as your Christmas cookies start resembling tiny edible trees, perfect for any holiday get-together.
Pro Tips for Making Christmas Tree Cookie Stacks with Buttercream Frosting Recipe
- Bake One Sheet at a Time: This ensures even heat distribution and more consistent cookies rather than overcrowding your oven.
- Don’t Overmix the Dough: Overmixing activates gluten and can toughen your cookies; mix until just combined.
- Use a Timer and Oven Thermometer: Ovens vary, and this helped me perfect the baking time without guesswork.
- Cool Completely Before Frosting: If you frost warm cookies, the buttercream melts and your stacks won’t hold up.
How to Serve Christmas Tree Cookie Stacks with Buttercream Frosting Recipe
Garnishes
I love using yellow star sprinkles on the very top for that nostalgic Christmas tree “star” effect, and then a mix of silver and gold pearl sprinkles to add a touch of elegance and sparkle. Sometimes I switch it up with tiny red and green jimmies for a more colorful, playful vibe — it totally depends on the party mood! Adding a sprinkle of edible glitter gives an extra festive sparkle too.
Side Dishes
These cookie stacks pair wonderfully with classic holiday drinks like hot cocoa topped with whipped cream, or a cozy cup of mulled cider. I also like serving them alongside a simple cheese board or fresh fruit to balance the sweetness and add more variety to dessert tables.
Creative Ways to Present
For Christmas parties, I’ve arranged these cookie stacks on rustic wooden boards sprinkled lightly with powdered sugar “snow.” Another fun idea is presenting them upside down on a cake stand to mimic a mini Christmas forest. Placing them beside small pine cones or sprigs of fresh rosemary adds a natural holiday charm that guests always admire.
Make Ahead and Storage
Storing Leftovers
After decorating, I store these cookie stacks in an airtight container at room temperature. From experience, they keep well for about 3-4 days without losing their freshness or frosting texture. If your kitchen tends to be warm, the fridge works too — just let them come back to room temp before serving so the frosting softens up a bit.
Freezing
I don’t recommend freezing the fully decorated stacks due to the frosting’s texture, but freezing the plain baked cookies works a treat. Freeze them in a single layer in a zip-top bag or airtight container, then thaw and frost right before your event. This method saves so much prep time and keeps your cookies fresh.
Reheating
Since these are cookies, reheating isn’t really necessary. If you want to freshen them up slightly, I gently warm a cookie or two in the microwave for about 5 seconds, but only after removing the frosting. Otherwise, I enjoy them straight from room temp or fridge — the buttercream frosting taste is the star here!
FAQs
-
Can I make the Christmas Tree Cookie Stacks with Buttercream Frosting Recipe ahead of time?
Absolutely! You can bake the cookies up to a week in advance and store them airtight at room temperature or freeze them undecorated for longer storage. It’s best to frost them the day you plan to serve, so the buttercream stays fresh and looks its best.
-
What if I don’t have green food coloring?
If you don’t have green food coloring, you can use natural alternatives like matcha powder or spirulina to tint the frosting, but start with a small amount since they have strong flavors. Otherwise, you might consider using white frosting and decorate with colorful sprinkles for a snowy tree look.
-
Can I make these cookies gluten-free?
Yes, by substituting the all-purpose flour with a gluten-free blend designed for baking, you can adapt this recipe. Keep an eye on the dough’s consistency—it might need a little extra moisture or binding agent like xanthan gum, depending on your flour blend.
-
How can I avoid my cookies from spreading too much in the oven?
Make sure your butter is just softened and not melted when mixing, and chill the cookie dough balls briefly before baking if your kitchen is warm. Also, avoid over-greasing your baking sheets. Using parchment paper or silicone liners helps cookies keep their shape better.
-
What’s the best way to stack the cookies without them toppling over?
Use a generous amount of frosting as “glue” between each cookie layer, and make sure your cookies are fully cooled before stacking. Applying gentle pressure when stacking helps the layers adhere. If needed, refrigerate the stacks for a bit to firm up before moving or serving.
Final Thoughts
Looking back, these Christmas Tree Cookie Stacks with Buttercream Frosting Recipe have become my go-to holiday treat—not just because they look adorable but because they bring so much joy to those who eat them. It’s a recipe that’s truly made for sharing, whether at a festive party, as a thoughtful homemade gift, or a sweet little tradition with family. I hope you embrace the fun of baking, decorating, and especially eating these beautiful cookie stacks. Give it a try and watch how these little trees bring a whole lot of holiday magic right into your kitchen!
Print
Christmas Tree Cookie Stacks with Buttercream Frosting Recipe
- Prep Time: 30 minutes
- Cook Time: 10 minutes
- Total Time: 1 hour 10 minutes
- Yield: 20 servings
- Category: Dessert
- Method: Baking
- Cuisine: American
- Diet: Vegetarian
Description
Create festive Stacked Christmas Tree Cookies featuring buttery sugar cookies in three sizes, layered with creamy green buttercream frosting and topped with decorative sprinkles. Perfect for holiday celebrations as charming edible decorations or delightful treats.
Ingredients
Cookies
- ¾ cup unsalted butter, softened
- ¾ cup confectioners’ sugar
- 1 large egg
- 1 teaspoon vanilla extract
- 2 ¼ cups all-purpose flour
- 1 teaspoon baking soda
- ½ teaspoon salt
Buttercream Frosting
- 1 cup unsalted butter, softened
- 4 cups confectioners’ sugar
- 1 teaspoon pure vanilla extract
- ¼ teaspoon salt
- Drops green food coloring, as desired
Garnishing
- Yellow star sprinkles
- Silver and gold pearl-shaped sprinklers
Instructions
- Preheat Oven: Preheat oven to 350F and line at least 2 baking sheets with Silpat liners or parchment paper; set aside.
- Make Cookie Dough: In a stand mixer fitted with paddle attachment or bowl with hand mixer, beat ¾ cup softened butter on high speed until creamy, about 2 to 3 minutes. Scrape down sides.
- Add Sugar: Add ¾ cup confectioners’ sugar and beat until incorporated and creamy, about 3 minutes.
- Incorporate Egg and Vanilla: Add 1 large egg and 1 teaspoon vanilla extract; beat until well incorporated. Scrape sides.
- Add Dry Ingredients: Add 2 ¼ cups all-purpose flour, 1 teaspoon baking soda, and ½ teaspoon salt; beat until just combined. Avoid overmixing.
- Form Cookie Balls: Make dough balls in three sizes: 1 teaspoon, 2 teaspoons, and 3 teaspoons, approximately 20 balls each size totaling about 60 balls.
- Bake Cookies: Bake large (3 teaspoons) balls for about 10 minutes, medium (2 teaspoons) for 8 minutes, and small (1 teaspoon) for 6 minutes or until edges are set. Cool on baking sheets 10 minutes then transfer to wire rack to cool completely.
- Prepare Buttercream: Beat 1 cup softened butter on high speed until smooth and creamy, 3 to 4 minutes.
- Add Sugar to Frosting: Add half of 4 cups confectioners’ sugar and beat on medium speed until incorporated. Scrape sides. Add remaining sugar and beat again, scraping sides.
- Add Flavor and Color: Add 1 teaspoon vanilla extract and ¼ teaspoon salt; beat to combine. Add green food coloring drops incrementally until desired shade achieved.
- Pipe Frosting: Fit star tip (1M) in piping bag, fill with frosting. Pipe frosting onto large cookies, then medium cookies. Pipe a swirl on small cookies to resemble tree tops.
- Decorate: Top small cookies with yellow star sprinkles. Stack cookies largest to smallest to form tree shapes. Decorate trees with silver and gold pearl sprinkles or preferred decorations.
Notes
- Baking times vary with size and oven differences; watch cookies closely and bake until edges are set.
- After decorating, store cookies airtight in fridge for 1 to 2 weeks or at room temperature up to 4 days.
- For freezing, freeze baked but undecorated cookies in airtight containers; frost after thawing, not before freezing.
- Rotate baking sheets midway and bake one sheet at a time on center rack for best results.
Nutrition
- Serving Size: 1 cookie tree
- Calories: 210 kcal
- Sugar: 18 g
- Sodium: 70 mg
- Fat: 13 g
- Saturated Fat: 7 g
- Unsaturated Fat: 5 g
- Trans Fat: 0 g
- Carbohydrates: 22 g
- Fiber: 0.5 g
- Protein: 2 g
- Cholesterol: 35 mg
