Coffee Mousse Recipe
If you love the idea of a dessert that’s light, creamy, and packed with that wonderful coffee kick, then you’re going to absolutely adore this Coffee Mousse Recipe. It’s one of those recipes that feels fancy but comes together surprisingly quickly—and the best part? It’s perfect for impressing guests or just treating yourself after a long day. Trust me, once you try this, you’ll want to make it again and again.
Why This Recipe Works
- Balanced coffee flavor: The instant coffee dissolves perfectly, giving a rich yet smooth coffee taste without bitterness.
- Light, airy texture: Folding whipped cream gently into the coffee syrup keeps it fluffy and luscious.
- Simple, minimal ingredients: Easy to find pantry staples come together for maximum flavor with minimum fuss.
- Flexible chilling time: Whether you whip it up last minute or the night before, it sets beautifully every time.

Ingredients & Why They Work
The ingredients in this Coffee Mousse Recipe are thoughtfully selected to create that perfect balance of creamy sweetness and bold coffee flavor. I always recommend investing in a good quality instant coffee granule because it really makes all the difference here.

- Instant coffee granules: Dissolve quickly and provide that authentic, intense coffee taste without brewing.
- Water: Helps dissolve the coffee and gelatin gently on the stove.
- Sugar (caster or granulated): Sweetens the mousse while also smoothing the texture.
- Powdered gelatine: Essential for setting the mousse perfectly without making it too firm.
- Vanilla extract: Adds warmth and balances the coffee flavor beautifully.
- Cold whipping cream: Whipped just right, it creates that airy, creamy texture.
- Cocoa or chocolate shavings: A classic finishing touch that adds a bit of texture and extra flavor.
Tweak to Your Taste
I love how versatile this Coffee Mousse Recipe is—there’s so much room for you to make it your own! Whether you prefer a bolder coffee punch or a subtler vanilla twist, you can easily adjust it. Don’t be shy about experimenting.
- Extra coffee kick: I sometimes increase the coffee granules to 5-6 teaspoons when I’m in need of a strong wake-up call, and it’s like a sweet latte in mousse form.
- Dairy-free option: I’ve tried coconut cream whipped to stiff peaks as a substitute, and while texture changes slightly, it’s delicious and inclusive.
- Alcohol infusion: A splash of coffee liqueur or Kahlúa stirred in with the syrup adds a grown-up twist that guests always love.
- Chocolate variation: Mixing in a little melted dark chocolate with the coffee syrup before folding in cream makes it richer and more decadent.
Step-by-Step: How I Make Coffee Mousse Recipe
Step 1: Gently dissolve gelatine and coffee
Start by placing the water in a medium saucepan over low heat. Sprinkle the gelatine evenly over the surface—that’s a little trick to help it bloom and dissolve smoothly. Stir constantly with a silicone spatula to rub the gelatine against the pan sides, ensuring no lumps. Don’t let it boil! Once fully dissolved, add the instant coffee granules and sugar, stirring until the sugar melts completely and the mixture thickens slightly. This gentle stirring and low heat create the smooth coffee base you want for the mousse.
Step 2: Cool your coffee mixture
Pour the coffee syrup into a large mixing bowl and pop it into the fridge for about 15-20 minutes. You’re looking for it to cool down but not set like jelly—think thick syrup consistency. I always check the edge with my finger before moving on; if it feels just a bit sticky but not solid, you’re good.
Step 3: Whip your cream to perfection
While your coffee syrup cools, pour the cold whipping cream into a large bowl. Using an electric mixer (or balloon whisk if you’re feeling ambitious), whip until firm peaks form. Be careful not to overwhip—when the peaks hold their shape but still feel silky, stop. Overwhipping can make it grainy, and no one wants that.
Step 4: Blend the flavors with care
Stir the vanilla extract into your cooled coffee syrup. Then, add a quarter of the whipped cream to the syrup and stir gently to loosen it. This first addition makes it easier to combine the rest without deflating. Next, add another quarter and switch to a gentle folding motion—lift from the bottom and fold over the top, preserving that precious air. Repeat with the remaining cream in two parts. You’ll know it’s ready when the mixture is light, fluffy, and can hold its shape rather than settling back down.
Step 5: Chill and serve
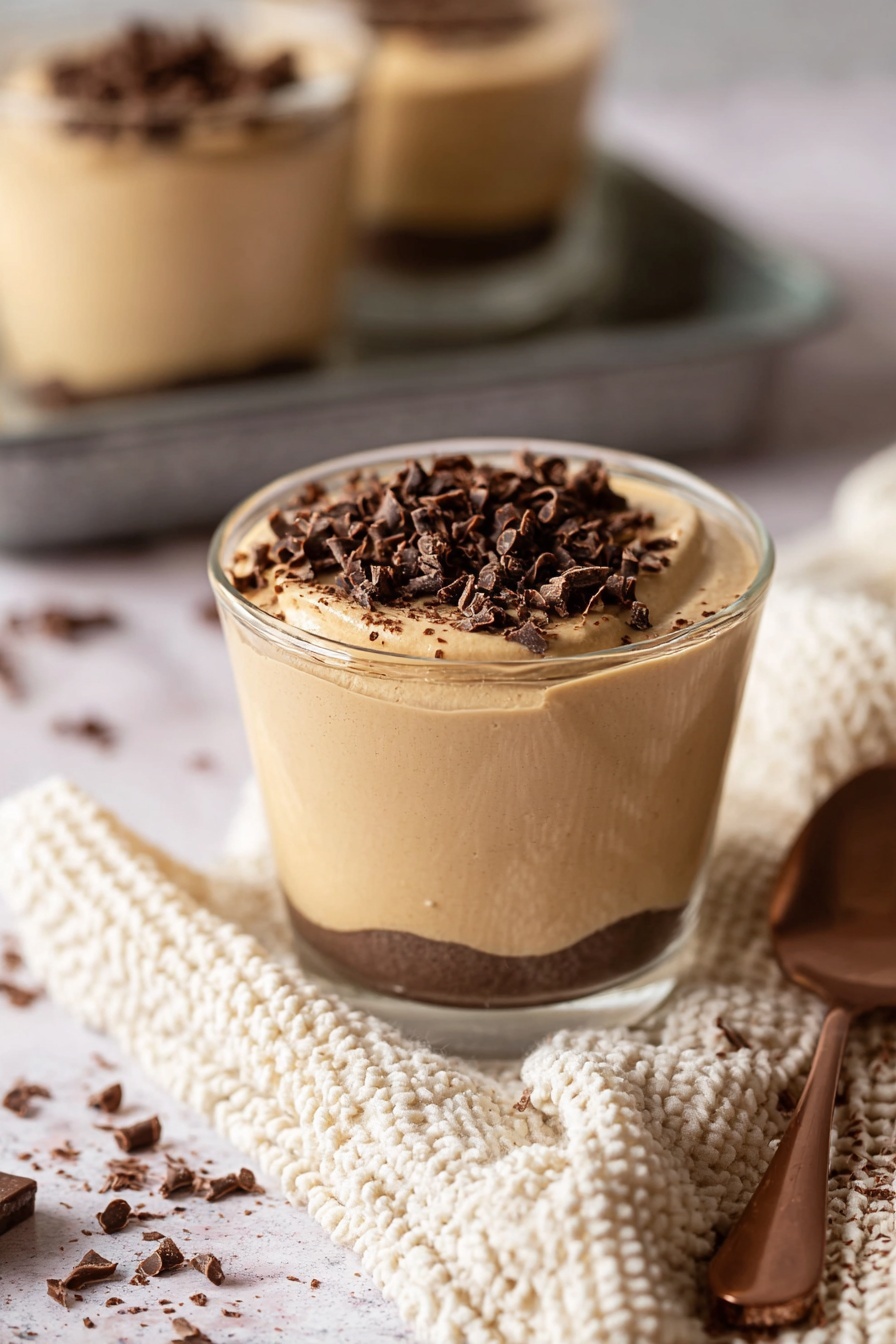
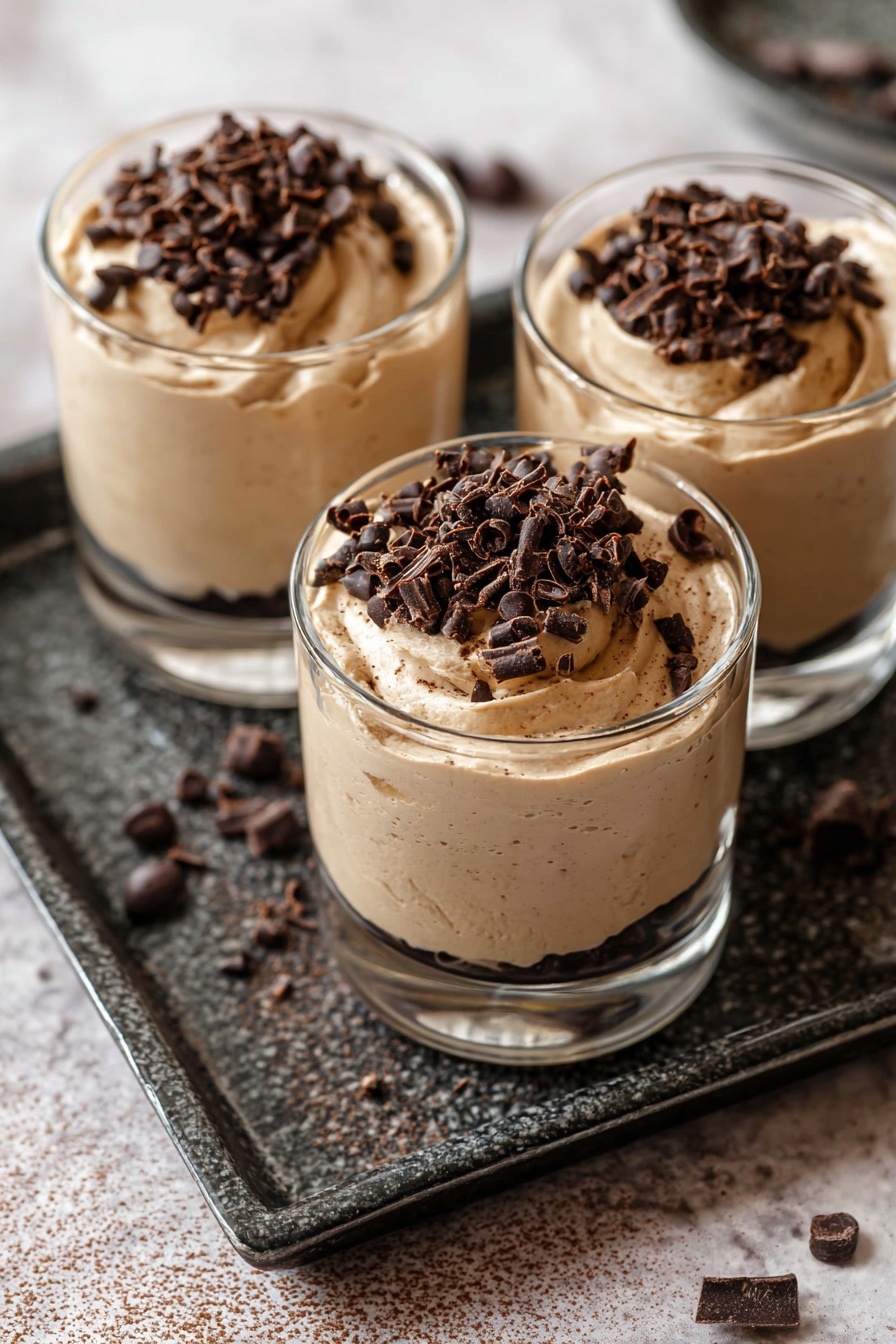
Divide your luscious coffee mousse evenly into dessert glasses or bowls. Chill them for at least two hours, or better yet, overnight—the chilling helps the flavors develop and the texture to set just right. When you’re ready to serve, sprinkle cocoa powder or chocolate shavings on top for that perfect finishing touch. If you want a touch of elegance, a few coffee beans or a tiny sprig of mint add a lovely visual contrast.
Pro Tips for Making Coffee Mousse Recipe
- Bloom Your Gelatine Properly: Sprinkling gelatine over cold water first helps it dissolve evenly and avoids lumps in the mousse.
- Don’t Overheat the Coffee Syrup: Keep the heat low and don’t let it boil; boiling can affect the coffee’s flavor and gelatine setting.
- Whip Cream to the Right Consistency: Stop whipping once firm peaks form to keep the mousse smooth and silky.
- Fold Gently to Preserve Air: Use a gentle folding technique to keep the mousse light and fluffy, avoiding deflating the whipped cream.
How to Serve Coffee Mousse Recipe
Garnishes
I’m a big fan of keeping it simple with garnishes—light dustings of cocoa powder or a handful of chocolate shavings add a delightful touch of elegance and texture. Sometimes I toss on a few coffee beans for a rustic, aromatic tweak, or even fresh mint leaves for a pop of color. These little details really make it feel special when serving friends.
Side Dishes
This coffee mousse pairs beautifully with anything light and fresh—think crisp biscotti, almond tuile cookies, or fresh berries. I’ve also enjoyed it alongside a simple fruit compote or a drizzle of caramel sauce for a contrast of flavors.
Creative Ways to Present
For a pretty party presentation, I like layering the coffee mousse with crushed chocolate cookies or a sprinkle of toffee bits in clear glasses—it adds texture and looks stunning. Alternatively, you can pipe the mousse into fancy dessert cups with a star-shaped tip for a beautiful swirl on top, finished with a dusting of espresso powder.
Make Ahead and Storage
Storing Leftovers
I usually keep leftovers covered tightly in the fridge for up to 2 days, and it holds its texture wonderfully. Just make sure to cover it well so it doesn’t absorb fridge odors.
Freezing
Freezing coffee mousse isn’t my favorite because the cream can separate when thawed, making the texture a little grainy. However, if you must, store it in an airtight container and thaw slowly in the fridge overnight before serving.
Reheating
This dessert is best served chilled, so reheating isn’t necessary. However, if it feels too firm after chilling, letting it sit at room temperature for 10-15 minutes helps soften it back to a perfect spoonable texture.
FAQs
-
Can I use brewed coffee instead of instant coffee granules?
Absolutely! You can substitute the instant coffee and water with about 1/4 cup of strong brewed espresso or coffee. Just omit the water from the recipe to keep the balance right. This gives a smoother, freshly brewed coffee flavor that some prefer.
-
How do I make sure my coffee mousse is light and not dense?
The key is in gently folding the whipped cream into the coffee syrup to preserve the air you’ve whipped in. Avoid stirring too vigorously or overwhipping the cream, which can lead to a dense texture. Patience and a light hand go a long way here!
-
Can I prepare coffee mousse ahead of time?
Yes! One of my favorite things about this Coffee Mousse Recipe is how well it sets overnight. Just cover and refrigerate for at least 2 hours, or up to 24 hours, to develop the best texture and flavor.
-
What’s the best way to serve coffee mousse?
Serve chilled with a dusting of cocoa or chocolate shavings. Pair it with crunchy cookies or fresh fruit for contrast. Presentation in clear glasses makes it visually stunning and inviting.
Final Thoughts
This Coffee Mousse Recipe quickly became one of my go-tos whenever I want a dessert that feels indulgent but isn’t heavy. It’s like a hug in a glass—smooth, creamy, and with just the right coffee boost. If you’d asked me before how hard it would be to nail a mousse at home, I’d have been intimidated. But this recipe proves it’s doable and delicious every time. So go ahead, give it a try for your next coffee break, dinner party, or when you just need a special treat—you won’t be disappointed!
Print
Coffee Mousse Recipe
- Prep Time: 10 minutes
- Cook Time: 5 minutes
- Total Time: 2 hours 30 minutes
- Yield: 6 servings
- Category: Dessert
- Method: Stovetop
- Cuisine: International
- Diet: Vegetarian
Description
This Coffee Mousse recipe offers a light and fluffy dessert infused with rich coffee flavor. Made using instant coffee granules, gelatin, and whipped cream, it creates a decadent and airy treat topped with cocoa or chocolate shavings, perfect for coffee lovers seeking a smooth and creamy dessert.
Ingredients
Coffee Syrup
- 1 tablespoon instant coffee granules (4 tsp)
- ¼ cup water
- ¾ cup caster sugar or white granulated sugar
- ½ teaspoon powdered gelatine
- 1 teaspoon vanilla extract
Whipped Cream
- 1 ½ cups whipping cream, cold
To Serve
- Cocoa or chocolate shavings
Instructions
- Dissolve Gelatine: Place the water into a medium saucepan over low heat and sprinkle the gelatine over the top. Stir constantly using a silicone or rubber spatula until the gelatine is fully dissolved. Avoid boiling the mixture.
- Add Coffee and Sugar: Add the instant coffee granules and sugar to the dissolved gelatine mixture. Continue stirring gently until the sugar completely dissolves, making sure the mixture does not boil.
- Chill Coffee Syrup: Transfer the coffee mixture to a large mixing bowl and refrigerate for 15 to 20 minutes until it is cooler than room temperature. It should thicken into a syrup but not set as jelly.
- Whip Cream: Pour the cold whipping cream into a separate large bowl and beat with an electric mixer or balloon whisk until firm peaks form. Be careful not to overwhip to avoid graininess; the peaks should just hold their shape.
- Add Vanilla: Stir the vanilla extract into the cooled coffee syrup.
- Combine Mixtures: Add one quarter of the whipped cream to the coffee syrup and stir gently to loosen it. Then add another quarter of the whipped cream and fold it in gently by lifting from the bottom and folding over the top, to keep air in the mixture.
- Fold Remaining Cream: Repeat the folding process two more times with the remaining cream until the mousse feels light and fluffy and holds its shape without settling.
- Chill Mousse: Divide the mousse evenly between small dessert glasses or bowls. Refrigerate for at least 2 hours or overnight to set.
- Serve: Before serving, sprinkle the mousse with cocoa powder or chocolate shavings for a decorative and flavorful touch.
Notes
- Use a standard 20ml tablespoon (equal to 4 teaspoons) to ensure accurate measurements.
- For stronger coffee flavor, increase instant coffee granules to 5-6 teaspoons or substitute the water with ¼ cup of strong espresso and omit the water.
- If using coffee powder instead of granules, reduce the quantity to 3 teaspoons to prevent bitterness.
- Be sure not to overwhip the cream; it should hold firm peaks but remain smooth.
- The nutrition details are approximate and may vary depending on ingredients used.
Nutrition
- Serving Size: 1 serving
- Calories: 270 kcal
- Sugar: 28 g
- Sodium: 40 mg
- Fat: 18 g
- Saturated Fat: 11 g
- Unsaturated Fat: 7 g
- Trans Fat: 0 g
- Carbohydrates: 24 g
- Fiber: 1 g
- Protein: 3 g
- Cholesterol: 70 mg


