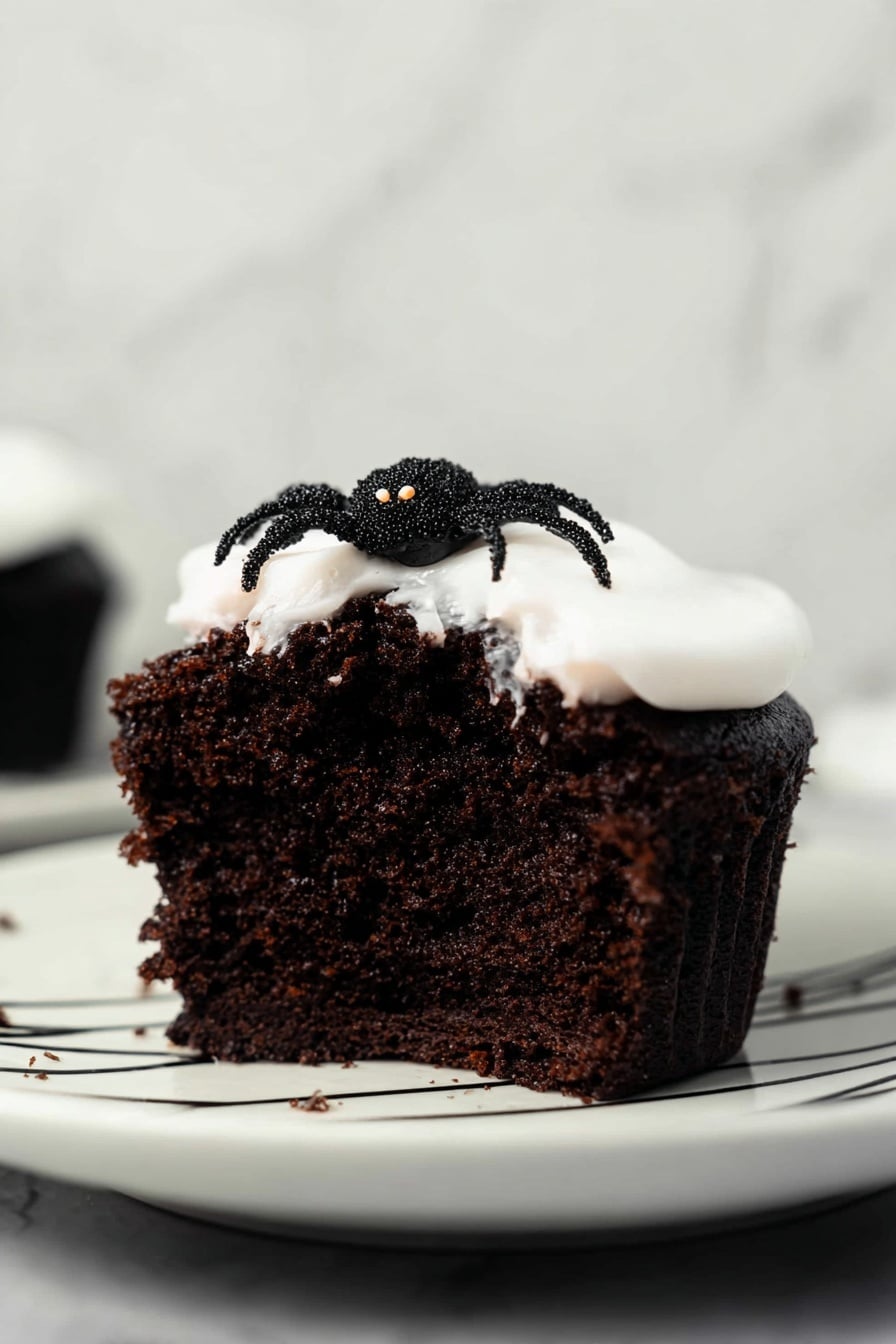
Creepy Halloween Spider Cupcakes Recipe
It’s that time of year when spooky treats steal the show, and I’m here to share a seriously fun and delicious recipe: the Creepy Halloween Spider Cupcakes Recipe. These cupcakes are not just eerie looking but also incredibly tasty, combining chocolate and pumpkin in a way that’ll have your guests coming back for more. If you’re ready to impress everyone at your Halloween party with a creepy crawl of spiders and moist cupcakes underneath, keep reading — I promise you, this recipe is fan-freaking-tastic!
Why This Recipe Works
- Perfect Texture Balance: The pumpkin puree keeps the chocolate cupcakes moist and tender, avoiding that dry crumb.
- Visual Impact: The black buttercream with spider decorations made from fondant and sprinkles makes a striking Halloween centerpiece.
- Flavor Harmony: The cocoa, pumpkin pie spice, and vanilla create a warm, comforting flavor that is just right for fall.
- Step-by-Step Friendly: I’ve included helpful notes and tips to make sure even your first attempt at spider cupcakes comes out beautifully creepy.

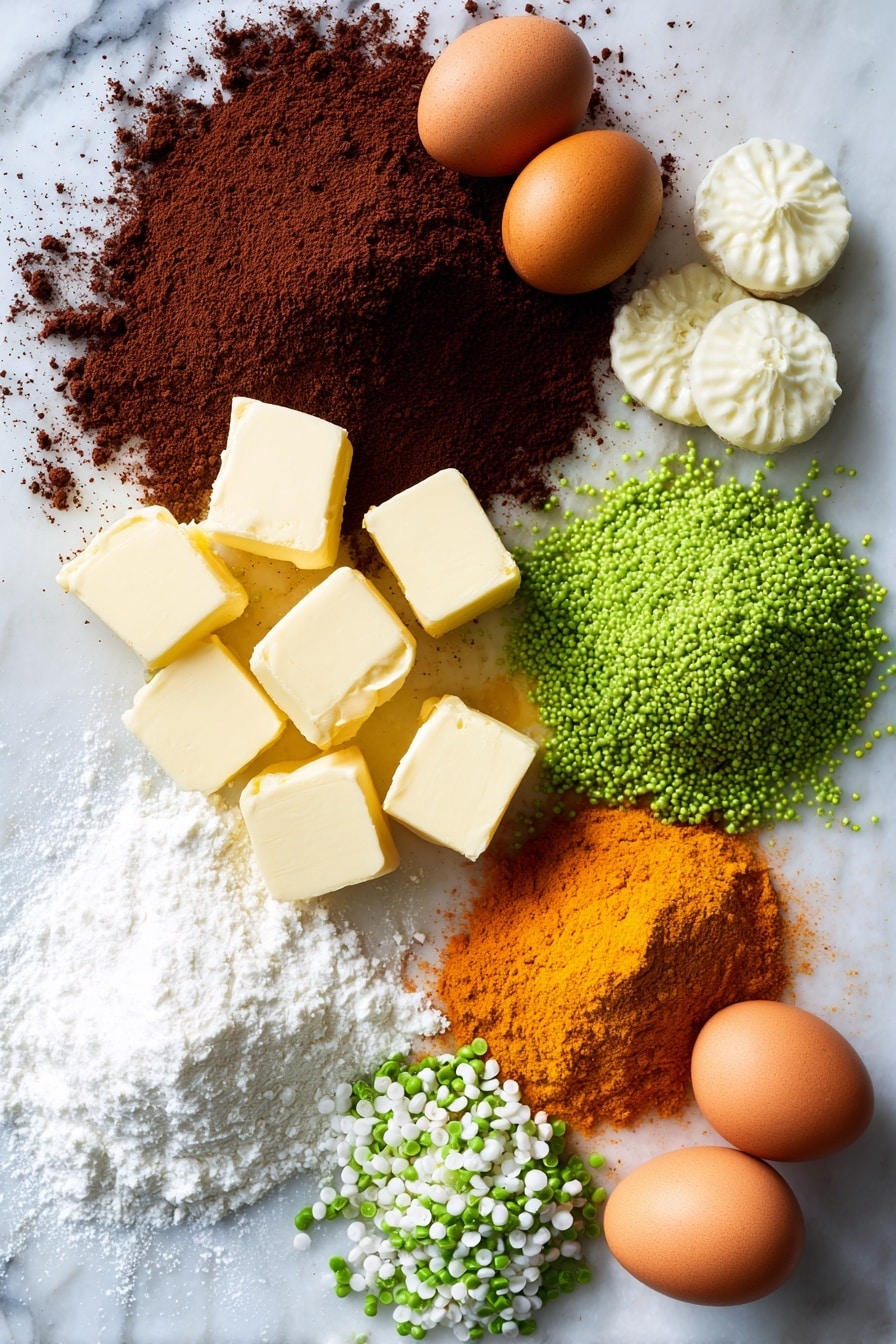
Ingredients & Why They Work
The magic of this Creepy Halloween Spider Cupcakes Recipe starts with the ingredients. Each one plays a role, whether it’s for structure, flavor, or that unmistakable creepy vibe. Plus, I’ve got some handy tips on picking the best pantry staples to get you cupcake-perfect results.
- Self-Raising Flour: This keeps your cupcakes light without needing extra leavening, perfect for a tender crumb.
- Cocoa Powder: Choose natural unsweetened for a rich chocolate flavor that pairs beautifully with pumpkin.
- Butter (Salted): Adds flavor and moisture; salted is great here because I like the balance it gives with the sweetness.
- Granulated Sugar: Uses regular sugar to provide sweetness and also helps create that tender texture when creamed with butter.
- Eggs: Bind everything together; beating them well ensures a nice rise and texture.
- Pumpkin Puree: Adds moisture, flavor, and a subtle richness; make sure to use pure pumpkin, not pumpkin pie filling.
- Milk: Helps thin the batter slightly for a soft crumb; whole milk gives the best richness.
- Baking Powder & Salt: Essential for lift and balance of flavor.
- Pumpkin Pie Spice: Key for that cozy, warm, festive flavor—don’t skip this!
- Vanilla Extract: Brings out all the flavors and adds a sweet aroma.
- Powdered Sugar: For smooth, silky buttercream.
- Black Cocoa Powder: Gives that deep black color to buttercream naturally, plus extra chocolate punch.
- Black Food Coloring: For intensifying the black color on frosting to make your spiders truly spooky.
- White Fondant: Perfect for shaping the spider legs and eyes; pliable and easy to work with for detailed decorations.
- Tiny Green Sprinkles: These are your spider’s creepy eyes — fun and super easy to apply with tweezers.
Tweak to Your Taste
I love to mix things up with this Creepy Halloween Spider Cupcakes Recipe. Sometimes I swap out the pumpkin pie spice for cinnamon-only or add a pinch of cayenne to the frosting to give it a sneaky kick. You can make these your own with little twists that suit your vibe.
- Variation: I once swapped butter for coconut oil in the buttercream, which gave a subtle coconut aroma — unexpected but totally worked with the pumpkin flavors.
- Dietary Modification: For a dairy-free version, use vegan butter and a non-dairy milk like oat or almond; the cupcakes still turn out super moist.
- Seasonal Changes: Switch pumpkin puree for sweet potato puree for a slightly different twist that still keeps the moist texture and fall vibes.
Step-by-Step: How I Make Creepy Halloween Spider Cupcakes Recipe
Step 1: Mixing the Dry Ingredients
Start by whisking together your self-raising flour, cocoa powder, pumpkin pie spice, baking powder, and salt. Sifting the mixture not only combines everything but also prevents lumps for a smoother batter. I like to set this aside while I prep the wet ingredients—it keeps the workflow easy and organized.
Step 2: Cream the Butter and Sugar
In a separate bowl, cream your butter and sugar together until it’s light and fluffy—usually about 2 minutes on medium speed. This step is crucial since it infuses air into the mixture, making your cupcakes nice and tender. Don’t forget to scrape the sides halfway through to ensure everything is evenly combined.
Step 3: Add Eggs and Pumpkin Puree
Add the eggs one at a time, beating thoroughly after each addition. This avoids curdling and helps with volume. Then, beat in the pumpkin puree — yep, the batter might curdle a bit here, but don’t worry, that’s normal and it won’t affect the final result.
Step 4: Fold in the Dry Ingredients and Milk
Gently fold half of your dry mixture into the wet ingredients, being careful not to overmix—overmixing can make cupcakes tough. Then add the milk and fold again, followed by the remaining flour mixture. Scrape down the bowl to catch any stubborn bits and add the vanilla extract for that lovely aroma.
Step 5: Bake the Cupcakes
Use a cookie or ice cream scoop to evenly portion the batter into cupcake liners—filling them about three-quarters full. Bake at 175°C (350°F) for 15-18 minutes. To check doneness, insert a toothpick; it should come out clean or with a few moist crumbs. Let them cool slightly in the tin before transferring to a rack to cool completely. Covering with a kitchen towel while they cool helps keep them moist.
Step 6: Make the Black Buttercream Frosting
Beat softened butter until creamy, then sift in powdered sugar and black cocoa powder. Give the mixture a light stir with a spatula before using the mixer to avoid the sugar flying everywhere. Beat until smooth and creamy, then add vanilla and beat again. The buttercream might initially look grayish — that’s totally fine; let it rest for 10-20 minutes to deepen the color. If it’s still not dark enough, add a few drops of black food coloring or mix red, green, and brown colors for a rich black. Let it rest again so the color intensifies.
Step 7: Decorate Your Creepy Halloween Spider Cupcakes
Load your buttercream into a piping bag fitted with a star tip, then pipe reverse stars in a circle on each cupcake for a textured webbed look. Roll out the white fondant thinly and cut circles (about 2 inches in diameter) to place in the center of your frosting — this is your spider’s web base. Then switch to a piping bag with a small round tip to pipe spider bodies: a bigger circle for the body, a smaller for the head, and add legs on each side. Use tweezers to carefully place tiny green sprinkles as the spider’s eyes. Trust me, these small details make your cupcakes come alive with creepiness!
Pro Tips for Making Creepy Halloween Spider Cupcakes Recipe
- Scrape, Scrape, Scrape: I always scrape my mixing bowl and beaters thoroughly after each step—this little effort ensures perfectly blended batter and frosting with no streaks.
- Don’t Panic at Curdling: When the batter curdles after adding pumpkin puree, it’s not a mistake—just keep folding gently and you’re good to go.
- Fondant Prep Is Key: Knead your fondant well before rolling it out and dust your surface with icing sugar to keep it from sticking or tearing.
- Keep Fondant Dry: Avoid refrigerating finished cupcakes as moisture can make the fondant soggy; keep them in a cool, dry place instead.
How to Serve Creepy Halloween Spider Cupcakes Recipe
Garnishes
I love keeping it simple with the spider’s black buttercream body, but those tiny green sprinkles for eyes add such a creepy-cute effect. Sometimes, I dust a bit of edible glitter or black sanding sugar around the edges — it catches the light and gives the illusion of a spooky shimmer on the spider webs.
Side Dishes
These cupcakes pair wonderfully with warm drinks like spiced apple cider or a rich hot chocolate — both add to the cozy spooky ambiance. For larger Halloween spread, think candy apples or caramel popcorn to keep the fall flavors consistent and fun.
Creative Ways to Present
I’ve had so much fun presenting these cupcakes on a black lace doily tray with plastic spiders scattered around for a theatrical touch. For a party, try serving them on a multi-tiered stand surrounded by dry ice for eerie fog effect — guests love the drama that brings to the table!
Make Ahead and Storage
Storing Leftovers
I usually store leftover spider cupcakes in an airtight container at room temperature for up to two days. Keeping them covered with a kitchen towel while cooling really helps maintain moisture, so nothing feels stale when you enjoy them later.
Freezing
If you want to freeze these creepy delights, I recommend freezing the unfrosted cupcakes wrapped tightly in plastic wrap and stored in a freezer bag. When you’re ready to indulge, thaw fully before decorating — frosting and fondant don’t freeze well and can get soggy.
Reheating
Since these are cupcakes meant to be eaten at room temperature, I usually don’t reheat leftovers. But if you prefer warm cupcakes, a 10-15 second zap in the microwave works — just be careful not to melt the fondant or buttercream!
FAQs
-
Can I use regular cocoa powder instead of black cocoa powder for the frosting?
You can use regular cocoa powder, but the frosting won’t be as dark. Black cocoa powder provides the intense black color and deeper chocolate flavor, which makes the spiders look extra creepy. If you only have regular cocoa, just add more black food coloring to achieve the darkness you want.
-
How do I prevent the fondant from getting soggy on the cupcakes?
Fondant can turn soggy due to humidity and condensation. Avoid refrigerating the decorated cupcakes; instead, store them in a cool, dry, air-conditioned room. Also, knead and roll the fondant well, and dust your workspace with icing sugar to keep it dry and smooth.
-
Can I make these cupcakes dairy-free or vegan?
Absolutely! Swap butter for vegan butter or coconut oil, use a plant-based milk like almond or oat, and replace eggs with flax eggs or other vegan egg substitutes. Keep in mind the texture might vary slightly but still delicious!
-
What’s the best way to pipe the spider legs?
Use a small round piping tip and a steady hand. Start piping one leg at a time on each side of the spider’s body. Keep your piping bag close to the cupcake to maintain control. If you struggle, practice on parchment paper first to get comfortable.
-
How long can I keep the decorated cupcakes fresh?
For best taste and texture, enjoy the cupcakes within 2 days when stored in an airtight container at room temperature. Beyond that, the fondant may start to dry out, and the cupcakes may lose some moisture.
Final Thoughts
This Creepy Halloween Spider Cupcakes Recipe is one of my favorite ways to bring some fun and fright to fall baking. There’s something so satisfying about creating spooky little spiders that taste as good as they look. Plus, it’s a great way to get kids involved in baking with a little Halloween magic. Give it a try — I promise this recipe brings joy, laughter, and maybe a little squeal or two from your guests. Happy haunting and happy baking!
Print
Creepy Halloween Spider Cupcakes Recipe
- Prep Time: 20 minutes
- Cook Time: 18 minutes
- Total Time: 1 hour 35 minutes
- Yield: 14 cupcakes
- Category: Dessert
- Method: Baking
- Cuisine: American
Description
Create spooky and delicious Creepy Halloween Spider Cupcakes featuring moist chocolate pumpkin cupcakes topped with black cocoa buttercream and decorated with white fondant spider webs and tiny green sprinkles for eyes. Perfect for a festive Halloween treat.
Ingredients
Chocolate Cupcakes
- 180 g self-raising flour
- 20 g cocoa powder
- 100 g salted butter
- 200 g granulated sugar
- 2 eggs
- 200 g pumpkin puree
- 100 ml milk
- ½ teaspoon baking powder
- ¼ teaspoon salt
- ½ teaspoon pumpkin pie spice
- 1 teaspoon vanilla extract
Buttercream
- 450 g powdered sugar
- 225 g salted butter
- 2 tablespoon black cocoa powder
- 2 tablespoon milk
- 1 teaspoon vanilla extract
- Black food coloring
Decoration
- 175 g white fondant
- Tiny green sprinkles (for the spiders’ eyes)
Instructions
- Preheat and Prepare: Preheat oven to 175°C and line a cupcake pan with muffin liners.
- Mix Dry Ingredients: Whisk together self-raising flour, cocoa powder, pumpkin pie spice, baking powder, and salt in a bowl. Sift and set aside.
- Cream Butter and Sugar: In a separate bowl, cream the butter and sugar on medium speed for about 2 minutes until light and fluffy, scraping sides and bottom halfway through.
- Add Eggs: Beat in the eggs one at a time thoroughly, scraping the bowl’s sides and bottom to ensure even incorporation.
- Combine Wet Ingredients: Beat in pumpkin puree until mixture slightly curdles, which is normal.
- Fold in Flour and Milk: Gradually fold half the dry flour mixture into wet ingredients, then fold in milk, followed by the remaining flour mixture. Avoid overmixing. Add vanilla extract and mix well.
- Fill Cupcake Liners: Scoop batter into liners, filling about three-quarters full for even baking.
- Bake: Bake cupcakes for 18 minutes or until a toothpick inserted in the center comes out clean. Let cupcakes rest in the pan for 1 to 2 minutes.
- Cool: Transfer cupcakes to a wire rack and cover with a kitchen towel to cool completely and retain moisture.
- Prepare Buttercream: Beat butter until smooth and creamy. Sift in powdered sugar and black cocoa powder, mixing lightly first then beating on medium speed until smooth. Scrape bowl and beaters.
- Add Flavor and Color: Add vanilla extract and beat. Let frosting rest 10-20 minutes for color to darken. If needed, add black food coloring or a mix of red, green, and brown gel colors; mix well and rest another 10-15 minutes.
- Fill Piping Bags: Transfer buttercream to a piping bag, then fit two more bags with star tip (#1M) and small round tip (#3) for decorating.
- Pipe Buttercream Stars: Using star tip, pipe a reverse star circle pattern atop each cooled cupcake.
- Cut Fondant Webs: Roll fondant to ⅛ inch thickness, cut 2-inch diameter circles, enough to cover all cupcakes, then place each on top of the piped buttercream in the center.
- Pipe Spider Bodies: Using round tip, pipe a small circle for spider body and a smaller circle as the head in front. Then pipe four legs on each side of the spider.
- Add Eyes: Using tweezers, attach two tiny green sprinkles for spider eyes to finish decoration.
Notes
- Scraping the bowl during mixing ensures proper ingredient incorporation.
- A cookie or ice cream scoop helps maintain consistent cupcake sizes.
- Adjust baking time if using different sized cupcake liners.
- Cover cupcakes with a kitchen towel while cooling to keep moist.
- Mixing sugar lightly before using a mixer prevents sugar dusting.
- Gel food colors are preferred over liquid to maintain frosting consistency.
- If buttercream is too much for one bag, divide between two bags for ease of decorating.
- Knead fondant well and dust workspace to prevent sticking when rolling.
- Cutter size for fondant webs can vary depending on cupcake size.
- Store decorated cupcakes in a cool, air-conditioned room to prevent fondant sogginess; avoid refrigeration.
Nutrition
- Serving Size: 1 cupcake
- Calories: 320 kcal
- Sugar: 30 g
- Sodium: 150 mg
- Fat: 16 g
- Saturated Fat: 9 g
- Unsaturated Fat: 6 g
- Trans Fat: 0 g
- Carbohydrates: 40 g
- Fiber: 3 g
- Protein: 4 g
- Cholesterol: 55 mg
