Easy Halloween Fudge Recipe
If you’re looking for a festive, fun, and downright delicious treat to wow your friends and family this season, you’re going to adore this Easy Halloween Fudge Recipe. It’s got that creamy, melt-in-your-mouth texture with the perfect pop of spooky colors to brighten up any Halloween spread. I tried this fudge last year for a little get-together, and honestly, it disappeared faster than I could serve it. Stick with me—I’ll walk you through every step and share tips to make sure your fudge turns out just right.
Why This Recipe Works
- Simple Ingredients: You only need a handful of pantry staples, making it super stress-free.
- Easy Color Customization: Divide, dye, and swirl for a festive look without complicated techniques.
- No Candy Thermometer Required: Melt and mix on low heat, perfect for beginners and kids.
- No-Bake Convenience: Set it in the fridge and skip the oven heat during already cozy fall days.

Ingredients & Why They Work
The magic starts with creamy white chocolate and sweetened condensed milk—the duo that delivers a ridiculously smooth and rich fudge base. Adding vegetable oil helps keep the melted chocolate silky when coloring. Halloween-themed sprinkles bring the charm without complicating flavors.

- White Chocolate: High-quality white chocolate melts smoothly and has just the right sweetness, crucial for silky fudge.
- Sweetened Condensed Milk: Adds creaminess and sweetness in one step, plus it helps the fudge set perfectly in the fridge.
- Food Coloring: Use gel or liquid food coloring for vibrant, spooky colors; gel tends to be more concentrated and less watery.
- Vegetable Oil: A little goes a long way in preventing the chocolate from seizing when mixed with color.
- Halloween Sprinkles or Candies: They add both texture and seasonal charm—go for spooky shapes or autumn colors!
Tweak to Your Taste
I love customizing this Easy Halloween Fudge Recipe to suit who I’m serving it to. Whether you want it extra colorful or a bit more decadent, there’s room to tweak without messing up the basics.
- Variation: Once, I swirled in a bit of pumpkin spice into the orange colored fudge—total game changer for the fall vibes!
- Dietary: You can swap white chocolate for dairy-free versions if needed—just be sure it melts just as smoothly.
- Seasonal Spin: Change the sprinkle colors for other holidays or birthdays; the base fudge is a true canvas.
Step-by-Step: How I Make Easy Halloween Fudge Recipe
Step 1: Line Your Pan and Prep Ingredients
First things first, grab an 8×8-inch tin and line it with baking paper—this helps you lift out the fudge cleanly later without any fuss. Having the ingredients prepped and ready saves time since the fudge comes together quickly.
Step 2: Melt White Chocolate and Condensed Milk
Break the white chocolate into chunks and place it in a saucepan with the sweetened condensed milk. Use low heat and stir gently but continuously. You’re aiming for a thick, glossy texture—this can take about 5–7 minutes. This slow melt is key; rushing or heating too high risks scorching or seizing.
Step 3: Divide and Color the Fudge Mixture
Once melted, pour the mixture evenly into four bowls. Now the fun begins! Add your black, orange, green, and purple food coloring—remember to add a few drops of vegetable oil in each bowl too. This little trick prevents the white chocolate from stiffening up when you stir the colors in.
Step 4: Layer the Colors in the Pan
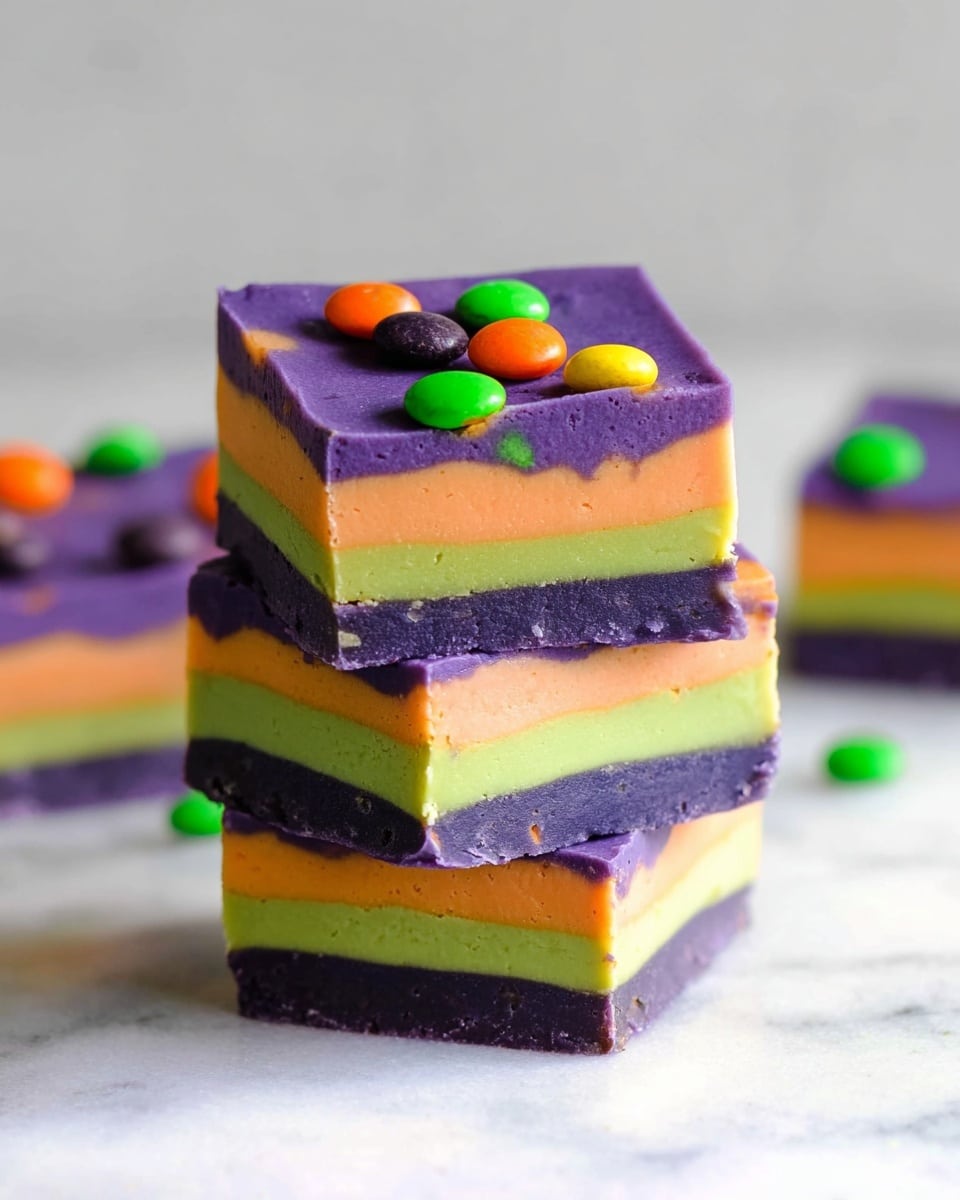
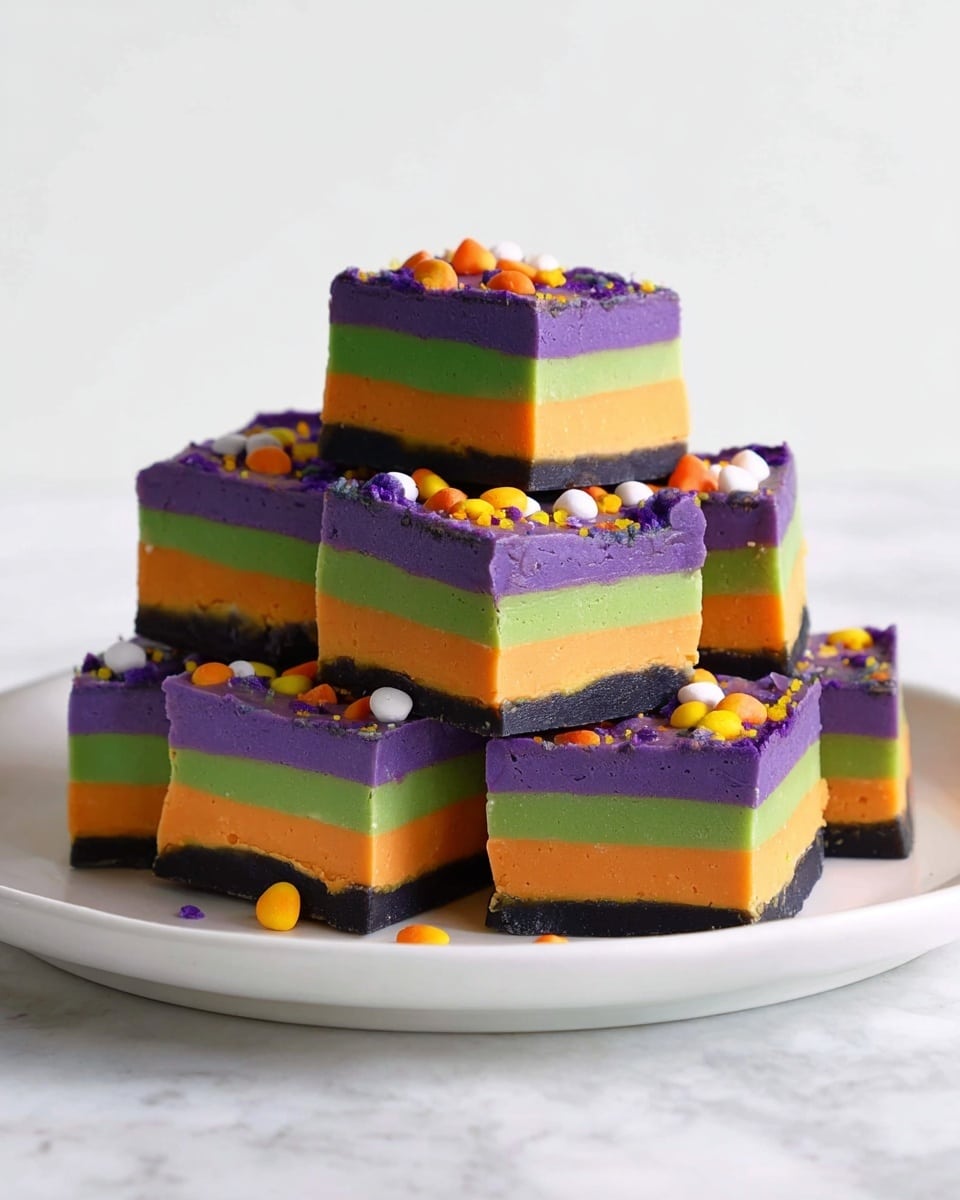
Spread each color into the lined tin one by one. Don’t worry if the fudge thickens while you work; a quick zap in the microwave for 10-20 seconds softens it right back up. Layering boldly really amps up the Halloween vibe and turns ordinary fudge into a party centerpiece.
Step 5: Sprinkle, Chill, and Cut
Top the layered fudge with your favorite Halloween sprinkles or candies for that festive crunch. Pop it into the fridge for at least 4 hours until it’s firm and easy to slice. Once chilled, lift the fudge out using the baking paper, cut into squares, and get ready to impress—or sneak a bite right away like I always do.
Pro Tips for Making Easy Halloween Fudge Recipe
- Gentle Heat: Always melt on low heat to prevent the chocolate from burning and becoming grainy.
- Oil Magic: Adding a few drops of vegetable oil when coloring keeps the fudge silky and prevents cracking.
- Microwave Trick: If your fudge gets too thick to spread, a quick 10-20 seconds in the microwave makes it smooth again.
- Use Fresh Colors: Older food coloring sometimes fades your colors; fresh vibrant gels will give you that eye-catching Halloween pop.
How to Serve Easy Halloween Fudge Recipe
Garnishes
I love topping this fudge with a festive mix of Halloween sprinkles—think tiny pumpkins, ghosts, and glittery bats. They add fun texture and make the fudge irresistible on a dessert platter. If you want to get creative, a drizzle of melted dark chocolate adds a nice contrast too.
Side Dishes
This fudge pairs beautifully with crisp apple slices or a simple cup of hot chocolate, especially on crisp fall evenings. I’ve also served it alongside pumpkin muffins and it was a big hit—combining creamy fudge with spiced pastries is a match made in Halloween heaven.
Creative Ways to Present
For our Halloween party, I arranged the fudge squares on a platter lined with black and orange tissue paper and scattered autumn leaves around. You could also pack individual fudge pieces into clear treat bags tied with festive ribbon—perfect for handing out or party favors!
Make Ahead and Storage
Storing Leftovers
Once your fudge is nicely set, store it in an airtight container in the fridge. It stays fresh and chewy for up to two weeks—plenty of time to enjoy or share. I like to layer parchment paper between pieces to avoid them sticking together.
Freezing
Freezing leftovers works well too. Wrap the fudge tightly in plastic wrap and then place it in a sealed freezer bag. When you want to enjoy some, just thaw overnight in the fridge—it keeps the texture just as delicious.
Reheating
I don’t recommend reheating fudge to serve but if your pieces got a little too firm, letting them sit at room temperature for 10-15 minutes softens them up nicely before serving.
FAQs
-
Can I use milk or dark chocolate instead of white chocolate for this Easy Halloween Fudge Recipe?
Absolutely! While the original recipe shines with white chocolate for that vibrant canvas of Halloween colors, you can swap in milk or dark chocolate. Keep in mind the colors might be less vivid with darker chocolates, and the fudge will have a richer, less sweet flavor profile.
-
What if my fudge seizes when adding food coloring?
This is a common hiccup. To prevent it, always add a few drops of vegetable oil alongside your coloring before stirring. If it happens, warming the mixture gently and stirring continuously usually helps smooth it out.
-
How do I get clean, neat cuts when slicing the fudge?
Chilling the fudge fully is essential for clean cuts. Use a sharp, thin-bladed knife, and for best results, warm the blade slightly by dipping it in hot water and wiping it dry before slicing. Wiping the knife clean between cuts also helps keep pieces neat.
-
Can kids help make this Easy Halloween Fudge Recipe?
Definitely! Kids love the coloring and decorating part. Just be sure to handle the melting step yourself or supervise closely, since it involves warm pans. This is a great family-friendly treat to make together.
Final Thoughts
This Easy Halloween Fudge Recipe has quickly become a seasonal favorite in my home because it brings such joyful, colorful fun with minimal fuss. Every time I make it, I’m reminded of why simple recipes with a creative twist end up being the most memorable. You’ll love how well it keeps, how easy it is to adapt, and how much your family and friends will adore each sweet, festive bite. So go ahead, grab those sprinkles, and make this Halloween extra sweet this year!
Print
Easy Halloween Fudge Recipe
- Prep Time: 15 minutes
- Cook Time: 10 minutes
- Total Time: 4 hours 25 minutes
- Yield: 16 servings
- Category: Dessert
- Method: Stovetop
- Cuisine: American
Description
This Easy Halloween Fudge recipe features creamy white chocolate fudge divided into spooky colors and topped with festive Halloween sprinkles. Perfect for parties and seasonal treats, it’s a quick stovetop dessert that sets firm in the fridge for a colorful, delicious sweet bite.
Ingredients
Fudge Base
- 450 g white chocolate (16 oz)
- 397 g sweetened condensed milk (14 oz)
- 1 teaspoon vegetable oil
Coloring and Decoration
- Black food colouring
- Orange food colouring
- Green food colouring
- Purple food colouring
- 2-3 tablespoons Halloween cake sprinkles or candies (e.g., Cake Decor spooky mix sprinkles)
Instructions
- Prepare the pan. Line an 8×8-inch tin with baking paper to prevent sticking and allow for easy removal of the fudge.
- Melt the chocolate. Break the white chocolate into chunks and place in a saucepan with the sweetened condensed milk. Heat over low stove heat while stirring gently until the chocolate melts and the mixture appears thick and glossy.
- Divide and color the fudge. Scoop the melted fudge mixture equally into 4 bowls. Add food colouring to each bowl to create black, orange, green, and purple fudge colors. Add a few drops of vegetable oil to each bowl to keep the mixture smooth and prevent seizing.
- Layer the fudge. Spread each colored fudge portion evenly into the lined tin, working one color at a time. If the fudge begins to thicken as you go, warm it briefly in the microwave for 10-20 seconds to regain smoothness.
- Add sprinkles and chill. Sprinkle the top with Halloween cake sprinkles or candies for a festive touch. Refrigerate the fudge for 4 hours until firm enough to cut.
- Serve. Remove the set fudge from the tin using the baking paper, cut into squares, and enjoy your colorful Halloween treat.
Notes
- Store the fudge in an airtight container in the refrigerator for up to 2 weeks to maintain freshness.
- If your fudge starts to harden while working with it, warming in short bursts in the microwave helps keep it smooth.
- For a thicker fudge, let it cool slightly before dividing and coloring.
- Feel free to substitute the sprinkles with your favorite Halloween candies or nuts for extra texture.
Nutrition
- Serving Size: 1 square (approx. 30 g)
- Calories: 130 kcal
- Sugar: 18 g
- Sodium: 20 mg
- Fat: 7 g
- Saturated Fat: 4 g
- Unsaturated Fat: 2 g
- Trans Fat: 0 g
- Carbohydrates: 15 g
- Fiber: 0 g
- Protein: 1 g
- Cholesterol: 5 mg
