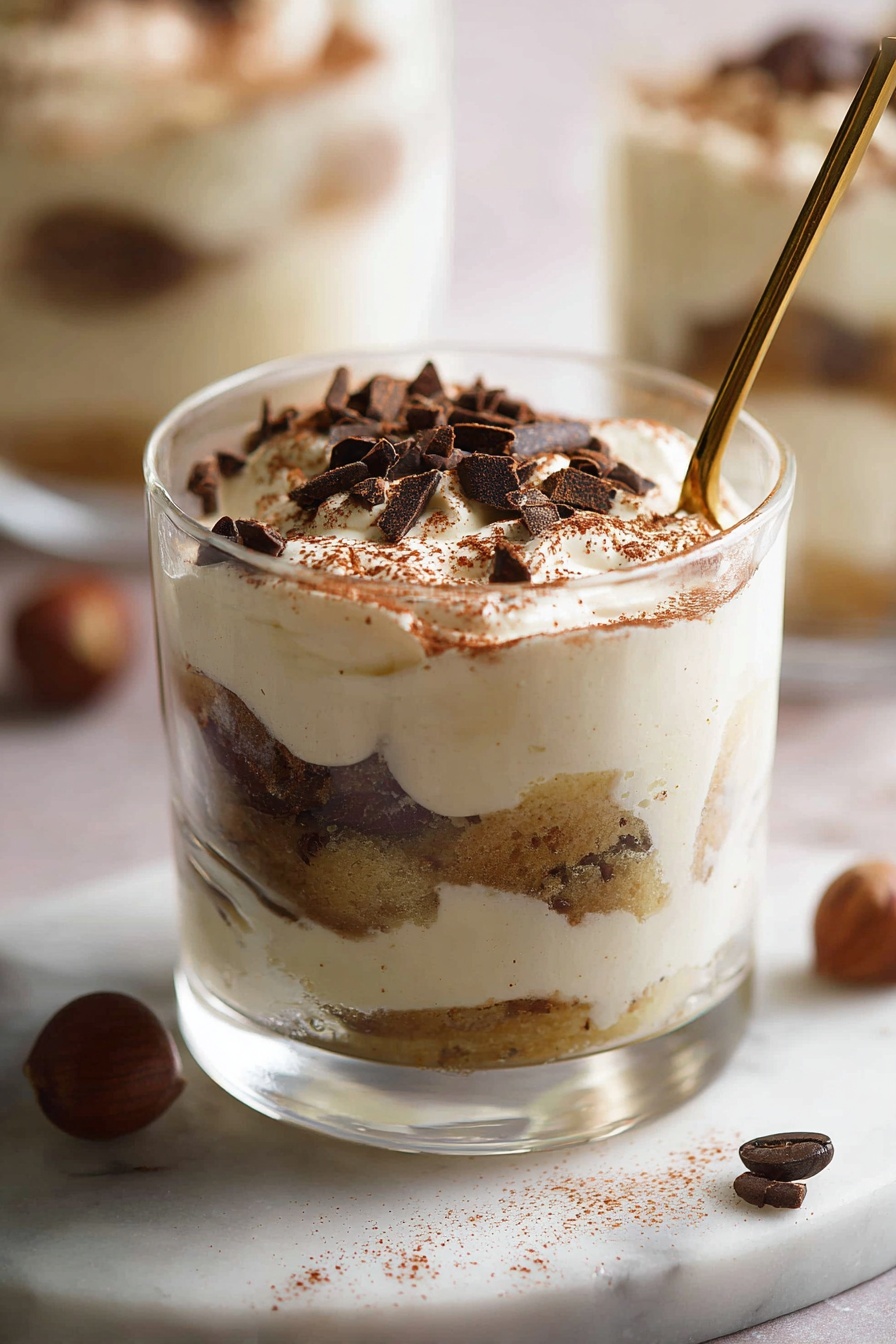
Easy Mascarpone Tiramisu Cups Recipe
If you’ve ever wanted to serve tiramisu but dreaded the fuss of slicing and layering a whole cake, then I’ve got something you’re going to love. This Easy Mascarpone Tiramisu Cups Recipe is my go-to for whipping up that classic Italian flavor in individual servings that feel fancy but are surprisingly simple. I remember the first time I made these cups—they were a total crowd-pleaser, and honestly, they saved me from spending hours fussing over a multi-layered tiramisu. Ready to impress your friends (or just treat yourself) without breaking a sweat? Let’s dig in!
Why This Recipe Works
- Individual Servings: Makes portion control easy and adds an elegant touch without extra effort.
- Simple Mascarpone Mousse: The mascarpone mixture is silky, rich, and whipped to just the right consistency—no complicated steps.
- Quick Soaking Method: Ladyfingers get dipped just long enough to soak flavor without getting soggy, so no mess or leaks.
- Flexible Ingredients: Optional extracts and liqueurs let you customize flavor without changing the base recipe.

Ingredients & Why They Work
Every ingredient in this Easy Mascarpone Tiramisu Cups Recipe has a job in making your dessert creamy, flavorful, and just the right texture. From mascarpone to ladyfingers, understanding why these work together helps you know what you can swap or tweak without losing that classic tiramisu magic.

- Mascarpone: This rich Italian cheese provides the creamy base—you want it at room temperature for easier mixing and a silky smooth texture.
- Heavy Whipping Cream: Adding this gives lightness and volume to the mascarpone mousse—chilled cream whips best and holds shape perfectly.
- Powdered Sugar: Sweetens the mousse effortlessly and dissolves completely, so you avoid any graininess.
- Vanilla Extract: Brings a warm, comforting aroma that balances the coffee and chocolate layers.
- Almond or Hazelnut Extract: Optional, but it adds a subtle nutty note that I personally love—it deepens the flavor.
- Espresso or Strong Coffee: The classic soak for ladyfingers. I recommend cooling it completely so it doesn’t melt the cream when dipped.
- Brandy or Marsala Wine (optional): Adds an adult twist and complexity, but you can skip or replace with more coffee for a non-alcoholic version.
- Ladyfingers: The delicate sponge that soaks up coffee without falling apart—ensure you dip them briefly to keep that perfect texture.
- Cocoa Powder: For dusting on top—unsweetened cocoa keeps it authentic and balances sweetness.
- Dark Chocolate Shavings (optional): Adds a bit of crunch and intense chocolate flavor—a small fancy detail that really elevates the presentation.
Tweak to Your Taste
The beauty of this Easy Mascarpone Tiramisu Cups Recipe is how easily it adapts to your flavor preferences. Like when I first made it, I tried swapping the almond extract with hazelnut—and it was a total hit! But feel free to get creative and make it your own.
- Decaf Version: I once made this with decaf espresso for a late-night treat—just as delicious without the caffeine kick.
- Non-Alcoholic: Skip the brandy and add a splash more coffee or a drop of vanilla extract to keep it flavorful but kid-friendly.
- Different Cookies: If ladyfingers aren’t available, try using pound cake cubes or even thin shortbread cookies for a different texture, but expect a slight flavor shift.
- Extra Chocolate: I love sprinkling a little extra shaved chocolate in between the layers when I’m feeling indulgent.
Step-by-Step: How I Make Easy Mascarpone Tiramisu Cups Recipe
Step 1: Whip the Mascarpone Mousse to Perfection
Start by combining mascarpone, cold heavy cream, powdered sugar, vanilla, and optional almond extract in a large bowl. Grab your handheld electric mixer and beat everything until it’s completely smooth and creamy. Take it slow here—if you over-mix, the mascarpone can curdle, so stop when you see soft peaks forming and the mixture feels fluffy but still rich. I like to test by lifting the beaters gently to see that luscious texture—it’s the heart of this tiramisu!
Step 2: Prep the Coffee Mixture
While the mousse is resting, mix your cooled espresso with brandy or your choice of liqueur in a shallow bowl. Keep the coffee cold—hot coffee will melt your cream layers and get soggy fast. I always make sure this step is done ahead, sometimes chilling the coffee mixture in the fridge to keep everything cool and refreshing.
Step 3: Assemble Your Tiramisu Cups
Grab your 12-ounce glasses or cups, and spread a spoonful of the mascarpone mousse on the bottom. Quickly dip two ladyfinger halves in the coffee mixture—just 1 to 2 seconds per side; they should be moistened but not soggy. Lay them on top of the cream layer, then add another layer of mascarpone mousse. Repeat with another layer of dipped ladyfingers and finish with a final layer of mousse. I usually go with two layers of ladyfingers and three layers of cream for a nice balance. Repeat until you’ve filled all six cups—this assembly feels like building your own dessert puzzle, and it’s so satisfying!
Step 4: Top and Chill
Sift a generous layer of unsweetened cocoa powder over the top of each cup and sprinkle with dark chocolate shavings if you’re using them. These little touches add that classic tiramisu look and a hint of bitter contrast. If you can, pop them in the fridge for at least 10 minutes to let the flavors marry—you can also make them up to 4 days ahead, which is a lifesaver for entertaining.
Pro Tips for Making Easy Mascarpone Tiramisu Cups Recipe
- Don’t Over-Soak Ladyfingers: Just a quick dip keeps them tender but prevents your cups from turning into coffee soup.
- Use Cold Heavy Cream: Chilled cream whips faster and holds those soft peaks longer, ensuring a fluffy mousse.
- Room Temp Mascarpone: It blends more easily and prevents lumps in your mousse for that perfectly smooth texture.
- Chill Before Serving: Letting the cups rest in the fridge helps flavors meld and creates a more cohesive dessert experience.
How to Serve Easy Mascarpone Tiramisu Cups Recipe
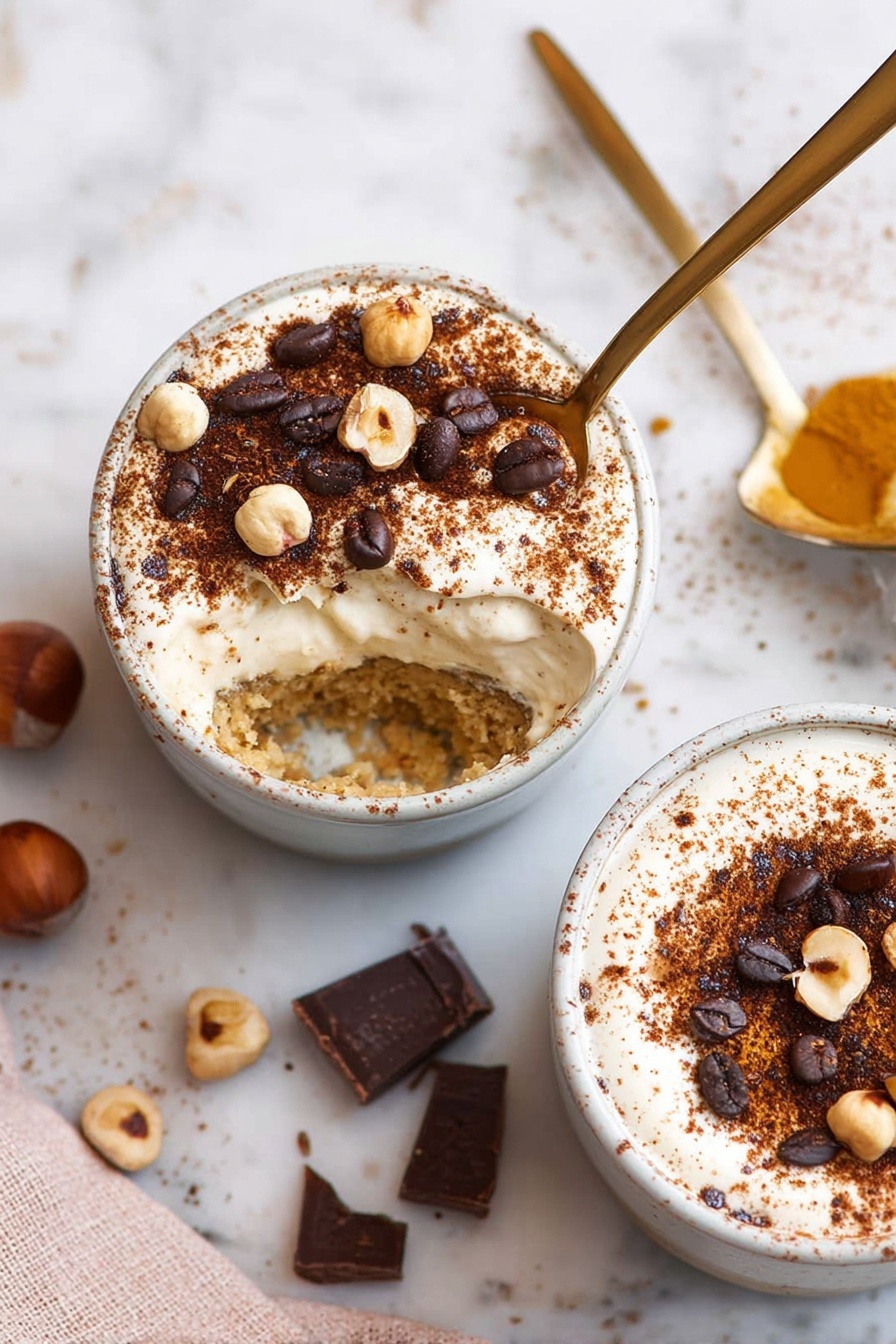
Garnishes
My go-to garnishes are a dusting of unsweetened cocoa powder paired with a few dark chocolate curls or even a single espresso bean perched on top for a touch of elegance—and yes, it makes you feel fancy! Sometimes, I like to add a sprinkle of freshly grated nutmeg or cinnamon if I want a spicy note that surprises guests in the best way.
Side Dishes
Though these tiramisu cups shine on their own, if I’m serving a full meal, I pair them with light sides like fresh berries or a simple almond biscotti on the side to keep things balanced. The fresh berries cut through the richness, making every bite feel fresh and inviting.
Creative Ways to Present
For special occasions, I’ve layered these tiramisu cups in clear glass jars tied with twine or placed them on a wooden board with a dusting of cocoa and edible flowers for added flair. These presentations are simple but make guests feel like you put in serious effort.
Make Ahead and Storage
Storing Leftovers
I cover the tiramisu cups tightly with plastic wrap and keep them in the fridge for up to four days. The flavors actually deepen over time, so leftovers taste even better the next day (if there’s any left!). Just make sure to store them upright to keep the layers perfect.
Freezing
If you want to prep well in advance, these cups freeze surprisingly well—wrap each one in plastic wrap and store them in an airtight container for up to 3 months. When I’ve frozen them, I usually thaw them in the fridge overnight, though some friends swear by serving them slightly frozen for a firmer, ice-cream-like texture.
Reheating
Since tiramisu is best served chilled, I don’t recommend reheating. Just take them out of the fridge about 10 minutes before serving to take the chill off but keep that creamy texture intact. If frozen, thaw overnight for best results, avoiding any microwaving to prevent the mousse from breaking down.
FAQs
-
Can I make Easy Mascarpone Tiramisu Cups Recipe without alcohol?
Absolutely! The alcohol adds flavor complexity, but you can simply omit it or replace it with extra espresso or a splash of vanilla extract. This keeps the dessert kid-friendly and perfect for anyone avoiding alcohol.
-
What can I use instead of ladyfingers?
Ladyfingers are traditional for their sponge texture and ability to soak up coffee without falling apart. That said, you can use pound cake, sponge cake, Nilla wafers, shortbread, or even Biscoff cookies as alternatives. Keep in mind each swap will subtly change the flavor and texture.
-
How long do these tiramisu cups last in the fridge?
They stay fresh and delicious for up to 4 days in the refrigerator when covered tightly. The flavors actually deepen and improve after a day, so don’t hesitate to make them ahead of time!
-
Can I prepare these tiramisu cups in larger or smaller glasses?
Yes! You can assemble tiramisu in any size glass you like. Just keep in mind that smaller glasses will be more like dessert shooters, while larger ones make for a full dessert portion. The layering process stays the same regardless.
Final Thoughts
This Easy Mascarpone Tiramisu Cups Recipe has been a staple in my dessert repertoire whenever I want something impressive but effortless. The freshest mascarpone, a quick dip of coffee-soaked ladyfingers, and a rich whipped cream base come together for a dreamy dessert that tastes like you spent hours crafting it. Whether it’s a weeknight treat or a festive gathering, I promise you’ll love how simple and delicious these cups are. Give it a try, and I’m betting it’ll become a favorite for you and your friends, just like it did for me!
Print
Easy Mascarpone Tiramisu Cups Recipe
- Prep Time: 10 minutes
- Cook Time: 0 minutes
- Total Time: 10 minutes
- Yield: 6 servings
- Category: Dessert
- Method: No-Cook
- Cuisine: Italian
Description
Delight in these Individual Tiramisu Cups featuring a luscious mascarpone mousse layered with espresso-soaked ladyfingers, topped with cocoa powder and dark chocolate curls. Perfectly portioned for six, these no-bake treats are easy to assemble and can be enjoyed immediately or chilled for intensified flavors.
Ingredients
Mascarpone Mousse:
- 8 ounces mascarpone at room temperature
- 1 cup heavy whipping cream cold from the fridge
- 1/2 cup powdered sugar
- 1/2 tablespoon pure vanilla extract
- 1/4 teaspoon almond extract or hazelnut extract (optional)
Other Ingredients:
- 2/3 cup cooled espresso or double-strength brewed coffee
- 2 tablespoons brandy or marsala wine, rum, hazelnut liqueur, almond liqueur, or coffee liqueur (optional; or you can use more espresso)
- 12 ladyfingers each broken in half
- 2 teaspoons unsweetened cocoa powder for topping
- 2 teaspoons dark chocolate curls or shaved dark chocolate (optional)
Instructions
- Prepare Mascarpone Mousse: Add all mascarpone mousse ingredients to a large bowl and use a handheld electric mixer to beat until smooth and creamy. Exercise caution to avoid over-mixing which can cause curdling.
- Mix Espresso and Liquor: Combine the cooled espresso and brandy (or chosen liquor) in a shallow bowl and stir to mix well.
- Assemble Tiramisu Cups: Spread a small amount of mascarpone mousse at the bottom of a 12-ounce glass. Dip 2 ladyfinger halves in the espresso mixture for 1 to 2 seconds per side ensuring they are saturated but not soaked, then place them over the cream layer. Add another layer of mascarpone mousse followed by another dipped ladyfinger layer, finishing with a final mascarpone mousse layer. Repeat the process for the remaining 5 glasses to yield 6 servings.
- Add Toppings: Sift unsweetened cocoa powder over the top layer of each glass and sprinkle with dark chocolate curls or shaved chocolate if desired.
- Chill and Serve: Refrigerate the tiramisu cups for at least 10 minutes before serving to allow flavors to meld. They can be stored covered in the refrigerator for up to 4 days or frozen for up to 3 months. Thaw before eating or serve frozen for an ice cream-like experience.
Notes
- For ladyfinger substitutions, consider sponge cake, pound cake, Nilla wafers, shortbread cookies, Biscoff cookies, or graham crackers; note that the flavor profile will vary.
- Use 12-ounce glasses for regular-sized dessert portions; however, glasses of any size can be used according to preference.
- Do not over-soak the ladyfingers in the espresso mixture to prevent sogginess and leakage.
- Chilling for longer periods (up to 4 days) enhances the flavor and texture.
- Freezing the cups creates a refreshing dessert similar to ice cream.
Nutrition
- Serving Size: 1 cup (approximate)
- Calories: 350 kcal
- Sugar: 20 g
- Sodium: 75 mg
- Fat: 25 g
- Saturated Fat: 15 g
- Unsaturated Fat: 8 g
- Trans Fat: 0.2 g
- Carbohydrates: 25 g
- Fiber: 2 g
- Protein: 6 g
- Cholesterol: 90 mg
