
Flourless Chocolate Cake with Ganache Recipe
If you’re craving a dessert that’s rich, decadent, and seriously impressive without a hint of flour, then this Flourless Chocolate Cake with Ganache Recipe is about to become your new best friend. This cake is so fudgy and chocolaty, it might just knock your socks off (it always does mine!). Whether you’re baking for a special occasion or just because you deserve it, I promise this recipe delivers results that will wow everyone at the table. Stick with me, and I’ll share all my tips so you nail it perfectly—every time.
Why This Recipe Works
- No Flour, No Fuss: Uses rich chocolate and eggs to create a dense, fudgy texture without any flour needed.
- Simple Ingredients: Pantry staples come together for something that feels indulgent but isn’t complicated at all.
- Room for Creativity: The ganache and optional whipped cream let you customize the finishing touch just how you like it.
- Trustworthy Technique: Step-by-step instructions make it easy to get that perfectly delicate, yet deeply chocolatey crumb every time.

Ingredients & Why They Work
This recipe uses a small list of ingredients that pack a punch working together. The star is of course the good-quality chopped chocolate, which melts into butter for a luscious base. Eggs are whipped to add lightness, while cocoa powder deepens the chocolate flavor. Here’s a quick run down of why each ingredient is worth noting—and some tips to get the best out of them.

- Unsalted Butter: Keeps the flavor pure and allows you to control salt precisely—plus gives the cake a silky smooth texture.
- Premium Chocolate Bar (60% or higher cacao): Using good chocolate here makes all the difference; it’s the whole flavor foundation of the cake.
- Instant Coffee (optional): Just a teaspoon enhances the chocolate’s richness without making it taste like coffee.
- Vanilla Extract: Adds depth and warmth to the chocolate flavor.
- Large Eggs (room temperature): They provide structure and lift when whipped, so don’t skip the room temp step for best results.
- Sugar: Sweetens without overpowering, balancing the bittersweet chocolate.
- Salt: Just a pinch to heighten all those cocoa notes.
- Unsweetened Cocoa Powder: Dusting the batter intensifies the chocolate punch and adds a lovely matte finish.
- Chocolate Ganache (optional): A creamy, glossy topping that adds luxury and moisture.
- Homemade Whipped Cream (optional): Lightens every bite and provides a soft contrast to the dense cake.
Tweak to Your Taste
I love making this cake my own, and you can too! Sometimes I swap in a little orange zest or a pinch of cinnamon for a seasonal twist. Don’t hesitate to play with the ganache flavor either—adding a splash of liqueur or a dash of chili powder can make it even more special.
- Orange Zest Variation: Adding fresh orange zest to the batter brightens the deep chocolate and is one of my favorite takes around the holidays.
- Dairy-Free Option: I’ve experimented with coconut oil instead of butter, and while the texture differs slightly, it still emerges delicious.
- Ganache Flavors: Try mixing in a bit of peppermint extract or a sprinkle of espresso powder in the ganache to completely change the vibe of the cake.
Step-by-Step: How I Make Flourless Chocolate Cake with Ganache Recipe
Step 1: Melting the Chocolate and Butter with Care
I start by chopping the chocolate coarsely—it helps it melt evenly without getting grainy. Then I microwave the butter and chocolate in 15-second bursts, stirring between each one so it melts smoothly. Don’t rush this step, because burnt chocolate is a real killer here. If you want, stir in the instant coffee and vanilla extract once it’s off the heat; those bring out the chocolatey goodness beautifully.
Step 2: Whipping Eggs and Sugar into Airy Perfection
In a clean, dry bowl, I beat the eggs, sugar, and salt together at high speed until they almost double in volume. This takes about 5 minutes with a hand mixer or less with a stand mixer—you want a pale, fluffy mix that holds soft peaks. This aeration is key to getting the cake’s signature texture.
Step 3: Marrying the Chocolate and Egg Mixtures
With the mixer on low, I drizzle the warm chocolate mixture slowly into the whipped eggs—this prevents scrambling the eggs or losing the air we just worked so hard to create. Then, I bump the speed back up briefly to blend everything together. The result is a glossy, rich batter that’s almost too good to put in the oven!
Step 4: Folding in Cocoa Powder and Baking
Sifting the cocoa powder over the batter keeps it lump-free, and I gently fold it in with a spatula to maintain as much air as possible. Then it’s loaded into a prepared springform pan lined with parchment paper and baked at 325°F (160°C) for about 30-35 minutes. Keep an eye on it—the edges should look set, but a slight jiggle in the center is exactly what you want.
Step 5: Cooling and Chilling for Ultimate Texture
Once baked, I let the cake cool completely at room temperature, then pop it in the fridge for at least 6 hours or overnight. This chilling step is crucial—it firms up the cake so you get clean slices and a dense, luxurious crumb that melts on your tongue.
Step 6: Adding Ganache and Finishing Touches
If you’re making the chocolate ganache, I prepare it ahead of time and let it cool for at least 15 minutes so it’s pourable but not runny. Spreading ganache over the chilled cake adds a glossy, silky finish that takes this cake from fabulous to next-level. I often top with a dollop of homemade whipped cream or fresh berries to balance the rich chocolate vibes.
Pro Tips for Making Flourless Chocolate Cake with Ganache Recipe
- Beat Eggs Thoroughly: Make sure you whip your eggs and sugar until they’re very fluffy—that’s what gives the cake its lift and delicate texture.
- Fold Gently: Incorporate the cocoa powder with gentle folding to keep the batter airy and light, avoiding dense spots.
- Use a Hot Knife for Slicing: Dip your knife in hot water and wipe dry each time before cutting—they’ll slice through smoothly without sticking or crumbling.
- Don’t Skip the Chill: Chilling the cake overnight sets the texture and makes it easier to slice, so try to plan ahead!
How to Serve Flourless Chocolate Cake with Ganache Recipe

Garnishes
I love to keep it simple and elegant by topping with a glossy layer of chocolate ganache, a few fresh raspberries or strawberries, and a cloud of lightly sweetened whipped cream. The fresh berries cut through the richness, and the whipped cream adds a dreamy softness that balances every bite beautifully.
Side Dishes
If I’m serving this cake at a dinner party, a scoop of vanilla bean ice cream or a dollop of mascarpone cheese alongside it is always a hit. A cup of rich espresso or a glass of full-bodied red wine also pairs wonderfully—basically, anything that can stand up to, and complement, intense chocolate.
Creative Ways to Present
For special occasions, I like to dust a bit of powdered sugar over the ganache or stencil a pretty design with cocoa powder on the whipped cream. Another fun idea I’ve done is layering the cake in small individual jars or glasses for an easy, elegant dessert presentation that guests love.
Make Ahead and Storage
Storing Leftovers
Once cooled and ganached, I store the cake covered tightly in the fridge. Wrapped well, it keeps moist and fresh for up to 4 days—though honestly, it rarely lasts that long around here!
Freezing
If you want to freeze it, slice the cake first and place parchment paper between layers to prevent sticking. Wrap tightly in plastic wrap and then foil. Frozen this way, it keeps well for up to 2 months and defrosts beautifully overnight in the fridge.
Reheating
I usually serve it chilled, but if you prefer it a little warmer, I let slices sit at room temperature for about 30 minutes or place them in a warm oven (around 250°F/120°C) for 5–7 minutes. The ganache softens up nicely without melting away.
FAQs
-
Can I use any type of chocolate for this Flourless Chocolate Cake with Ganache Recipe?
It’s best to use a good-quality eating chocolate with at least 60% cacao for deep flavor and smooth melting. Lower quality chocolates often contain fillers and can lead to a grainy texture. If possible, avoid baking chips since they contain stabilizers that may not melt as well.
-
Do I need to refrigerate the cake before serving?
Yes! Refrigerating the cake for at least 6 hours—or overnight—helps it set properly and makes slicing much easier. It also improves the texture by allowing flavors to meld beautifully.
-
Is this Flourless Chocolate Cake with Ganache Recipe suitable for gluten-free diets?
Absolutely! Since it contains no flour, this cake is naturally gluten-free, making it a perfect treat for anyone avoiding gluten.
-
Can I make this cake without the ganache?
Definitely. The cake is delicious on its own, thanks to its intense chocolate flavor and fudgy texture. Ganache simply adds a luscious, glossy finish, but you can also dust with powdered sugar or serve with whipped cream instead.
Final Thoughts
What makes this Flourless Chocolate Cake with Ganache Recipe so close to my heart is how effortlessly it turns simple ingredients into something truly special. Every time I make it, I get that warm feeling of accomplishment from pulling a stunning cake out of the oven—and sharing it with friends always feels like a little celebration. I hope you enjoy making and eating it just as much as I do. So go on, grab your chocolate, fire up that mixer, and treat yourself—you deserve it!
Print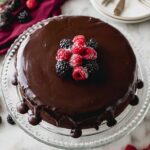
Flourless Chocolate Cake with Ganache Recipe
- Prep Time: 20 minutes
- Cook Time: 35 minutes
- Total Time: 6 hours 55 minutes
- Yield: 10 servings
- Category: Dessert
- Method: Baking
- Cuisine: American
- Diet: Gluten Free
Description
This Flourless Chocolate Cake is a rich, dense, and fudgy dessert made without flour, featuring premium dark chocolate and a silky texture. It’s perfect for chocolate lovers and is topped optionally with chocolate ganache and homemade whipped cream for an indulgent finish.
Ingredients
Chocolate Mixture
- 12 tablespoons unsalted butter (170 g)
- 6 oz coarsely chopped premium chocolate bar (60% Ghirardelli is recommended)
- 1 teaspoon instant coffee (optional)
- 1 teaspoon vanilla extract
Egg Mixture
- 4 large eggs, room temperature
- 1 cup sugar
- ¼ teaspoon salt
Dry Ingredient
- ½ cup unsweetened cocoa powder (50 g)
Optional Toppings
- 1 batch chocolate ganache
- Homemade whipped cream
Instructions
- Prepare Oven and Pan: Preheat your oven to 325 degrees Fahrenheit (160 degrees Celsius) and line the bottom of an 8-inch springform pan with parchment paper to prevent sticking.
- Melt Chocolate and Butter: In a medium heatproof bowl, combine butter and chopped chocolate. Microwave in 15-second intervals, stirring thoroughly between each, until completely melted and smooth. Stir in instant coffee and vanilla extract, then set aside to cool slightly.
- Beat Eggs, Sugar, and Salt: In a large bowl or a stand mixer fitted with the whisk attachment, combine eggs, sugar, and salt. Beat on high speed until the mixture doubles in volume, approximately 5 minutes with a hand mixer or 1 to 2 minutes with a stand mixer.
- Incorporate Chocolate Mixture: With the mixer on low speed, slowly drizzle the melted chocolate mixture into the egg mixture. Once combined, increase mixer speed and mix thoroughly until smooth and homogenous.
- Fold in Cocoa Powder: Sift the unsweetened cocoa powder over the batter. Using a spatula, gently fold it in until fully incorporated, taking care not to deflate the airy batter.
- Bake the Cake: Pour the batter into the prepared springform pan. Bake in the preheated oven for 35 minutes. The edges should be set and the center may appear slightly jiggly but not liquid.
- Cool and Chill: Allow the cake to cool completely at room temperature. Then, transfer it to the refrigerator to chill for 6 hours to fully set and develop flavor.
- Add Toppings and Serve: If using, pour chocolate ganache that has cooled for at least 15 minutes evenly over the cake before serving. Slice the cake using a knife warmed under hot water and dried between slices for clean cuts. Top with homemade whipped cream and berries if desired.
Notes
- Using room temperature eggs helps the batter to whip up better and achieve a lighter texture.
- If you don’t have a microwave, melt the chocolate and butter bain-marie style over simmering water.
- Sifting cocoa powder prevents lumps and ensures it folds in smoothly.
- The cake center may seem slightly underbaked, but it will firm up after chilling.
- Warm the knife blade before slicing to ensure clean, neat pieces.
- For the richest flavor, use a high-quality dark chocolate with at least 60% cocoa content.
- Optional instant coffee enhances the chocolate flavor without adding a coffee taste.
Nutrition
- Serving Size: 1 slice
- Calories: 380 kcal
- Sugar: 32 g
- Sodium: 100 mg
- Fat: 28 g
- Saturated Fat: 17 g
- Unsaturated Fat: 10 g
- Trans Fat: 0 g
- Carbohydrates: 32 g
- Fiber: 5 g
- Protein: 6 g
- Cholesterol: 150 mg


