Halloween Brownie Bites Recipe
If you’re hunting for a quick, crowd-pleasing dessert that’s bursting with spooky charm, then this Halloween Brownie Bites Recipe is your new best friend. These little brownie truffles are super easy to whip up, no oven required, and perfect for sharing—or sneaking a few before the party even starts. Trust me, once you try them, they’ll be flying off your plate faster than you can say “witch’s brew.” Let’s dive in and make Halloween extra sweet!
Why This Recipe Works
- No Baking Needed: You can whip these up with just a microwave, making them super convenient for last-minute gatherings.
- Perfect Bite-Sized Treats: These brownie balls are easy to pick up and munch, ideal for parties or packing into lunchboxes.
- Customizable Fun: The sprinkle coating lets you get creative—make them spooky, colorful, or elegant based on your mood or theme.
- Moist & Fudgy Texture: Combining corn syrup and chocolate syrup keeps these bites irresistibly soft and never dry.

Ingredients & Why They Work
Each ingredient here plays a role in boosting flavor and texture while keeping things simple. Using a boxed brownie mix saves time, but the magic comes from adding chocolate and corn syrup to achieve that rich, fudgy bite. Plus, the water helps bring it all together for rolling perfection.

- Boxed Brownie Mix: The base for your bites—choose your favorite brand for trusted flavor and texture.
- Chocolate Syrup: Adds extra chocolatey goodness and a glossy sheen to your bites.
- Corn Syrup: Keeps brownie bites chewy and moist without becoming sticky.
- Water: Helps loosen the mixture just enough so it’s easy to shape but still thick.
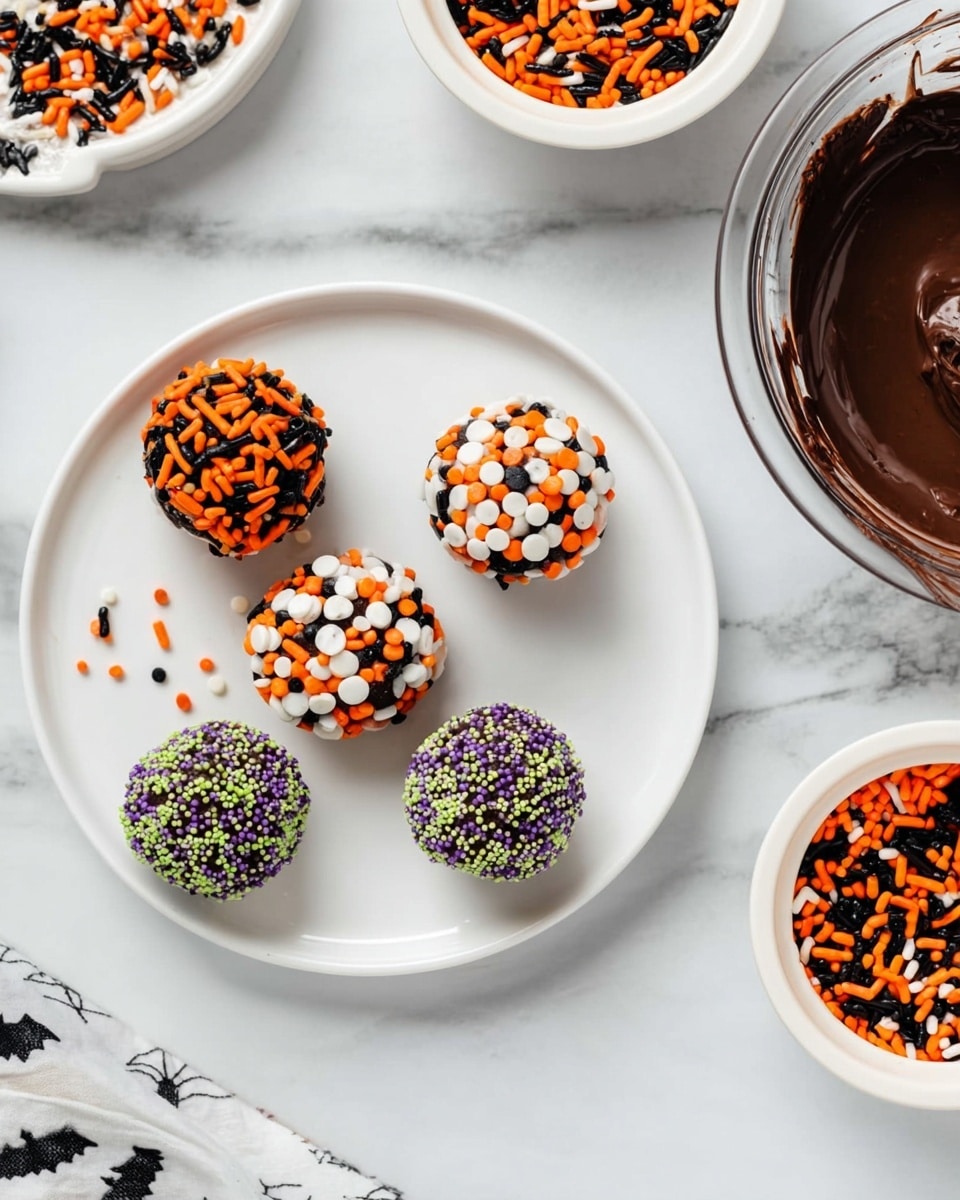
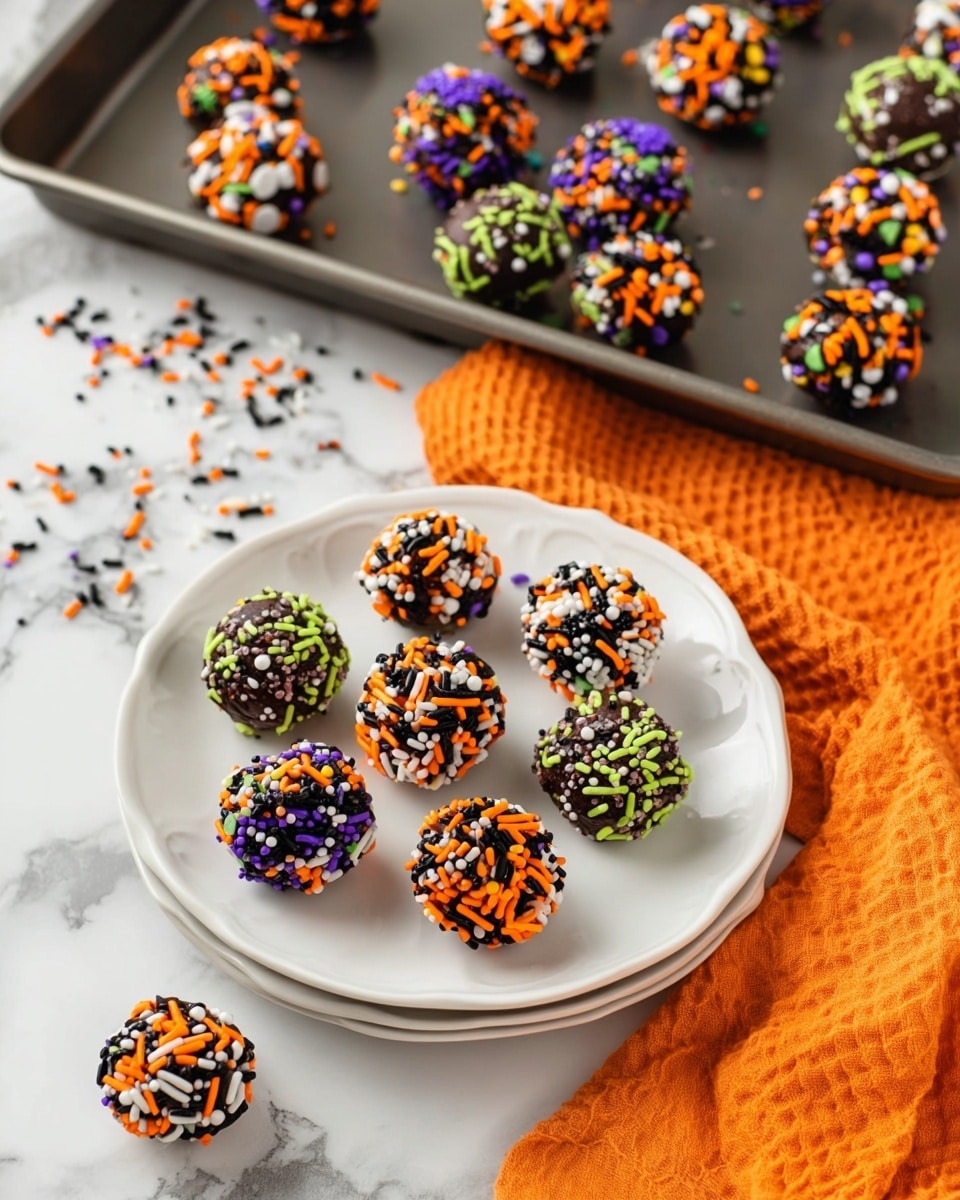
- Halloween Sprinkles: The festive finishing touch; I love using bright colors and fun shapes to keep the party vibe going.
Tweak to Your Taste
I’m all about making recipes my own, and with this Halloween Brownie Bites Recipe, that means playing with sprinkles or adding in extras like sea salt flakes or chopped nuts. Feel free to experiment—it’s hard to go wrong here!
- Variation: I once mixed in a teaspoon of espresso powder to amp up the chocolate flavor—it was a total game changer!
- Dietary Mods: For a gluten-free version, just pick a gluten-free boxed brownie mix.
- Seasonal Changes: Swap out Halloween sprinkles for peppermint bits during the winter holidays for a festive twist.
Step-by-Step: How I Make Halloween Brownie Bites Recipe
Step 1: Microwaving the Brownie Mix
Pour your dry brownie mix into a large microwave-safe bowl—trust me, you want room to stir without a mess. Heat it in 30-second bursts, stirring between each, until the mixture reaches about 160°F (that’s warm and just starting to melt). Usually, about 1 and a half minutes does the trick. This step is key because overheating can make the batter dry, and underheating means it won’t blend smoothly.
Step 2: Mixing in the Syrups and Water
Once the mix is warm, add your corn syrup, chocolate syrup, and water. Here’s where you blend it all together until the texture is smooth and glossy. Don’t rush—take your time stirring so everything combines evenly. The batter should feel thick but malleable enough to roll.
Step 3: Rolling and Coating the Bites
Place your Halloween sprinkles in a shallow dish—this makes the coating process a breeze. Scoop out about one tablespoon of batter at a time. I like to keep my hands slightly damp to stop the batter from sticking to me (it’s a total game changer). Roll the ball in your hands, then gently roll it in the sprinkles until coated. Lay each finished bite on a plate or baking sheet.
Step 4: Chill and Serve
Pop the plate or tray into the fridge and chill for at least one hour—this helps firm up the bites so they hold their shape when you serve. I usually make these in the morning for a party that evening, but they’re definitely tempting to nibble on before guests arrive.
Pro Tips for Making Halloween Brownie Bites Recipe
- Keep Your Hands Damp: This simple trick prevents sticky fingers and helps form perfectly round bites.
- Don’t Skip the Thermometer: Checking the temperature ensures you don’t overheat the brownie mix, keeping the final texture moist.
- Chill Thoroughly: Giving the bites enough time to set helps them hold their shape and enhances the fudgy feel.
- Store Airtight: Prevent drying out by keeping leftover bites in a sealed container in the fridge.
How to Serve Halloween Brownie Bites Recipe
Garnishes
I love using a mix of spooky sprinkles—think little pumpkins, bats, and candy corn shapes. It instantly adds personality and makes these bites a total showstopper at any party. You can also dust some cocoa powder or drizzle a little white chocolate for a more sophisticated vibe.
Side Dishes
These brownie bites pair wonderfully with a creamy pumpkin spice latte or a frothy hot chocolate for chilly Halloween nights. For a party spread, set alongside popcorn, candied nuts, or even a cheese board—the sweet and savory combo keeps guests happily nibbling.
Creative Ways to Present
Try serving your Halloween Brownie Bites on a tiered dessert stand decorated with fake spider webs, or arrange them in mini cupcake liners shaped like pumpkins or ghosts. If you’re feeling crafty, pipe little faces on them with icing—kids go wild for that kind of fun!
Make Ahead and Storage
Storing Leftovers
I always keep leftover brownie bites in an airtight container in the fridge—they stay fresh for up to 5 days. If you’re planning to eat them within a day, leaving them at room temperature covered in plastic wrap works fine too, but refrigeration helps maintain that perfect chewy texture.
Freezing
These freeze beautifully! Just place them on a baking sheet to freeze individually before transferring to a freezer-safe bag. When you want a treat, let them thaw in the fridge overnight. They keep well for up to 2 months without losing their fudgy charm.
Reheating
If you want to warm them up, a quick 10-15 second zap in the microwave softens them without drying them out. Just be careful not to overdo it—the goal is warm and gooey, not melted mess!
FAQs
-
Can I make Halloween Brownie Bites Recipe without a microwave?
Absolutely! While the microwave is quick and convenient, you can gently warm the brownie mix in a double boiler or low heat on the stove, stirring constantly until it reaches the right temperature and consistency.
-
What type of brownie mix works best?
I recommend using a fudgy boxed brownie mix rather than cake-style for the best chewy texture. Brands with a deep chocolate flavor really shine in this no-bake version.
-
Can I use homemade brownie mix?
You can try it with homemade mix dry ingredients, but because of the simplicity of this recipe, a boxed mix ensures consistent results. If you do, make sure your homemade mix is well combined and follows a similar dryness level.
-
How do I keep the brownie bites from sticking?
Keeping your hands slightly damp while rolling the batter is the easiest trick to prevent sticking. Also, chilling the mixture briefly before rolling can help if it’s too sticky at room temperature.
Final Thoughts
This Halloween Brownie Bites Recipe has become one of my go-to treats when I want something festive but fuss-free. They hit that perfect balance of rich chocolate flavor and playful presentation, plus they don’t require you to heat up the whole kitchen baking. I genuinely hope you enjoy making (and eating!) them as much as I do—it’s one of those recipes that brings instant smiles, whether you’re sharing with friends, family, or just indulging yourself. Give it a try, and tell me how your brownie bites turn out!
Print
Halloween Brownie Bites Recipe
- Prep Time: 15 minutes
- Cook Time: 2 minutes
- Total Time: 1 hour 17 minutes
- Yield: 30 truffles
- Category: Dessert
- Method: No-Cook
- Cuisine: American
Description
Delightfully rich and festive Halloween Brownie Bites made effortlessly with boxed brownie mix, enhanced with chocolate and corn syrup, rolled in colorful Halloween sprinkles. Perfect for a quick, no-bake treat that’s fun to make and share during spooky celebrations.
Ingredients
Brownie Base
- 19 oz boxed brownie mix
- 2 Tbsp chocolate syrup
- 2 Tbsp corn syrup
- ¼ cup water
Topping
- Halloween sprinkles, as needed for coating
Instructions
- Heat Brownie Mix: Place the dry brownie mix in a large microwave-safe mixing bowl. Microwave in 30 second increments, stirring between each, for about 1 ½ minutes or until the mixture reaches a temperature of 160°F using an instant-read thermometer.
- Add Syrups and Water: Remove from microwave and add the corn syrup, chocolate syrup, and water to the hot brownie mix.
- Mix Until Smooth: Stir the mixture thoroughly until it becomes well combined and smooth in texture.
- Prepare Sprinkles: Pour Halloween sprinkles into a shallow dish to make coating easier.
- Form Brownie Balls: Scoop out 1 tablespoon of the brownie mixture at a time. Slightly dampen your hands to prevent sticking, then roll each scoop into a smooth ball.
- Coat with Sprinkles: Roll each brownie ball in the sprinkles until evenly coated, then place on a plate or baking sheet.
- Repeat Rolling: Continue rolling and coating until all of the brownie batter is shaped into truffles.
- Chill: Refrigerate the brownie bites for at least 1 hour to firm up before serving.
Notes
- Store finished brownie bites in an airtight container in the refrigerator to maintain freshness.
- For variation, try using different types of sprinkles or add chopped nuts to the mixture before rolling.
- Dampening your hands slightly helps prevent the sticky batter from clinging while rolling.
- Use an instant-read thermometer to ensure precise heating and avoid overcooking the brownie mix.
- These bites can be made a day ahead and kept chilled for convenience.
Nutrition
- Serving Size: 1 truffle
- Calories: 110 kcal
- Sugar: 15 g
- Sodium: 60 mg
- Fat: 4 g
- Saturated Fat: 1.5 g
- Unsaturated Fat: 2 g
- Trans Fat: 0 g
- Carbohydrates: 18 g
- Fiber: 1 g
- Protein: 1 g
- Cholesterol: 0 mg
