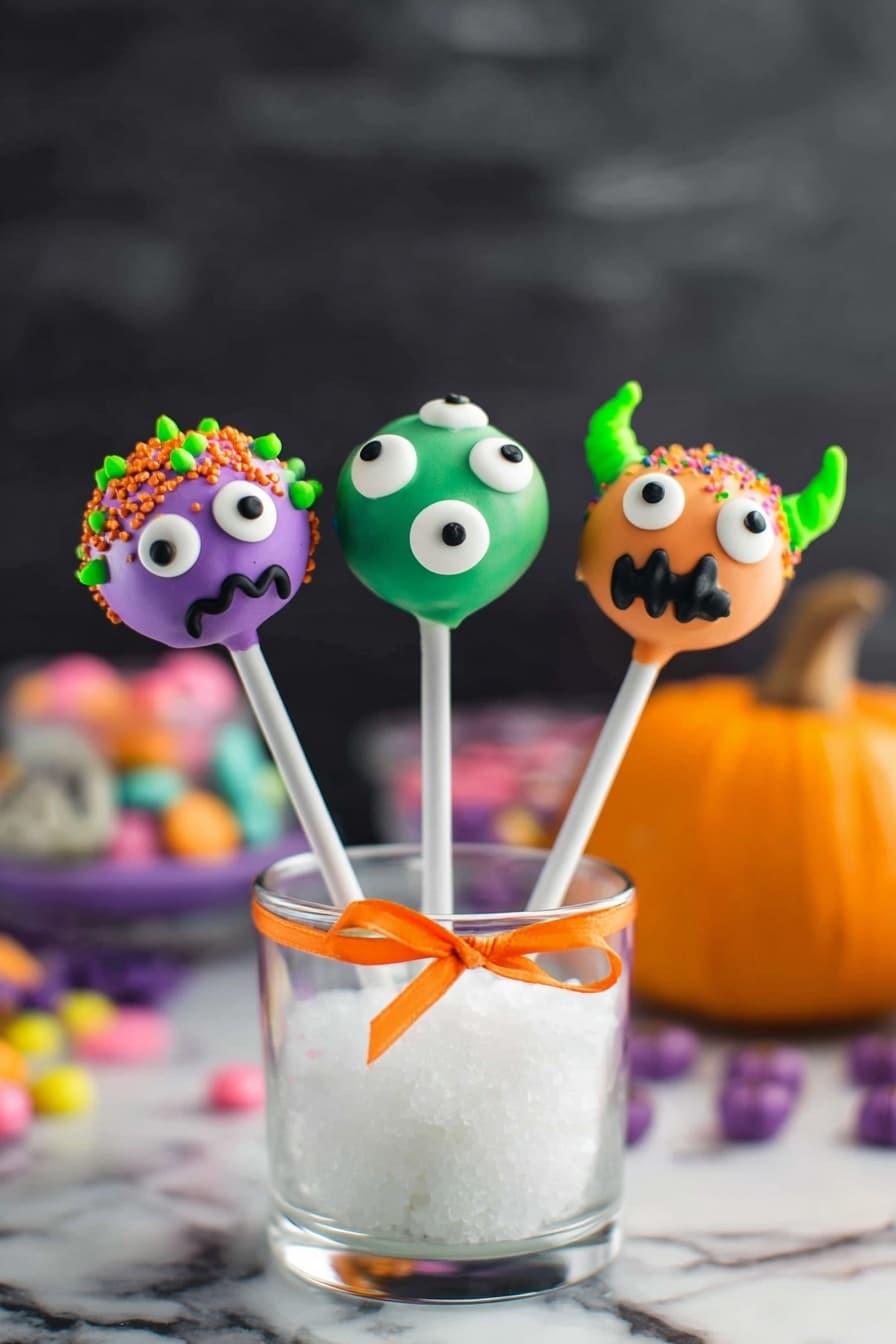
Halloween Cake Pops Recipe
If you’re looking for an easy, spooky, and downright adorable treat to wow your guests this fall, you’ve got to try this Halloween Cake Pops Recipe. These mini donut pops are dipped in colorful candy melts and decorated with fun eyes and sprinkles — seriously, they’re like little edible monsters ready to party. I’ve made these every Halloween for years, and they’re always a crowd-pleaser, especially with the kids. Keep reading, because I’m going to share all my tips for getting these perfect, festive pops every time!
Why This Recipe Works
- Simple Ingredients, Big Impact: Using mini donuts as the base means you skip baking and get those perfect cake pops texture in minutes.
- Candy Melts for Easy Decorating: These colorful melts coat smoothly and harden quickly, making your pops look polished and festive.
- Customizable Fun: With candy eyes, sprinkles, and black gel, you can make your pops as spooky or silly as you like — perfect for any Halloween vibe.
- No-Fuss Assembly: No fancy tools or baking skills needed, just basic dipping and decorating for reliable, impressive results.

Ingredients & Why They Work
This Halloween Cake Pops Recipe depends on a few key ingredients that come together beautifully without fuss. The mini donuts are the perfect “cake” pops base – moist, tasty, and already shaped. Candy melts make the coating process a breeze, and those candy eyeballs? They’re what bring the spooky magic to life.
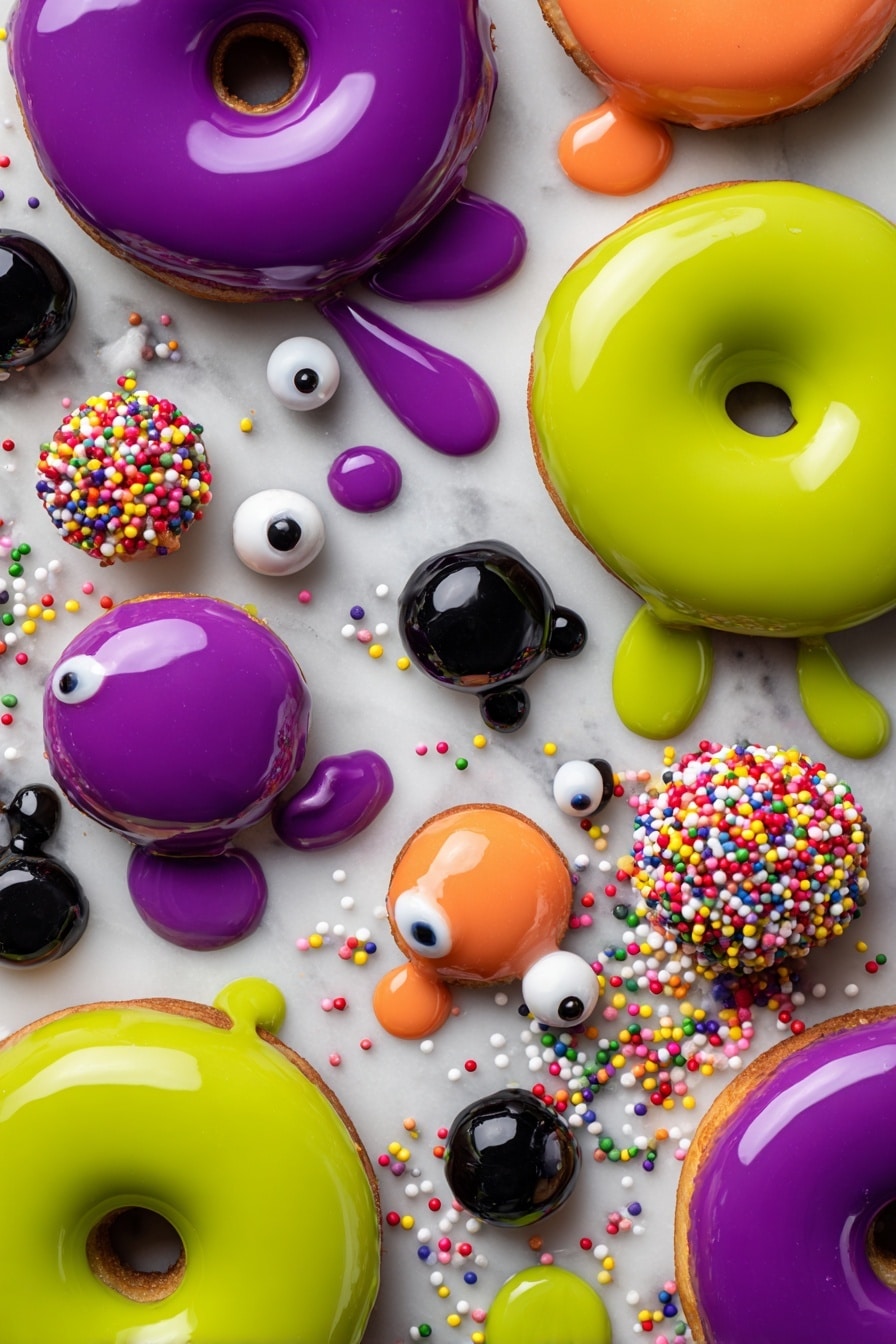
- Candy melts (green, purple, orange): These melt easily and set quickly with a shiny finish—great for dipping and decorating.
- Lollipop sticks: Essential for the classic cake pop look and easy handling; soak the tip in candy melt for a better hold.
- Mini donuts or donut holes: These replace the need to bake cake from scratch, saving time while delivering that soft, cakey texture.
- Candy eyeballs: These make decorating fun and simple, adding personality to each pop.
- Assorted sprinkles: For vibrant texture and colors that amp up the Halloween theme.
- Black decorating gel: Perfect for drawing details like mouths and stitches, making your pops extra spooky or silly.
Tweak to Your Taste
I love making this Halloween Cake Pops Recipe my own by switching up colors and decorations each year. You can easily tailor it to your crowd’s preferences, dietary needs, or the spooky theme of the season.
- Chocolate Lovers’ Variation: Try dipping some pops in melted dark or milk chocolate instead of candy melts. I did this once and the grown-ups loved the richer flavor!
- Gluten-Free Version: Use gluten-free mini donuts or donut holes—just make sure they’re sturdy enough to hold the dip and decorations.
- Extra Spooky: Add edible glitter or use edible markers to draw scary faces. One year, I even added tiny candy spider legs for an extra creep factor.
- Flavor Boost: Sprinkle a little cinnamon or pumpkin spice on the wet candy melts before they set for a festive aroma.
Step-by-Step: How I Make Halloween Cake Pops Recipe
Step 1: Prepare Your Decorating Station
I like to cover my work surface with wax paper or parchment — this saves so much cleanup later, and your pops won’t stick when you set them upright to dry. Have all your decorations handy: candy melts already melted, candy eyes laid out, and sprinkles nearby. Trust me, having everything within reach keeps things moving smoothly!
Step 2: Dip the Sticks and Insert into Donuts
Dip about 1/4 to 1/2 inch of each lollipop stick into the melted candy melts. This little “glue” step is key—stick the candy melt-coated end right into each mini donut, then stand them up upside down on your wax paper with the sticks pointing up. Let these set for a few minutes until the candy hardens and holds the sticks firmly. If you skip this, your pops might wobble or fall apart later.
Step 3: Fully Dip Each Donut in Candy Melts
Now the fun part: dip each donut completely into the candy melts. Give it a gentle twist and turn to coat evenly—this helps avoid any thin spots showing through. Hold the pop over the bowl to let excess drip off, then place it back on the wax paper upside down. Let them fully cool until hardened, usually about 10-15 minutes. This step creates that glossy, candy shell that makes your pops look so magical.
Step 4: Decorate Your Pops
Once the candy coating is dry, it’s time to add the personality. Use the decorating gel to draw mouths, stitches, or creepy smiles. Stick on candy eyeballs with a dab of melted candy. For sprinkles, I wait about 3 minutes after dipping before sprinkling on top so they stick just right without sliding off. And if you want to get creative, you can pipe little candy melt horns on wax paper, let them harden, and then attach them with more melted candy for monster ears or horns. Your imagination is the limit here!
Pro Tips for Making Halloween Cake Pops Recipe
- Dip Sticks Twice: Coating the stick tip in candy melt before inserting it creates a stronger bond and prevents the donut from sliding off later.
- Cool Upside Down: Always let the pops dry upside down, stick side up—that keeps them sturdy and helps the candy melts harden evenly without drips.
- Work in Batches: If melting a large batch of candy melts, keep some warm by resting the bowl over a pot of warm water so it stays fluid for dipping and decorating.
- Avoid Peeling Candy Coating: Don’t store cake pops in the fridge; condensation causes the candy to sweat and crack when brought back to room temp. Keep in a cool, dry place instead.
How to Serve Halloween Cake Pops Recipe

Garnishes
I always go for those insane candy eyeballs — they really make the pops come alive! Adding a mix of sprinkles in Halloween colors (think black, orange, purple) adds texture and fun. For mouths and details, the black decorating gel is my go-to because it’s easy to apply and sets nicely. Sometimes, I even toss in edible glitter just for that extra magical shimmer.
Side Dishes
These pops are super sweet and festive on their own but pair beautifully with a cup of warm spiced apple cider or even a simple bowl of pumpkin soup if you’re hosting a party. I’ve also served them alongside some salty popcorn or roasted pumpkin seeds — the sweet-and-salty combo is a winner!
Creative Ways to Present
I love to display my Halloween Cake Pops Recipe by sticking the finished pops into a foam block covered with black tissue paper, then scatter fake spider webs and plastic spiders around. Another fun idea is to arrange them in mini cauldrons or pumpkin baskets for a truly festive touch. If you’re feeling crafty, tie little ribbons around the sticks or add a tag with each guest’s name for an extra personal party favor.
Make Ahead and Storage
Storing Leftovers
If you happen to have leftovers (which is rare!), store them in an airtight container at room temperature, away from humidity. Refrigerating causes the candy coating to sweat and get tacky, and that’s just no fun for anyone.
Freezing
I haven’t had great luck freezing these since the moisture tends to ruin the candy coating once thawed. I recommend making them fresh on the day you plan to serve for best texture and appearance.
Reheating
These cake pops are best eaten as is—no need to reheat, since the candy coating is meant to be crisp. If the coating somehow softens, just let them sit at room temp for a bit to firm up again before serving.
FAQs
-
Can I use cake balls instead of mini donuts for this Halloween Cake Pops Recipe?
Yes, you can use homemade or store-bought cake balls instead of mini donuts. Just make sure they’re firm enough to hold onto the lollipop sticks and dip nicely without falling apart. Using donuts, though, is much faster if you want a simple shortcut!
-
What are the best types of candy melts to use?
I recommend the classic Wilton or Merckens brand candy melts. They melt evenly and harden with a nice sheen. Avoid using colored chocolate chips, as they don’t melt as smoothly and can be tricky to work with.
-
How do I prevent the candy melts from cracking?
Make sure not to refrigerate your finished cake pops. Store them at room temperature in an airtight container instead. Also, don’t handle them too much before they’re fully set, and avoid rapid temperature changes to keep that candy shell smooth and intact.
-
Can I prepare these Halloween Cake Pops Recipe in advance?
Yes! You can prepare them up to 24 hours ahead of time and keep them in an airtight container at room temperature. Just avoid refrigeration to prevent condensation damage.
-
Any tips for decorating tricky details?
Use a fine-tip decorating gel for drawing mouths and stitches. For attaching eyes, use a small dot of melted candy as glue. If you want to add candy melt horns or other shapes, pipe them separately onto wax paper, let them harden, then attach with melted candy for best stability.
Final Thoughts
This Halloween Cake Pops Recipe has been my go-to festive treat for years because it’s so simple yet endlessly fun to personalize. They bring that perfect balance of spooky and sweet, guaranteed to get smiles from everyone at your Halloween party. Honestly, I think you’ll love how easy they are to make and how much creative freedom you get with decorations. So grab those mini donuts and candy melts, and let’s get dipping — you’re going to nail these!
Print
Halloween Cake Pops Recipe
- Prep Time: 30 minutes
- Cook Time: 0 minutes
- Total Time: 40 minutes
- Yield: 24 servings
- Category: Dessert
- Method: No-Cook
- Cuisine: American
Description
These spooky Halloween Cake Pops are fun and festive treats made by coating mini donuts with colorful candy melts and decorating with candy eyeballs, sprinkles, and black decorating gel. Perfect for Halloween parties, they’re easy to make and can be customized with various decorations to create cute monster or sprinkle-topped pops.
Ingredients
Main Ingredients
- 1 cup candy melts (green, purple, and/or orange)
- 24 6- to 7-inch lollipop sticks
- 24 plain mini donuts and/or donut holes
Decorations
- Candy eyeballs
- Assorted sprinkles
- Black decorating gel
Instructions
- Melt Candy Melts: Melt the candy melts according to the package directions until smooth and ready for dipping.
- Insert Sticks: Carefully dip each lollipop stick about 1/4- to 1/2-inch into the melted candy melts, then insert into each mini donut. Place the donuts upside down with the sticks pointing up on wax paper and allow to cool for a few minutes until the candy melt hardens.
- Coat Donuts: Dip each donut into the melted candy melts, rotating to fully coat them. Set them upside down on wax paper again and let them cool completely until the coating is hardened.
- Decorate Pops: Use candy eyeballs, assorted sprinkles, and black decorating gel to decorate the cake pops as desired. Refer to the notes for decorating tips.
- Serve or Store: Serve the cake pops once the candy melts have fully set. If storing, keep them at room temperature in an airtight container and consume within 24 hours to avoid sweating and cracking.
Notes
- For sprinkle-topped pops, allow the first candy melt layer to set for 3 minutes before dipping the tops in sprinkles.
- For drizzled pops, wait until the first candy melt layer is almost completely set before drizzling on a second layer.
- For monster pops, let the first candy melt layer dry completely, then use extra melted candy melts to attach candy eyeballs and decorate with sprinkles and black writing gel as desired.
- To create monster horns, pipe candy melts into horn shapes on wax paper, allow to harden, and attach them to the cake pops using additional candy melts. For large horns, placing a sprinkle inside the horn adds support.
- Do not store cake pops in the refrigerator or freezer to avoid color bleeding and cracking from condensation.
Nutrition
- Serving Size: 1 cake pop
- Calories: 120 kcal
- Sugar: 15 g
- Sodium: 85 mg
- Fat: 5 g
- Saturated Fat: 3 g
- Unsaturated Fat: 2 g
- Trans Fat: 0 g
- Carbohydrates: 18 g
- Fiber: 0.5 g
- Protein: 1 g
- Cholesterol: 5 mg

