Halloween Dirt Cake Cups Recipe
If you’re on the hunt for a Halloween treat that’s fun, easy, and guaranteed to wow your guests, you’ve got to try my Halloween Dirt Cake Cups Recipe. This dessert has been a favorite in my house for years – it’s that perfect combo of creamy pudding, crunchy Oreos, and festive candy that instantly brings a smile. Whether you’re prepping for a party or just want a playful snack with the kiddos, these Dirt Cake Cups are going to be your new go-to. Stick around and I’ll walk you through every step to get yours just right!
Why This Recipe Works
- Easy Layering: Each pudding layer spreads smoothly, giving you that classic “dirt and worms” look without hassle.
- Festive Flavors & Colors: Orange-colored vanilla pudding adds that spooky touch, making it perfect for Halloween vibes.
- Kid-Approved Fun: Gummy worms and candy pumpkins bring playfulness—kids love digging in!
- No Baking Required: This recipe delivers a show-stopping dessert with minimal effort and no oven time.

Ingredients & Why They Work
I love how this recipe blends simple ingredients that play off each other—creamy puddings, crunchy Oreos, and those colorful candies. Plus, prepping instant pudding saves so much time without sacrificing flavor or texture.

- Milk: Essential for preparing the puddings so they’re silky smooth.
- Instant chocolate pudding mix: Gives the base chocolatey depth and creamy texture everyone loves.
- Instant vanilla pudding mix: Adds subtle sweetness and acts as a canvas for that fun orange color.
- Orange food coloring: For that eye-catching Halloween hue in the vanilla pudding. If you don’t have orange, mixing red and yellow works like a charm!
- Gummy worms: The “worms” in your dirt—kid favorites that add chewy contrast.
- Oreo cookies: Crushed to create the “dirt” layers with just the right crunch.
- Pumpkin candies: Perfect for topping and adding cuteness to each cup.
- Bone sprinkles (optional): For an extra spooky look that’s surprisingly festive and fun.
Tweak to Your Taste
I’ve played around with this recipe plenty of times and honestly, it’s super flexible. I encourage you to have fun experimenting—this dessert is all about creating Halloween magic your way.
- Adding Peanut Butter: Once, I stirred a spoonful of peanut butter into the chocolate pudding—deliciously rich twist that my family couldn’t get enough of!
- Non-Dairy Version: I’ve swapped regular milk with almond milk and used dairy-free pudding mixes with great results.
- Extra Crunch: Some crushed pretzels mixed into the Oreo “dirt” add salty sparkle if you prefer.
- More Spooky Garnishes: I love adding edible candy eyes or mini plastic spiders (for decoration only!) for a creepier look at parties.
Step-by-Step: How I Make Halloween Dirt Cake Cups Recipe
Step 1: Prepare Your Pudding Bases
Start by mixing each pudding mix with milk in separate bowls following package instructions, then chill them in the fridge. I like to let them set for at least 10 minutes so they get nice and thick, which makes layering easier. Once the vanilla pudding is set, stir in a few drops of orange food coloring and mix well—add more if you want a brighter orange. This little color trick gives your dirt cake those festive Halloween vibes.
Step 2: Build Your Dirt Layers
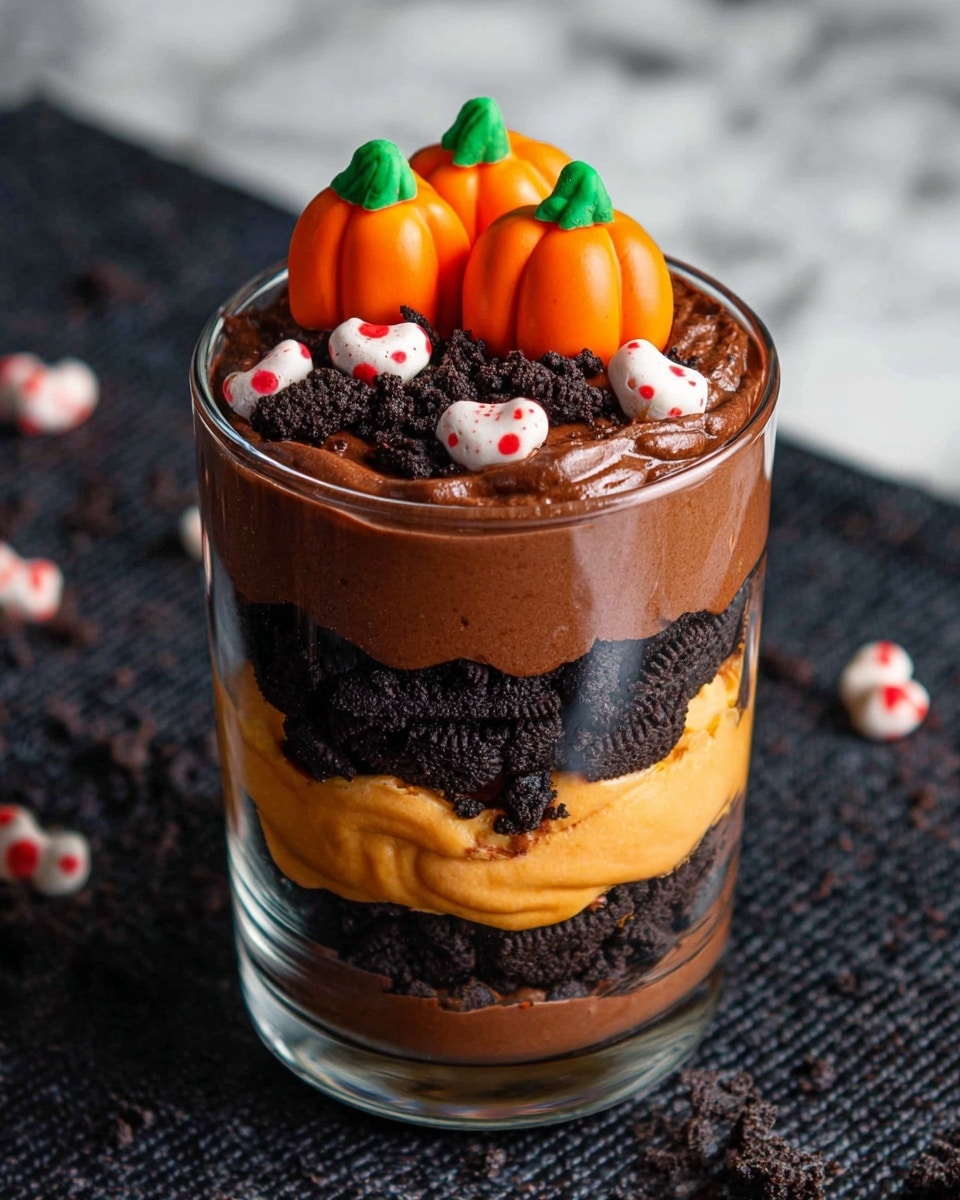
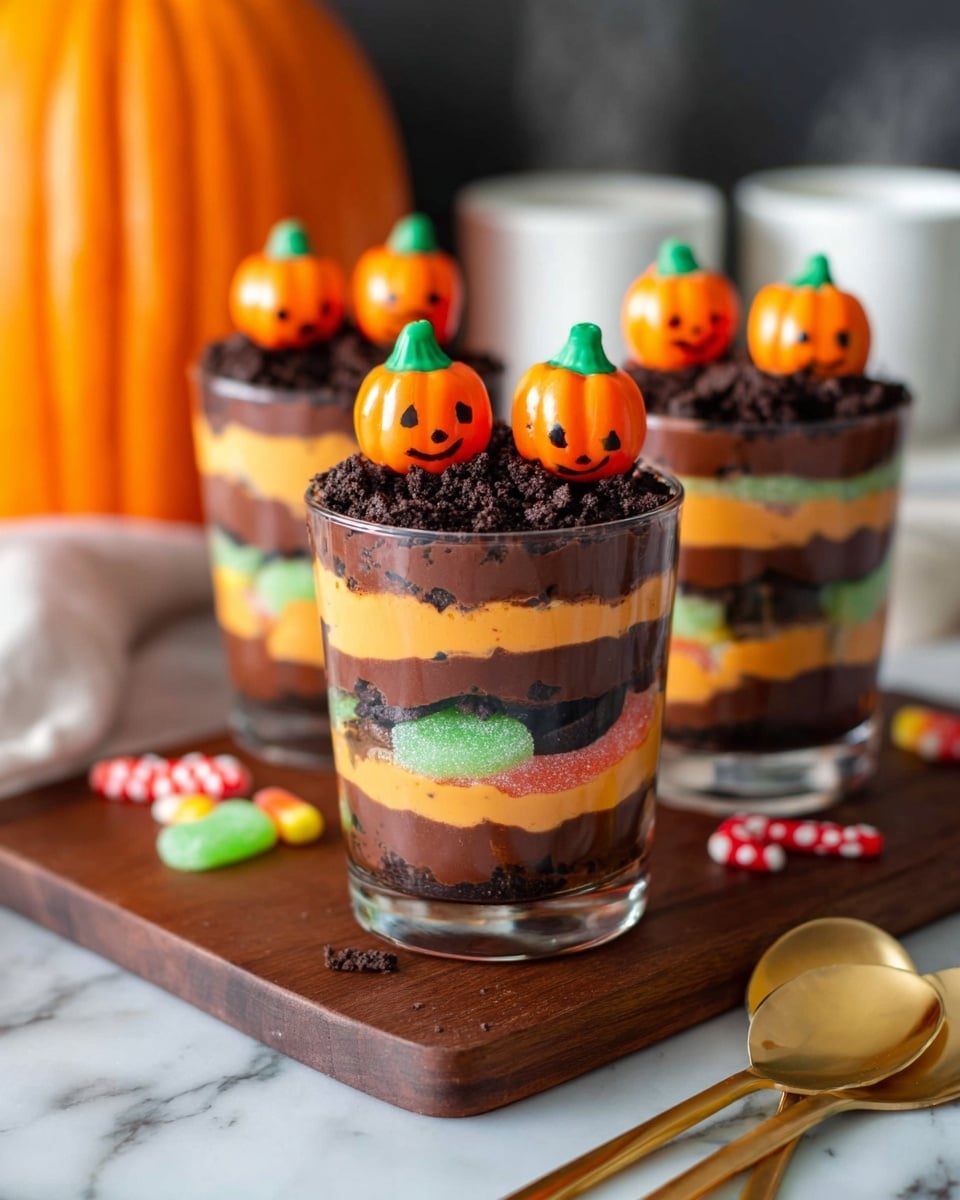
Divide half of the chocolate pudding evenly into your serving glasses, smoothing it gently with a spoon. Then, scatter the gummy worms on top—don’t be shy, the “worms” are the star of the show! Next, sprinkle about a third of the crushed Oreo cookies over the gummies. Layer half of the orange vanilla pudding next, spreading it carefully, then top again with another third of crushed Oreos. Follow with the rest of the chocolate pudding and finally, the remaining Oreos. Each layer adds texture and that iconic “dirt cup” effect.
Step 3: Dress Up Your Dirt Cups
Pop three pumpkin candies on top of each cup and sprinkle with bone sprinkles if you’re using them. This final touch always gets compliments and makes the cups look extra festive and fun right before serving.
Pro Tips for Making Halloween Dirt Cake Cups Recipe
- Pudding Consistency: Make sure your puddings are fully set and thick before layering—fluid pudding makes the layers slip and slide.
- Crush Oreos Coarsely: I like leaving some chunks here and there for texture instead of powdering them completely.
- Use Clear Glasses: This way, the layers show beautifully and your guests can see all the fun details inside.
- Gummy Worm Placement: Distribute gummy worms across layers instead of clustering in one spot for a playful surprise in every bite.
How to Serve Halloween Dirt Cake Cups Recipe
Garnishes
I usually keep it simple with pumpkin candies and gummy worms, but for parties, I love adding edible googly eyes or some chocolate spider web drizzles on top. It’s a sweet detail that makes a real impression, especially with kids.
Side Dishes
This dessert pairs perfectly with things like caramel apples, candy corn, or even simple roasted pumpkin seeds for that full Halloween snack spread. I like offering some salty snacks too, like popcorn, to balance the sweetness.
Creative Ways to Present
For Halloween parties, I’ve served these dirt cups in small mason jars decorated with twine and little spooky tags. Another fun idea is to use mini flower pots lined with parchment paper—kids think they’re real dirt pots! You can even try layering in clear plastic test tubes for a science-lab theme.
Make Ahead and Storage
Storing Leftovers
I store leftovers covered tightly in the fridge for up to 3 days. The flavors meld nicely overnight, but I recommend adding fresh gummy worms and candy pumpkins after storing so they stay vibrant and chewy.
Freezing
I haven’t tried freezing the assembled cups because the puddings can get watery after thawing. But if you want to prep in advance, you can freeze the crushed Oreos or gummy worms separately.
Reheating
This dessert is best enjoyed cold, so I don’t recommend reheating. Just take the cups out of the fridge about 10 minutes before serving to soften the pudding a bit if you like.
FAQs
-
Can I make Halloween Dirt Cake Cups Recipe vegan or dairy-free?
Absolutely! Swap regular milk for almond or oat milk and look for vegan instant pudding mixes (some brands offer that option). Just check the gummy worms and candies too, as some contain gelatin or dairy ingredients.
-
How long do these dirt cake cups last?
They last about 3 days refrigerated. For the best texture, add fresh candies right before serving after storage.
-
Can I prepare this recipe without gummy worms?
Yes! You can substitute with other Halloween-themed candies like candy corn or mini marshmallows, or just omit them completely—this recipe is very forgiving.
-
What’s the best way to crush Oreos for this recipe?
I like crushing them coarsely by hand or with a rolling pin inside a sealed bag to keep some texture and avoid an overly powdery cup. It adds a pleasant crunch!
Final Thoughts
This Halloween Dirt Cake Cups Recipe holds a special spot in my recipe box because it’s easy to make, visually impressive, and downright fun to eat. I hope you enjoy making it as much as I do—there’s just something magical about sharing these “creepy” cups around the kitchen table and watching smiles light up. Give it a try this season and watch it quickly become a favorite Halloween tradition in your home!
Print
Halloween Dirt Cake Cups Recipe
- Prep Time: 25 minutes
- Cook Time: 0 minutes
- Total Time: 25 minutes
- Yield: 8 servings
- Category: Dessert
- Method: No-Cook
- Cuisine: American
Description
Halloween Dirt Cake Cups are a fun and festive dessert featuring layers of chocolate and orange-colored vanilla pudding, crushed Oreos, gummy worms, and pumpkin candies, perfect for a spooky Halloween treat.
Ingredients
Puddings
- 4 cups milk divided, for preparing puddings
- 1 box instant chocolate pudding mix 3.4 ounces
- 1 box instant vanilla pudding mix 3.4 ounces
- Orange food coloring, as needed
Toppings and Decorations
- 1 cup gummy worms
- 22 Oreo cookies crushed
- 24 pumpkin candies
- 2 tablespoons bone sprinkles, optional
Instructions
- Prepare puddings: Use the milk to prepare and chill each box of pudding in separate bowls according to package instructions.
- Color vanilla pudding: Add a few drops of orange food coloring to the vanilla pudding and stir. Gradually add more drops to achieve the desired orange color.
- Layer chocolate pudding: Divide half of the chocolate pudding evenly into the bottom of each glass.
- Add gummy worms: Distribute the gummy worms over the chocolate pudding layer in each glass.
- Sprinkle Oreos: Sprinkle one-third of the crushed Oreos evenly over the gummy worms.
- Add orange pudding layer: Divide half of the orange-colored vanilla pudding over the crushed Oreos and spread evenly. Reserve the other half of vanilla pudding for another use.
- Sprinkle Oreos again: Sprinkle one-third of the crushed Oreos over the orange pudding layer.
- Add remaining chocolate pudding: Divide the remaining chocolate pudding over the Oreos and spread evenly.
- Top with Oreos: Sprinkle the remaining crushed Oreos over the last chocolate pudding layer.
- Decorate: Place three pumpkin candies on top of each glass and optionally decorate with bone sprinkles.
Notes
- If orange food coloring is not available, mix four drops of red food coloring with five drops of yellow food coloring to make orange. Use gel food coloring sparingly as it is more concentrated.
- Add food coloring gradually and stir to achieve the desired shade without over-coloring.
- This recipe serves 8 cups and is best served chilled.
- You can substitute gummy worms with other Halloween-themed candies if preferred.
- Bone sprinkles are optional but add a spooky decorative touch.
Nutrition
- Serving Size: 1 cup
- Calories: 280 kcal
- Sugar: 30 g
- Sodium: 150 mg
- Fat: 12 g
- Saturated Fat: 5 g
- Unsaturated Fat: 5 g
- Trans Fat: 0 g
- Carbohydrates: 40 g
- Fiber: 1 g
- Protein: 3 g
- Cholesterol: 15 mg

