Halloween Jack Skellington Ricotta Olive Tarts Recipe
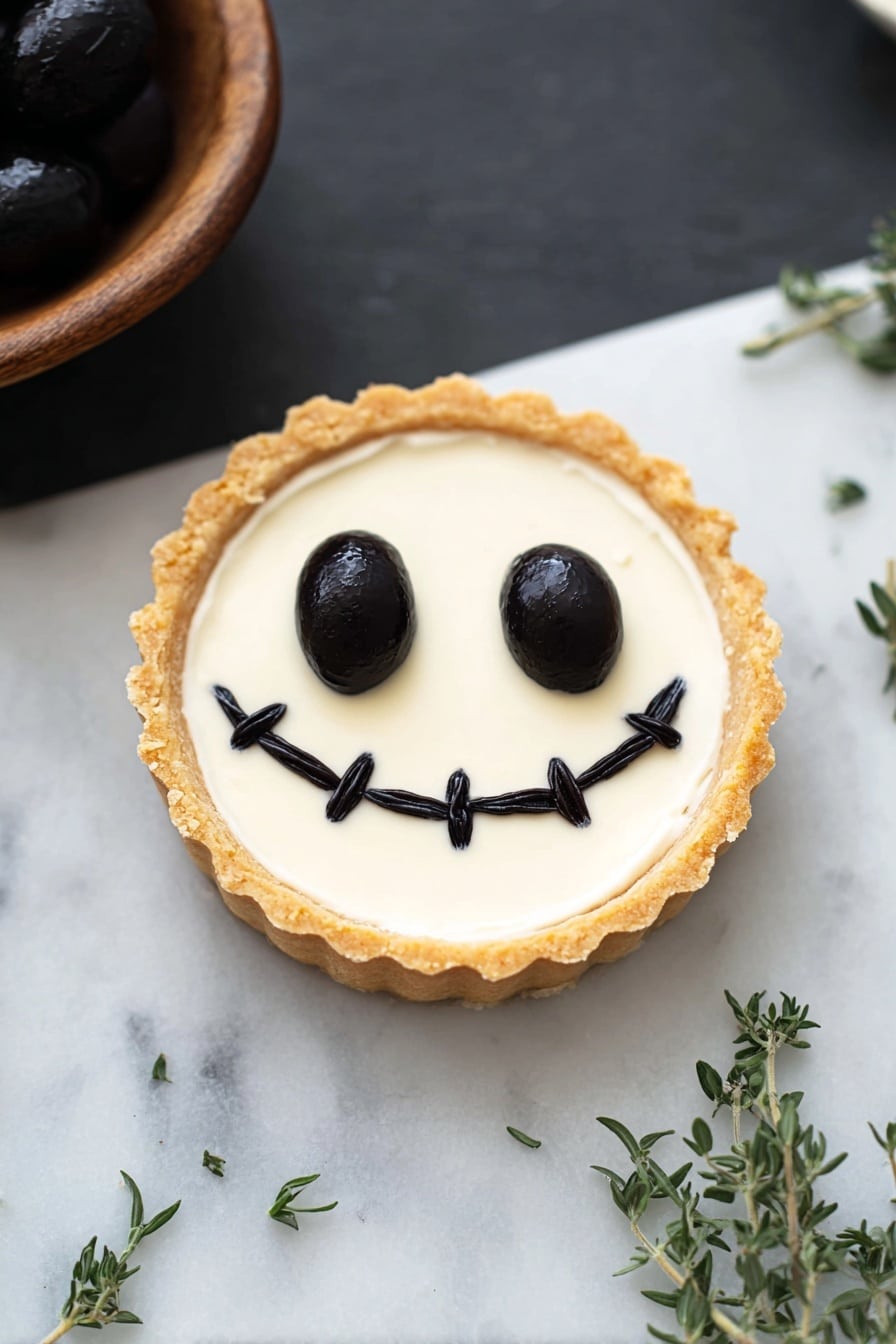
If you’re looking to add a spooky yet delicious twist to your Halloween menu, the Halloween Jack Skellington Ricotta Olive Tarts Recipe is an absolute must-try. Trust me, these cute little tarts with their creamy ricotta filling and striking olive faces will be the star of any party or cozy night in. Not only are they visually fun to make, but their balance of savory flavors is downright irresistible. Stick with me, and I’ll walk you through making these Halloween treats that are as fun to eat as they are to create!
Why This Recipe Works
- Perfectly Balanced Flavor: The creamy ricotta combined with salty olives and tangy sun-dried tomatoes creates a savory bite that’s both rich and fresh.
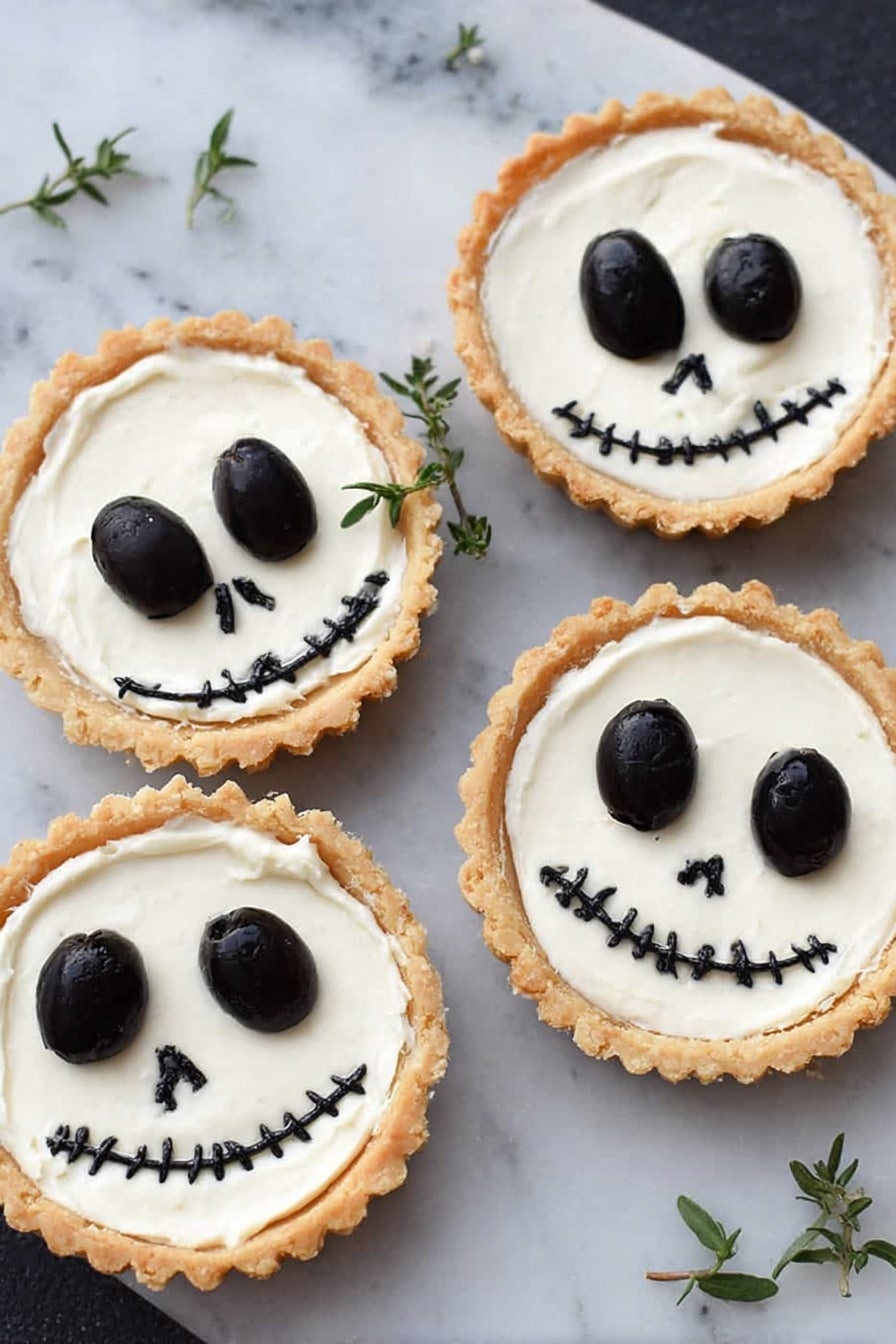
- Eye-Catching Presentation: The Jack Skellington olive faces aren’t just adorable—they add a fun Halloween vibe that’s guaranteed to impress guests of all ages.
- Gluten-Free Friendly: Using a blend of gluten-free flours for the crust means you get crisp, flaky tart shells without wheat, perfect for those with gluten sensitivities.

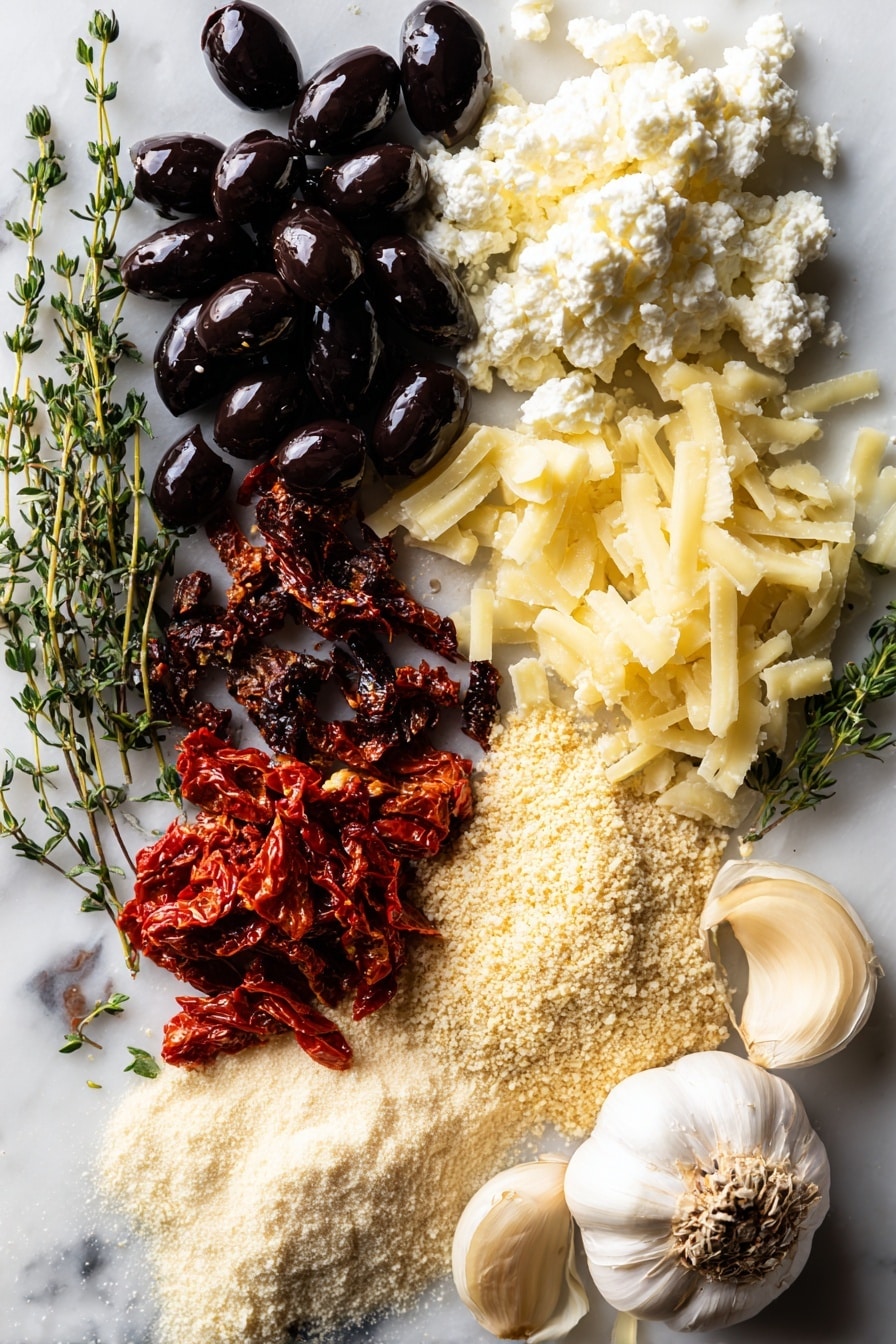
Ingredients & Why They Work
The magic of this Halloween Jack Skellington Ricotta Olive Tarts Recipe lies in the thoughtful ingredient choices, which carefully balance texture and taste while keeping a gluten-free base. From handcrafted oat flour to fresh thyme, each component plays its part in elevating these tarts.
- Sweet rice flour: Provides a slightly sticky texture that holds the crust together beautifully.
- Millet flour: Adds a subtle nuttiness and sturdiness to the crust.
- Gluten-free oat flour: Offers a mild, wholesome flavor and tender crumb; I usually make this fresh by grinding oats at home for the best texture.
- Tapioca flour: Helps with elasticity and a nice chew in the crust, keeping it from crumbling.
- Cold unsalted butter: Is key for a flaky crust—cutting it cold and into small pieces ensures it bakes into delicious layers.
- Black olives: Are the star of the “face” decoration and add a salty punch to the filling.
- Sun-dried tomatoes: Bring a tangy savoriness and gorgeous color contrast to the tarts.
- Fresh thyme: Sprinkled throughout for an herby brightness that elevates the whole tart.
- Parmesan cheese: Delivers a sharp umami lift, making each bite satisfyingly rich.
- Ricotta cheese: Creates the creamy, smooth base filling that sets perfectly in the oven.
- Greek yogurt: Adds pleasant tang and creaminess to balance the richness.
- Egg whites: Provide structure to the ricotta filling without adding heaviness.
- Garlic: Mines enough savory depth to sparkle but never overpower.
- Kosher salt: Enhances every ingredient’s natural flavor.
Tweak to Your Taste
I love to personalize this Halloween Jack Skellington Ricotta Olive Tarts Recipe depending on the season and who I’m sharing them with. It’s really flexible! Feel free to adjust ingredients or make subtle swaps to suit your preferences or dietary needs.
- Variation: I sometimes swap fresh thyme for rosemary or oregano for an earthier flavor that my family enjoys equally well.
- Make it Vegan: You can try using vegan ricotta alternatives and a flax egg in place of egg whites—though texture might vary slightly.
- Spice it up: Adding a pinch of chili flakes into the ricotta filling gives a surprisingly delightful kick that contrasts beautifully with the creamy cheese.
- Seasonal swaps: In autumn, roasted pumpkin cubes replace sun-dried tomatoes to add natural sweetness and sturdiness.
Step-by-Step: How I Make Halloween Jack Skellington Ricotta Olive Tarts Recipe
Step 1: Whisk and Cut the Gluten-Free Crust
Start by whisking together your gluten-free flours, tapioca starch, and salt in a large bowl. Then add your cold, cubed butter. This is where a little elbow grease goes a long way—work the butter into the flour with your fingertips until the biggest chunks are about pea-sized. This bit is crucial for a flaky texture, so take your time. Add the ice water a tablespoon at a time, mixing until the dough just holds together when pinched. If it gets too wet, your crust will be sticky and hard to roll out, so keep it light.
Step 2: Chill and Shape Tart Discs
Divide your dough into 6 to 8 portions depending on your tart pan size. I find 4-inch tartlets perfect for little bites. Roll each piece into a ball, flatten to a disc, and wrap tightly in plastic. Pop these into the fridge for at least 30 minutes — trust me, this rest makes rolling much easier and keeps that buttery crust from shrinking when baked.
Step 3: Roll Out and Prepare Tart Shells
Preheat your oven to 400ºF. Roll each dough disc between two sheets of parchment paper dusted with millet flour until it’s roughly an inch larger than your tart pan. Here’s a neat trick: peel off one parchment sheet and gently flip the dough into your tart pan with parchment still on top; then peel that off to avoid sticking. Press the dough gently into the pan, crimping the edges as you go. If you have a smaller pan like mine, work in batches. Line all your tart shells, then pop them in the oven.
Step 4: Assemble the Toppings and Bake the Crust
Thinly slice 6 black olives paper-thin for the iconic mouth, cutting 12-14 ovals for the nose. Keep these delicate and neat — I like to use chopsticks for placing these later; it works wonders for precision. Chop the rest of the olives coarsely for the filling base. Add sun-dried tomatoes, fresh thyme, and parmesan to each tart before baking the shells for 12 minutes, or until just turning golden. This pre-bake stops the crust from getting soggy once the ricotta filling goes in.
Step 5: Mix Filling and Final Bake
While the crusts are in the oven, whisk together ricotta, Greek yogurt, egg whites, minced garlic, and salt until smooth. Once the crust is slightly cooked, pour the filling in until each tart is filled to the brim. Now, decorate with two whole black olives for eyes, small olive ovals for the nose, and that iconic criss-cross mouth with your thin olive strips. Bake the filled tarts for 20-25 minutes until the ricotta is just set. Smaller tart pans might finish sooner, so start checking after 15 minutes to avoid overbaking. Serve warm for the best creaminess.
Pro Tips for Making Halloween Jack Skellington Ricotta Olive Tarts Recipe
- Keep Butter Cold: Always use cold, cubed butter and handle it quickly to keep the crust flaky instead of greasy.
- Chill the Dough Thoroughly: Don’t skip the resting time in the fridge; it helps minimize shrinkage when baking.
- Precision with Olive Slices: Use a sharp paring knife and chopsticks for placing the olive “faces” — this little detail makes the tarts truly special.
- Watch Your Bake Time: Mini tart sizes vary, so start checking for filling doneness early to keep them from overcooking and drying out.
How to Serve Halloween Jack Skellington Ricotta Olive Tarts Recipe
Garnishes
I like to finish these tarts with a sprinkle of extra fresh thyme leaves right before serving — it brightens up the plate and adds a lovely herby aroma. A few cracked black peppercorns also add a nice little kick. If you want to get festive, scatter some edible glitter or herbs dyed with natural food coloring for a spooky glow.
Side Dishes
These tarts pair fabulously with a crisp autumn salad — think arugula with apple slices, toasted walnuts, and a maple vinaigrette. They also go well alongside a warm pumpkin soup or a hearty beet and goat cheese salad. For a party vibe, serve with a selection of dips and roasted veggies.
Creative Ways to Present
For Halloween parties, I’ve arranged these tarts on a black slate tray with sprigs of rosemary for a “forest” effect. You can also create mini “graveyards” by using dark crackers or black sesame seeds sprinkled around. Another fun idea is placing each tart on a bed of mashed purple sweet potatoes to enhance that eerie, Halloween feel.
Make Ahead and Storage
Storing Leftovers
I usually store leftover tarts in an airtight container in the fridge for up to 3 days. Make sure they’re completely cooled before sealing to avoid sogginess. Let them sit at room temperature for 10 minutes before reheating for the best texture.
Freezing
Freezing works surprisingly well! I freeze baked, cooled tarts in a single layer on a baking sheet first, then transfer to freezer bags. When you want to enjoy them again, thaw overnight in the fridge overnight, then reheat in a 400°F oven for about 7 minutes. The crust stays crisp and the filling tastes fresh.
Reheating
To keep that fresh-baked vibe, I reheat these tarts in a preheated oven at 400°F for 7 minutes. Avoid microwaving if you can—it can turn the crust soggy and the ricotta watery.
FAQs
-
Can I use regular flour instead of gluten-free flours for the crust?
Absolutely! If you’re not gluten-sensitive, you can swap the gluten-free flours with all-purpose flour in equal amounts. Just keep an eye on dough consistency, since regular flour absorbs water differently. The texture might be slightly less crumbly but still delicious.
-
How do I prevent the crust from shrinking while baking?
Chilling your dough discs well before rolling and pressing them into the tart pans is key. Also, avoid overworking the dough during mixing and rolling, and it’s best to bake the crust partially before adding the ricotta filling.
-
Can I make these tarts ahead of time for a party?
Yes! You can prepare and bake the tarts a day in advance and store them in the fridge. Just reheat them in a hot oven for about 7 minutes before serving to restore crispness and warmth.
-
What if I don’t have espresso tablespoons of sun-dried tomatoes?
You can substitute with roasted red peppers or even finely diced roasted cherry tomatoes for a milder sweetness. Just make sure they’re well-drained so the crust doesn’t get soggy.
-
How do I make the Jack Skellington face look perfect?
Patience, a sharp knife, and using tools like chopsticks to place the olive pieces help tremendously. Practicing the thin slicing on a spare olive can build confidence before decorating each tart.
Final Thoughts
Honestly, the Halloween Jack Skellington Ricotta Olive Tarts Recipe is one of my favorite ways to bring a bit of Halloween charm into the kitchen without relying on overly sweet treats. There’s something so joyful about creating these quirky faces and then biting into that creamy, savory filling with the crispy crust. I hope you enjoy making (and eating!) these as much as I do—they’re perfect for impressing friends, entertaining kids, or just celebrating Halloween any way you like. So grab your rolling pin, sharpen your paring knife, and have fun bringing Jack Skellington to life on your tart pans!
Print
Halloween Jack Skellington Ricotta Olive Tarts Recipe
- Prep Time: 45 minutes
- Cook Time: 40 minutes
- Total Time: 1 hour 25 minutes
- Yield: 8 tarts
- Category: Appetizer
- Method: Baking
- Cuisine: American
- Diet: Gluten Free
Description
Halloween Jack Skellington Ricotta Olive Tarts are delightful gluten-free mini tartlets with a creamy ricotta filling and spooky olive decorations, perfect for festive gatherings or themed parties. The crust is made from a blend of gluten-free flours, providing a crisp base, while the filling combines ricotta, greek yogurt, and aromatic herbs for a rich bite.
Ingredients
Gluten-Free Tart Crust
- ½ cup sweet rice flour
- ¼ cup millet flour
- ⅓ cup gluten-free oat flour
- 3 tablespoons tapioca flour
- ¼ teaspoon kosher salt
- 8 tablespoons cold, unsalted butter, cut into tablespoon-sized pieces
- 7 tablespoons ice water
Filling and Toppings
- 1 can black olives
- 4 tablespoons julienned sun-dried tomatoes, from a jar packed in oil
- 3 teaspoons fresh thyme leaves
- 3 tablespoons freshly grated parmesan cheese
- 1½ cups ricotta cheese
- ¼ cup + 2 tablespoons greek yogurt
- 3 egg whites
- 3 cloves garlic, minced
- ½ teaspoon kosher salt
Instructions
- Make the crust dough: Whisk together the sweet rice flour, millet flour, oat flour, tapioca flour, and salt in a large bowl. Add the cold butter pieces and mix with your hands until the largest butter pieces are pea-sized. Gradually add the ice water, one tablespoon at a time, combining each addition until the dough holds together when pinched.
- Chill the dough: Divide the dough into 6-8 pieces depending on tart size. Roll each piece into a ball, flatten into a disc, wrap in plastic wrap, and refrigerate for 30 minutes.
- Preheat and roll out dough: Preheat the oven to 400°F. Roll out each dough disc between two sheets of parchment or wax paper, sprinkled lightly with millet flour, into a circle about 1 inch larger than your mini tart pans.
- Form tart shells: Remove one piece of parchment and flip the crust into the tart pan with parchment side up. Remove the second piece of parchment and press dough into the pan carefully. Repeat for all tart shells, working in batches if needed.
- Prepare olive decorations: Thinly slice 6 black olives into paper-thin strips for the mouth, and cut 12-14 small ovals for the noses. Set aside.
- Assemble base toppings: Chop 3-4 tablespoons of black olives and evenly distribute among the tart shells. Place 3-5 strips of julienned sun-dried tomatoes on each tart, sprinkle about ¼ teaspoon of fresh thyme leaves, and evenly divide the grated parmesan cheese over the tarts.
- Bake tart shells: Bake the assembled tart shells for 12 minutes until the crust is lightly cooked.
- Prepare ricotta filling: While crusts bake, whisk together ricotta cheese, greek yogurt, egg whites, minced garlic, and salt until smooth and combined.
- Fill and decorate tarts: Remove crusts from oven and divide the ricotta filling among each tart, filling them to the top. Place two whole black olives for the eyes and two small olive ovals for the nose on each tart. Create a criss-cross mouth using the thin olive strips, using chopsticks for precision.
- Bake completed tarts: Bake for 25 minutes, checking at 15 minutes for doneness. The ricotta filling should be set but not browned. Remove from oven and serve warm.
- Reheat instructions: To reheat, bake the tarts at 400°F for 7 minutes until warmed through.
Notes
- Make your own gluten-free oat flour by grinding whole oats in a food processor for best texture.
- If you don’t have millet flour, you can substitute with extra sweet rice flour or another gluten-free flour.
- Use cold butter pieces to get a flaky crust texture.
- Work quickly when handling butter and dough to keep butter cold and prevent melting.
- The filled tarts can be baked in batches if your tart pans do not all fit in the oven at once.
- Use chopsticks to delicately place olive decorations without breaking them.
- Leftover tarts can be stored covered in the refrigerator and reheated before serving.
- This recipe can be doubled to serve larger crowds.
Nutrition
- Serving Size: 1 tart
- Calories: 210 kcal
- Sugar: 2 g
- Sodium: 350 mg
- Fat: 15 g
- Saturated Fat: 7 g
- Unsaturated Fat: 6 g
- Trans Fat: 0 g
- Carbohydrates: 12 g
- Fiber: 2 g
- Protein: 7 g
- Cholesterol: 40 mg


