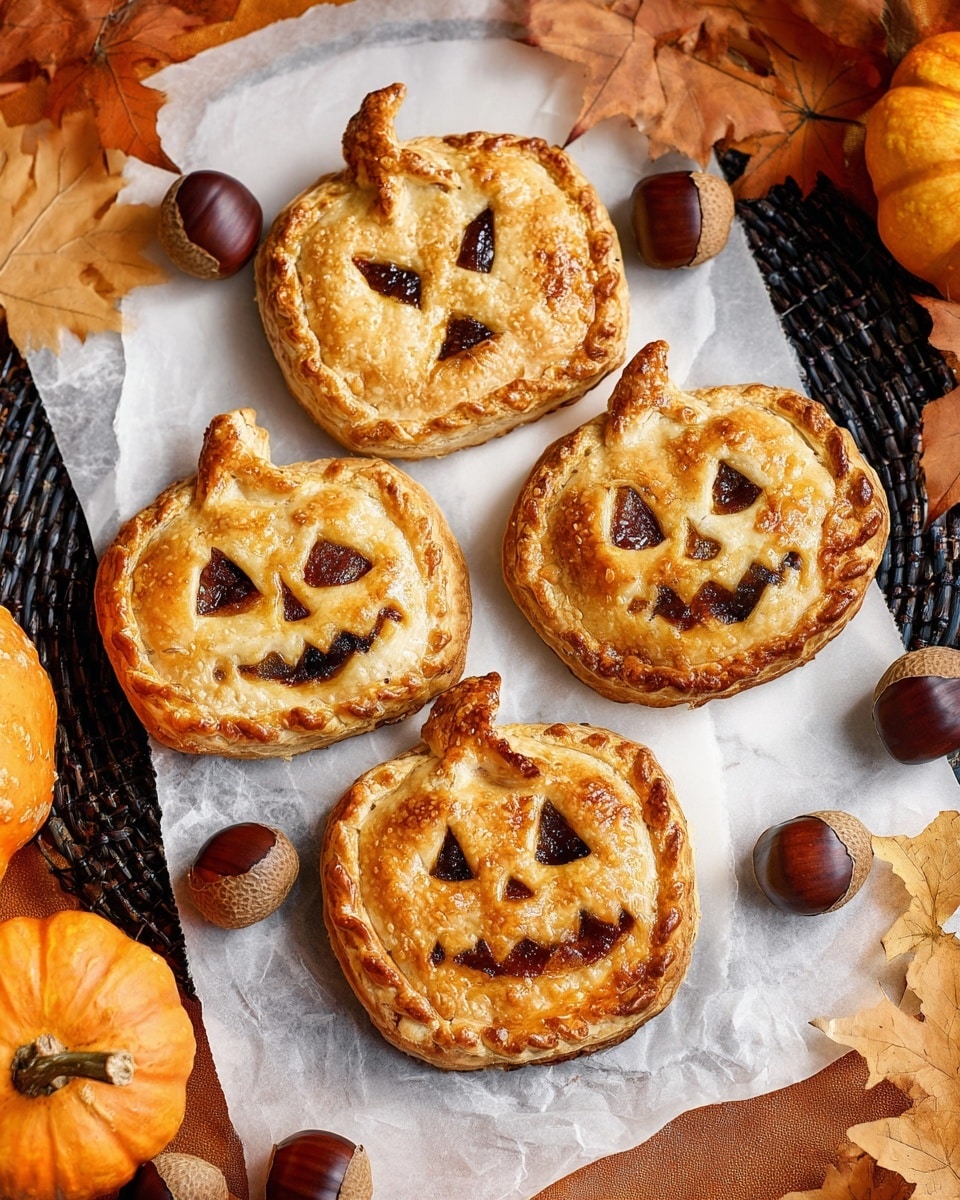
Halloween Pumpkin Hand Pies Recipe
If you’re on the hunt for a fun, festive treat that’s perfect for the fall season, you’re going to absolutely love this Halloween Pumpkin Hand Pies Recipe. These little pies are like bite-sized pockets of cozy pumpkin goodness wrapped in flaky pastry, and they’re super easy to make, even if you’re not a baking expert. I remember the first time I made them—they vanished faster than I could say “trick or treat!” So, stick around, and I’ll walk you through everything you need to know to create your own spooktacular pumpkin hand pies that everyone will enjoy.
Why This Recipe Works
- Simple Ingredients: Using refrigerated pie crust and pumpkin pie mix keeps things convenient and foolproof.
- Fun & Festive Design: Carving Jack O’ Lantern faces makes these hand pies perfect for Halloween gatherings.
- Versatile Cooking Methods: Bake in the oven or air fryer, depending on what works best for your kitchen.
- Perfect Portion Size: Hand pies are the ideal individual treat—easy to hold, share, and enjoy.

Ingredients & Why They Work
When crafting the perfect Halloween Pumpkin Hand Pies Recipe, picking the right ingredients really makes all the difference. The combo of pre-made pie crust and pumpkin pie filling is a winning duo because it saves time yet doesn’t compromise flavor. Here’s what you’ll want to keep on hand and why:

- Refrigerated pie crust: Super convenient and flaky; just make sure to keep it chilled while handling for clean cuts.
- Pumpkin pie mix: The star of the filling—rich spices and pumpkin flavor packed in one container, or you can make your own if you like homemade touches.
- Egg (for egg wash): Creates that gorgeous golden shine and helps seal the pies together like a pro.
- Water or milk: Added to the egg wash to make brushing smoother.
- Cinnamon sugar (optional): Adds a lovely sweet-spicy crunch if you want to sprinkle some on before serving or baking.
- Parchment paper or silicone mat: For non-stick baking—makes clean-up a breeze and pies come out perfectly.
- Cookie cutter or cardboard template: Helps you create adorable pumpkin shapes consistently.
Tweak to Your Taste
One of the best things about this Halloween Pumpkin Hand Pies Recipe is how customizable it is. I love switching up the filling or scraps depending on my mood and pantry stock. Don’t be afraid to play with it!
- Variation: I once added a sprinkle of mini chocolate chips to the pumpkin filling for extra sweetness—a total crowd-pleaser.
- Make it vegan: Swap the egg wash for a plant-based milk and use vegan pie dough to keep these pies friendly for all dietary needs.
- Spice it up: Adding a pinch of nutmeg or cloves to the filling deepens the flavor, perfect if you’re a spice-lover like me.
- Shape fun: Besides pumpkins, try using leaf-shaped or ghost-shaped cookie cutters to keep the Halloween spirit alive!
Step-by-Step: How I Make Halloween Pumpkin Hand Pies Recipe
Step 1: Prep Your Workstation and Preheat the Oven
First things first—preheat your oven to 400°F (200°C). Line your baking sheet with parchment paper or a silicone mat to prevent sticking. This simple step saves you a sticky cleanup later, which is always a win in my book! While the oven warms, unroll your first sheet of refrigerated pie crust on the parchment, keeping the second in the fridge to stay cold and firm.
Step 2: Cut Out Your Pumpkin Shapes
Use a 4-inch pumpkin cookie cutter if you’ve got one, or cut around a cardboard template to create your pumpkin shapes. I made my own template from sturdy cardboard and it’s been a game-changer for consistency. You should easily get 8 pumpkins from one 9-inch dough round. Keep the dough cold so your edges stay crisp and carved faces don’t get soggy.
Step 3: Fill and Seal Those Pies
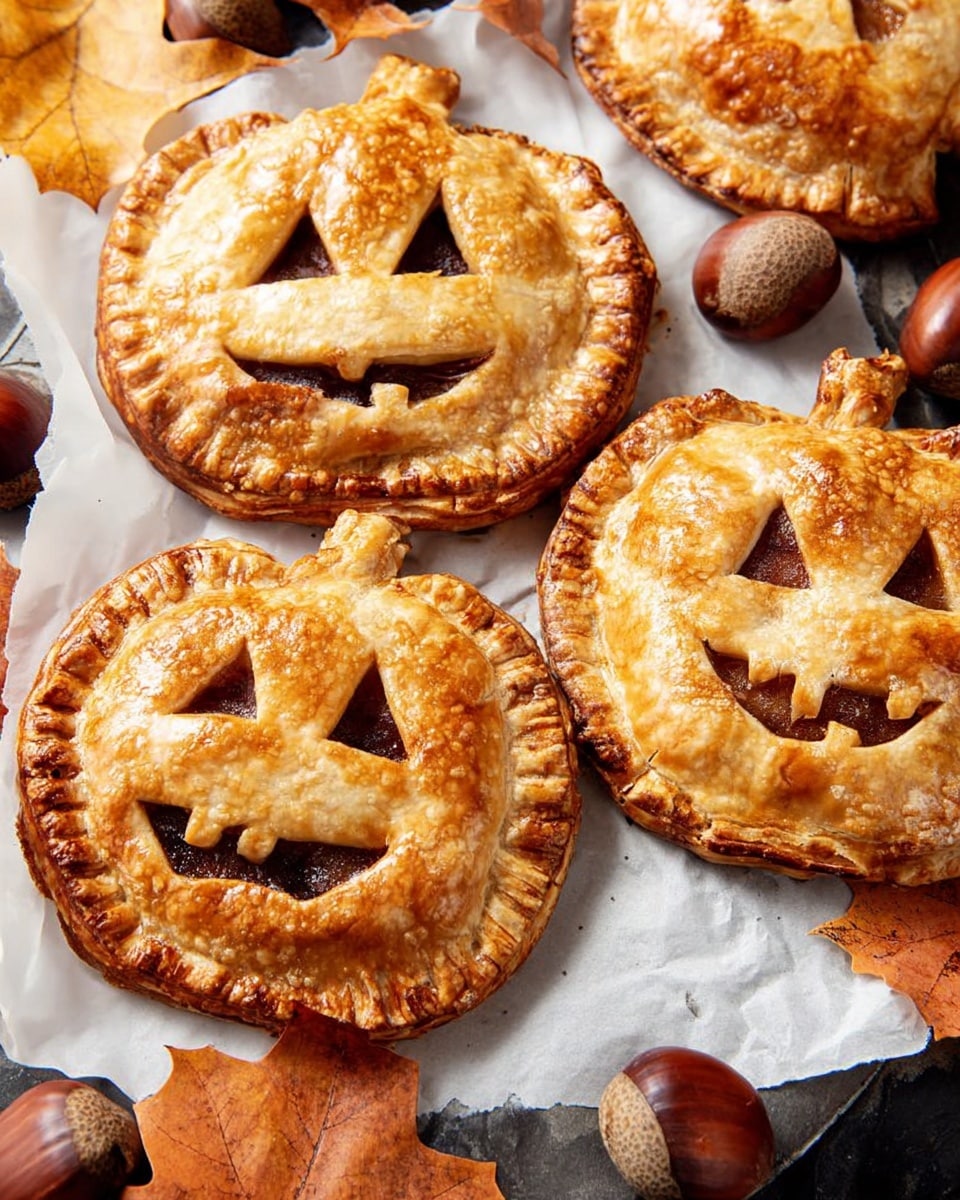
Place about 2 tablespoons of pumpkin pie mix in the center of half your cutouts, leaving roughly a third-inch border around the edges. Brush some egg wash around the edges—that little bit helps the top and bottom crusts stick together like magic. Then, carve fun Jack O’ Lantern faces into the plain pumpkin shapes or make a few vertical slits if carving feels intimidating—that helps steam escape and keeps your pies from bursting.
Step 4: Seal, Brush, and Bake
Place the “top” pumpkins with faces onto the filled “bottom” halves, carefully align edges, and crimp them with a fork to seal everything tight. Don’t skip this part because you want the filling to stay inside! Brush the tops generously with the remaining egg wash—you’ll get that beautiful golden color once baked. Then pop them into your hot oven for about 16-19 minutes or until they’re golden brown to your liking.
Bonus Step: Air Fryer Option
If you’re short on time or don’t want to heat up your whole oven, you can air fry these beauties at 350°F (180°C) for 13-16 minutes. I love the air fryer method because it crisps the crust beautifully—just space them well in the basket, and remember the second batch usually cooks faster!
Pro Tips for Making Halloween Pumpkin Hand Pies Recipe
- Keep Dough Chilled: Keeping your second dough round in the fridge allows for cleaner cuts and easier face carving without dough sticking.
- Don’t Overfill: I learned the hard way—if you overfill, the pies leak and get soggy, so stick to about 2 tablespoons of filling.
- Seal Edges Well: Using egg wash on edges before sealing and crimping with a fork ensures your pies don’t burst open in the oven.
- Bake Until Golden: Watch them closely in the final few minutes to prevent burning; everyone’s oven heats differently.
How to Serve Halloween Pumpkin Hand Pies Recipe
Garnishes
I usually keep things simple with these hand pies, but a generous dusting of cinnamon sugar right after baking makes them shine. Sometimes, I like to add a dab of whipped cream or a scoop of vanilla ice cream on the side—that combo tastes like pumpkin pie heaven, no fork required!
Side Dishes
Since these pies are a sweet treat, I often pair them with a warm cup of spiced apple cider or hot chocolate, especially for chilly fall evenings. For a party, they go great alongside savory snacks like mini sandwiches or a simple green salad to balance the sweetness.
Creative Ways to Present
Last Halloween, I arranged the hand pies on a big platter shaped like a pumpkin, surrounded by candy corn and fall leaves—it was a hit! You can also serve them in mini paper bags for a grab-and-go vibe at parties or line them up on a tiered dessert stand with candy pumpkins for a festive display.
Make Ahead and Storage
Storing Leftovers
If you happen to have leftovers (lucky you!), store them in an airtight container in the fridge. I usually keep mine for up to 4 days. The crust will soften a bit overnight, so reheating just before serving is key for that fresh-out-of-the-oven feel.
Freezing
I love that these pies freeze well! Just bake them completely, then let cool. Wrap each pie in plastic wrap and store in a freezer-safe bag for up to 2 months. When you’re ready, thaw in the fridge overnight, then reheat for that fresh-baked goodness.
Reheating
To reheat, pop the pies in a toaster oven or standard oven at 350°F (175°C) for about 8-10 minutes. This method keeps the crust flaky and avoids sogginess that a microwave sometimes causes. If you’re in a pinch, a quick microwave zap (30 seconds) works but it’s not quite the same.
FAQs
-
Can I use homemade pumpkin pie filling for this recipe?
Absolutely! Homemade pumpkin pie filling is a fantastic choice if you want full control over spices and sweetness. Just make sure it’s thick enough so it won’t leak out during baking. If your filling is too runny, consider cooking it down a bit or adding a little cornstarch to help it set.
-
Do I really need to cut Jack O’ Lantern faces on top?
Not at all! The faces are more about fun and flair. If carving isn’t your thing, simply cutting a few slits to vent steam will do the trick and prevent pies from bursting. But if you’re feeling creative, carving adds that extra Halloween charm.
-
Can I make these pies ahead and bake just before serving?
You sure can! Assemble the pies and keep them covered in the fridge for a few hours before baking. This can save you a lot of time on party day. Just bring them back to room temperature for 10-15 minutes before placing in the oven.
-
What’s the best way to avoid soggy bottoms?
Keeping the dough cold and not overfilling helps a lot, plus baking on parchment or a silicone mat allows proper heat circulation. Letting the pies cool for a few minutes after baking lets steam escape, so the crust stays crisp.
-
Can I skip the egg wash?
You can, but the egg wash does two things: helps seal the edges and gives that lovely golden, glossy finish. If avoiding eggs, a light brush of plant-based milk or water can work, but the color won’t be quite as rich.
Final Thoughts
If you’re craving a Halloween treat that’s as cute as it is delicious, this Halloween Pumpkin Hand Pies Recipe should be your go-to. I love how easy it is to whip up a batch that looks impressive but doesn’t require hours in the kitchen. Plus, these pies bring that warm pumpkin spice vibe in every bite—perfect for sharing with family, friends, or sneaking a few when no one’s looking! Trust me, once you try these, they’ll become a fall staple you’ll want to make over and over. So go ahead—grab that pie crust, unroll some fun, and bake up a little Halloween magic!
Print
Halloween Pumpkin Hand Pies Recipe
- Prep Time: 5 minutes
- Cook Time: 19 minutes
- Total Time: 24 minutes
- Yield: 16 servings
- Category: Dessert
- Method: Baking
- Cuisine: American
- Diet: Vegetarian
Description
These Halloween Pumpkin Hand Pies are delightful mini pies filled with spiced pumpkin pie mix and shaped like festive pumpkins. Perfect for a seasonal treat, they can be baked or air fried until golden brown, with adorable carved Jack O’ Lantern faces or simple ridges to let steam escape.
Ingredients
Dough
- 1 2-count package refrigerated pie crust
Filling
- 1 cup pumpkin pie mix (or homemade mix)
Egg Wash
- 1 egg whisked with 1 tablespoon water or milk
Optional Topping
- 1 tablespoon cinnamon
- 4 tablespoons baker’s sugar
Instructions
- Preheat and Prepare: Preheat your oven to 400 °F (200 °C) and line a baking sheet with parchment paper or a silicone mat for easy cleanup.
- Cut Dough Shapes: Unroll one sheet of refrigerated pie crust and use a 4-inch pumpkin cookie cutter or a cardboard template to cut out 8 pumpkin shapes. Keep the second sheet chilled in the refrigerator.
- Fill Pies: Place about 2 tablespoons of pumpkin pie mix in the center of four pumpkin cutouts, leaving a ⅓-inch border. Brush egg wash on the edges to help seal the pies.
- Create Faces and Slits: On the other four pumpkin cutouts, carve Jack O’ Lantern faces or cut four vertical slits to allow steam to escape during baking.
- Seal Pies: Place the pumpkin tops on the filled bottoms, align edges, crimp edges with a fork, then brush the tops with the remaining egg wash.
- Repeat: Repeat filling and sealing steps with the second sheet of dough.
- Bake in Oven: Place the pies on the prepared baking sheet and bake for 19 minutes until golden brown to dark brown, depending on preference.
- Air Fry Option: Alternatively, place 4 pies in the air fryer basket and cook at 350 °F (180 °C) for 16 minutes until golden brown. Repeat with the second batch; it will cook faster.
- Serve or Store: Serve warm immediately or store in an airtight container in the refrigerator for up to 4 days. Reheat in a toaster or toaster oven before serving.
Notes
- Using a chilled dough makes cutting the pumpkin shapes and carving faces easier.
- A 4-inch pumpkin cookie cutter or cardboard template can be used to create uniform shapes.
- You can make extra pies by rerolling the dough scraps.
- Optional cinnamon sugar topping can be sprinkled before baking or just before serving for added sweetness.
- These hand pies are best enjoyed warm and can be quickly reheated.
Nutrition
- Serving Size: 1 hand pie
- Calories: 180 kcal
- Sugar: 8 g
- Sodium: 150 mg
- Fat: 9 g
- Saturated Fat: 4 g
- Unsaturated Fat: 4 g
- Trans Fat: 0 g
- Carbohydrates: 23 g
- Fiber: 2 g
- Protein: 2 g
- Cholesterol: 40 mg
