Mason Jar Cakes Recipe
If you’re looking for a fun, delicious, and totally charming way to enjoy cake, you’ve got to try this Mason Jar Cakes Recipe. Trust me, these little jar desserts are an absolute crowd-pleaser — adorable, portable, and packed with layers of rich chocolate sponge and fluffy frosting. I love making these when I want something a bit different for parties or just a sweet treat at home. You’re going to adore how easy they are to personalize and present!
Why This Recipe Works
- Simple Ingredients: Uses an easy boxed cake mix combined with a quick homemade frosting to save time and effort.
- Fun Presentation: Baking cake layers in jars creates perfect single servings that look festive and unique.
- Customizable Flavors and Colors: You can experiment with different frosting shades and toppings to match any occasion.
- Great for Make-Ahead: These cakes store well, making them perfect for prepping celebrations in advance.

Ingredients & Why They Work
The magic of this Mason Jar Cakes Recipe comes down to the blend of convenience and flavor — the Devil’s Food cake mix provides a moist, rich base while the marshmallow cream frosting keeps the texture light and airy. Plus, the pops of purple and green keep it fun and festive, especially if you’re aiming for a themed dessert.

- Devils Food Chocolate Cake Mix: The base of deep chocolate flavor and moist crumb — boxed mix helps you skip the fuss but still get great flavor.
- Vegetable Oil, Eggs, Water: Follow the box instructions for perfect cake texture; oil keeps the cake moist.
- Butter (Room Temperature): Essential for making the frosting smooth and creamy; make sure it’s softened for best mixing.
- Powdered Sugar: Sweetens and thickens the frosting, giving it that luscious, pipe-able consistency.
- Marshmallow Cream: Adds a dreamy, fluffy texture to the frosting and a slight sweetness that lightens the butter.
- Vanilla Extract: A flavor enhancer that rounds out the sweetness and adds depth.
- Food Coloring (Purple & Green): These create eye-catching layers perfect for seasonal or quirky celebrations.
- Dark Chocolate Candy Melts: Perfect for piping cute spiderweb designs or any other decorative patterns you like.
- Mason Jars (8 oz size): The signature vessel for this recipe — sturdy, reusable, and perfect for layering.
- Ziploc or Piping Bags: Ideal for frosting application, giving you control for clean, pretty layers.
- Sprinkles (Optional): Adds fun texture and color for extra festive flair.
Tweak to Your Taste
One of my favorite things about this Mason Jar Cakes Recipe is how flexible it is. I love adding a little twist to keep things exciting, and honestly, you should totally make it your own! Switch up the colors, swap candy melts for different decorations, or even try different cake flavors.
- Flavor Swaps: I’ve tried vanilla or red velvet cakes instead of the Devil’s Food, and they turn out fantastic — give it a shot if you want a new twist!
- Frosting Variations: Adding a teaspoon of almond extract can transform the frosting beautifully, adding a nutty aroma.
- Dietary Changes: If you want to make this gluten-free, pick a gluten-free cake mix, and use dairy-free butter alternatives to suit your needs.
- Seasonal Themes: Swap purple and green for orange and black at Halloween or red and pink for Valentine’s Day — the sky’s the limit.
Step-by-Step: How I Make Mason Jar Cakes Recipe
Step 1: Baking the Perfect Chocolate Cupcakes
First things first, preheat your oven to 350°F (175°C). Line a standard muffin tin with paper baking cups — this keeps the cakes easy to handle. Mix the Devil’s Food cake mix according to the box directions (water, oil, and eggs). Don’t skip that step — mixing it just right is key for moist cupcakes. Fill each muffin cup about two-thirds full with batter, then pop them in the oven for about 18 minutes. To check doneness, a toothpick inserted near the center should come out mostly clean (a few moist crumbs are perfect). Once baked, let them cool completely on a wire rack — warm cakes won’t frost well and could make your jars soggy.
Step 2: Whip Up That Dreamy Marshmallow Frosting
While the cupcakes cool, it’s frosting time! In your mixer, cream a full cup of room temperature butter until it’s light and fluffy — this usually takes about 2-3 minutes. Then add the entire jar of marshmallow cream and beat again until combined. Good stuff! Now add powdered sugar and vanilla extract, whipping for around 4 minutes until the frosting is silky and spreadable. Divide your frosting into two bowls—one gets purple food coloring; the other, green. Stir each until the colors are vivid and even. This step is where you can get creative with shades or add flavor extracts if you want.
Step 3: Assemble the Layers Inside Your Jars
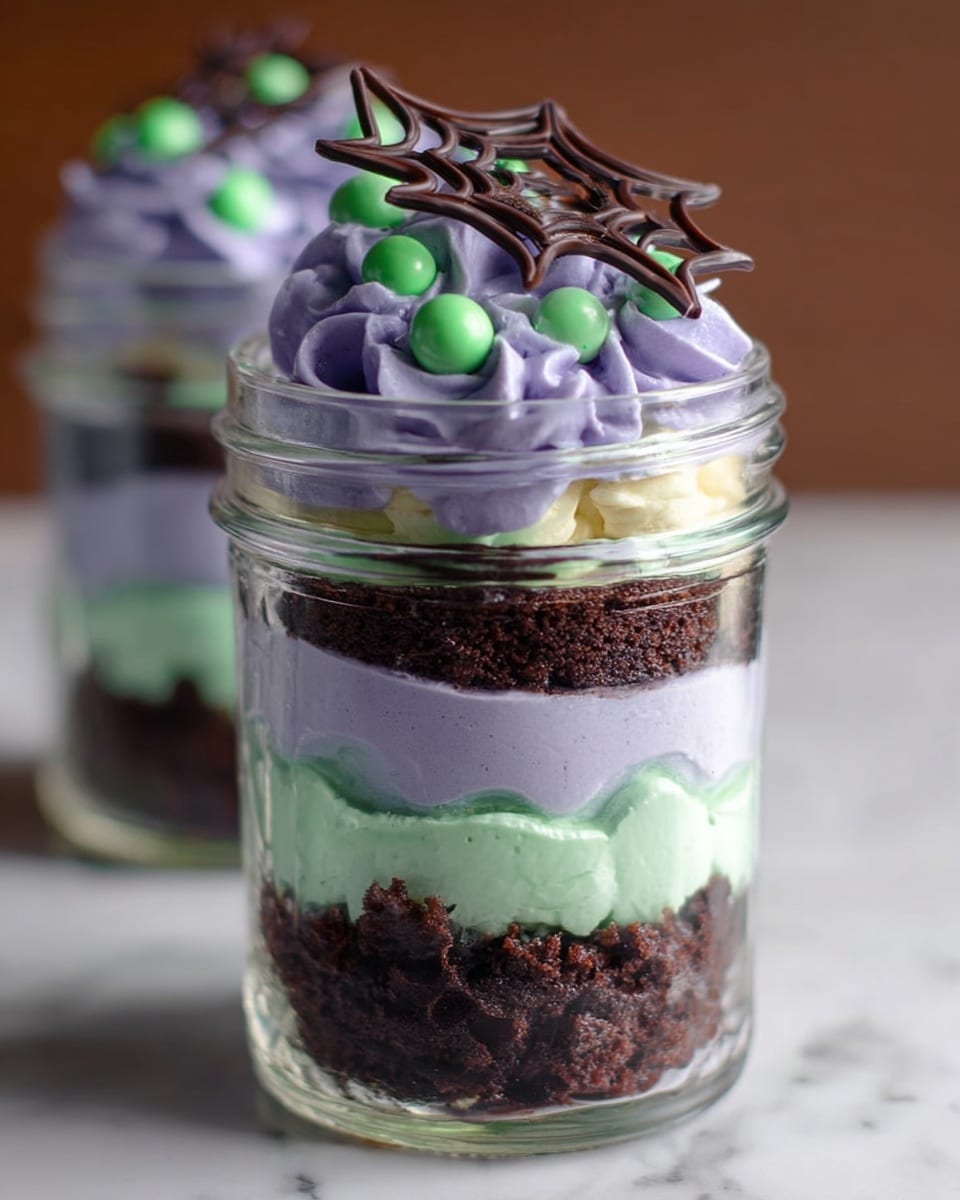
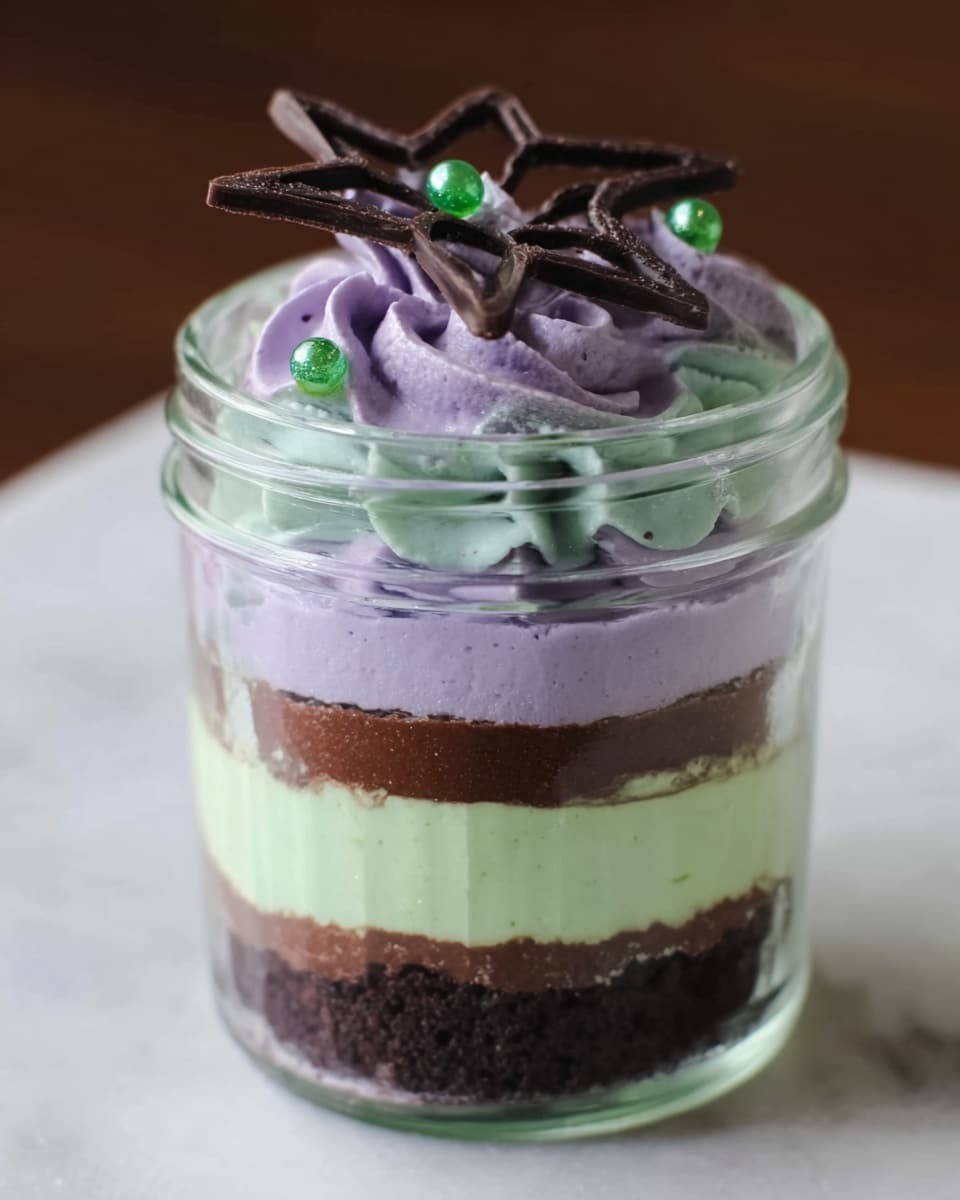
Remove the paper baking cups from your cooled cupcakes—this makes the layers neat and no paper bits in sight! Next, using a serrated knife (I find a small bread knife works great), slice each cupcake horizontally into two halves. In each mason jar, place one half of a cupcake to form the base. Using a piping or Ziploc bag with a small corner cut off, pipe a layer of frosting (start with purple or green, whichever you like). Sprinkle on your favorite candies or sprinkles for some texture and color. Repeat the cake and frosting layers, finishing with a big swirl of frosting and sprinkles on top. The layering makes each bite fun and pretty.
Step 4: Add That Stunning Spider Web Design
For a spooky touch (perfect around Halloween, but fun any time), grab some dark chocolate candy melts. Melt them gently in the microwave in 30-second bursts, stirring carefully between sessions so they don’t burn. Transfer the melted chocolate to a piping bag or a small Ziploc with a tiny corner snipped. Trace your spider web pattern over wax paper (I usually print out a design and place wax paper on top to follow the lines). Let the chocolate harden completely before carefully peeling off the webs and placing them on top of your jars or holding them as charming dessert toppers.
Pro Tips for Making Mason Jar Cakes Recipe
- Use Room Temperature Butter: It whips up better and makes the frosting smoother and fluffier.
- Cool Cupcakes Completely: To avoid melting your frosting and soggy layers, make sure your cupcakes are fully cooled before assembling.
- Don’t Overfill Jars: Leave a little space at the top so frosting swirls and decorations can shine without spilling.
- Piping Bag Hacks: If you don’t have piping bags, Ziploc bags work wonders—just clip a tiny corner for controlled frosting application.
How to Serve Mason Jar Cakes Recipe
Garnishes
I love topping mine with colorful sprinkles or edible glitter to add that extra sprinkle of joy. Sometimes I’ll toss in mini chocolate chips or candy pearls for a bit of texture. The chocolate spider webs are a total showstopper, especially if you want to impress your guests with a little DIY flair. Fresh berries or edible flowers can also jazz up the jars beautifully if you want a fresh, summery feel.
Side Dishes
These jar cakes are pretty hearty on their own, but when serving at parties, I like pairing them with a light side like a scoop of vanilla ice cream or fresh fruit salad. Hot drinks like coffee or tea complement the richness of the chocolate beautifully, enhancing the overall dessert experience.
Creative Ways to Present
For special occasions, I’ve wrapped each jar with twine and little handwritten tags – guests loved the personal touch. You can also stack the jars in rustic wooden crates for a farmhouse vibe or arrange them on a tiered cupcake stand for a fancy display. Adding seasonal ribbon or themed toppers can take these from everyday treats to centerpiece-worthy desserts.
Make Ahead and Storage
Storing Leftovers
I’ve stored leftover mason jar cakes by keeping the lids tightly sealed and refrigerating. They hold up beautifully for up to 3-4 days without losing flavor or texture, which is perfect if you want to prepare ahead or enjoy a sweet treat across several days.
Freezing
Freezing works great for this recipe! Just pop the cakes into the freezer with lids on, and they’ll last for a couple of months. When I thaw mine, I bring them to the fridge overnight and let come to room temperature before serving for best texture.
Reheating
I usually skip reheating since these are best served chilled or at room temperature. But if you do want things warmer, I suggest removing the lid and gently microwaving for 10-15 seconds — watch carefully so you don’t melt the frosting.
FAQs
-
Can I use homemade cake instead of boxed mix for this Mason Jar Cakes Recipe?
Absolutely! While the boxed mix saves time, you can swap in your favorite homemade chocolate cake recipe. Just make sure it’s fully cooled before assembling layers in the jars to avoid melting the frosting.
-
What size mason jars work best for this recipe?
Eight-ounce mason jars are ideal. They fit just the right amount of cake and frosting for single servings without being too bulky or too small.
-
Can I make these ahead for a party?
Definitely! You can bake and assemble the jars a day or two prior, then keep them refrigerated until serving. Just add fresh sprinkles or decorations right before you want to impress your guests.
-
How long will these Mason Jar Cakes stay fresh?
Stored in the fridge with a tight lid, they stay fresh for about 3-4 days. For longer storage, freezing is a great option.
Final Thoughts
I’ve made this Mason Jar Cakes Recipe for everything from Halloween parties to quiet weekend treats, and it never fails to be a hit. There’s something so comforting and special about digging into your own little jar of layered chocolate and frosting — plus, they’re pretty fun to decorate and customize. I hope you give this a try and have as much joy making and eating these as I do. Trust me, once you do, mason jar cakes might just become your new favorite way to celebrate sweet moments!
Print
Mason Jar Cakes Recipe
- Prep Time: 25 minutes
- Cook Time: 18 minutes
- Total Time: 43 minutes
- Yield: 8 servings
- Category: Dessert
- Method: Baking
- Cuisine: American
Description
A fun and festive Mason Jar Cakes recipe featuring layers of rich Devils Food Chocolate Cake and colorful marshmallow frosting, perfect for individual servings and easy gifting.
Ingredients
Cake
- 1 box Devils Food Chocolate Cake mix
- Vegetable oil as directed on box
- Eggs as directed on box
- Water as directed on box
Frosting
- 1 cup room temperature butter
- 2 cups powdered sugar
- 1 7 oz jar marshmallow cream
- 1 teaspoon vanilla extract
- Food coloring purple
- Food coloring green
Decoration
- 1 bag dark chocolate candy melts
- Sprinkles optional
- 8 oz mason jars
- Ziploc or piping bags
Instructions
- Preheat Oven: Heat your oven to 350 degrees Fahrenheit.
- Prepare Muffin Cups: Place paper baking cups inside regular size muffin tins.
- Mix Cake Batter: Prepare the Devils Food Chocolate Cake mix according to box instructions using water, vegetable oil, and eggs.
- Bake Cupcakes: Pour batter into muffin cups and bake for approximately 18 minutes or as directed on the box.
- Cool Cupcakes: Remove cupcakes from the pan and allow to cool completely.
- Make Frosting: Cream 1 cup of room temperature butter in a mixer, then add marshmallow cream. Gradually mix in powdered sugar and vanilla, continuing to beat for about 4 minutes until smooth and blended.
- Color Frosting: Divide frosting into two bowls. Add 3 drops of purple food coloring to one bowl and mix well. Add 3 drops of green food coloring to the other bowl and mix well.
- Prepare Cake Layers: Remove paper baking cups from cupcakes and cut each cupcake horizontally into halves.
- Assemble Jars: Place one cupcake half at the bottom of each mason jar. Fill a Ziploc or piping bag with purple frosting, cut off the corner, and pipe frosting over the cupcake layer. Sprinkle candies or sprinkles on top.
- Repeat Layers: Add the second cupcake half on top, pipe green frosting, then sprinkle. Finish with frosting and sprinkles as desired.
- Create Spider Web Decorations: Draw or print a spider web on paper and cover it with wax paper. Melt dark chocolate candy melts in 30-second microwave intervals until smooth. Pour melted chocolate into a piping bag or Ziploc bag, cut a tiny hole at the tip, and trace the spider web onto wax paper. Let chocolate harden completely.
- Serve: Once spider webs are firm, place them on top of the jars or use as decorations. Serve and enjoy your Mason Jar Cakes!
Notes
- Ensure cupcakes are completely cooled before cutting for easier handling.
- Use parchment paper to help remove cupcake layers smoothly.
- Substitute dark chocolate candy melts with white chocolate or colored melts for variation.
- Sprinkles can be tailored to the occasion or theme.
- Chocolate spider webs can be made ahead of time and stored in an airtight container.
Nutrition
- Serving Size: 1 jar (about 150 g)
- Calories: 350 kcal
- Sugar: 38 g
- Sodium: 220 mg
- Fat: 18 g
- Saturated Fat: 10 g
- Unsaturated Fat: 6 g
- Trans Fat: 0 g
- Carbohydrates: 45 g
- Fiber: 2 g
- Protein: 3 g
- Cholesterol: 45 mg

