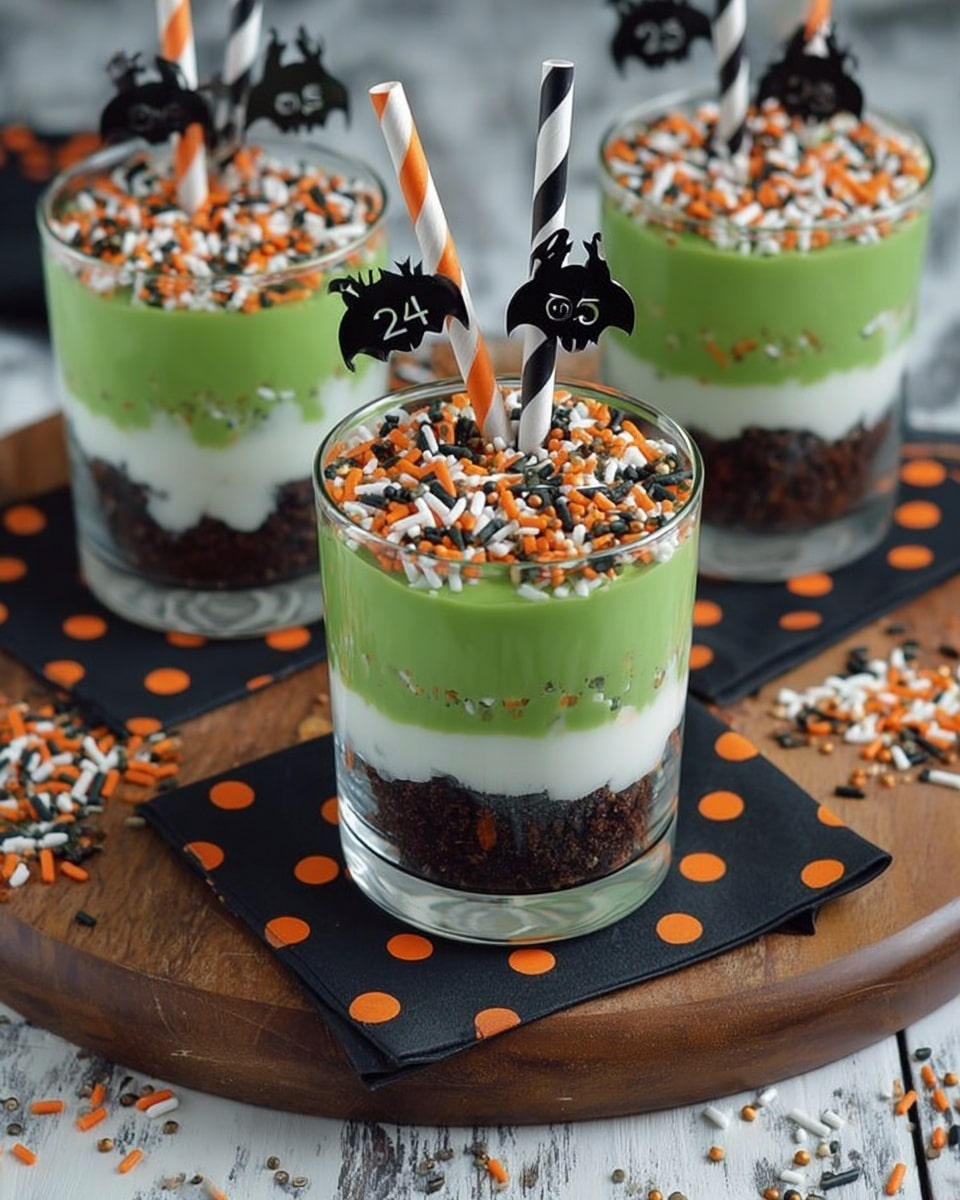
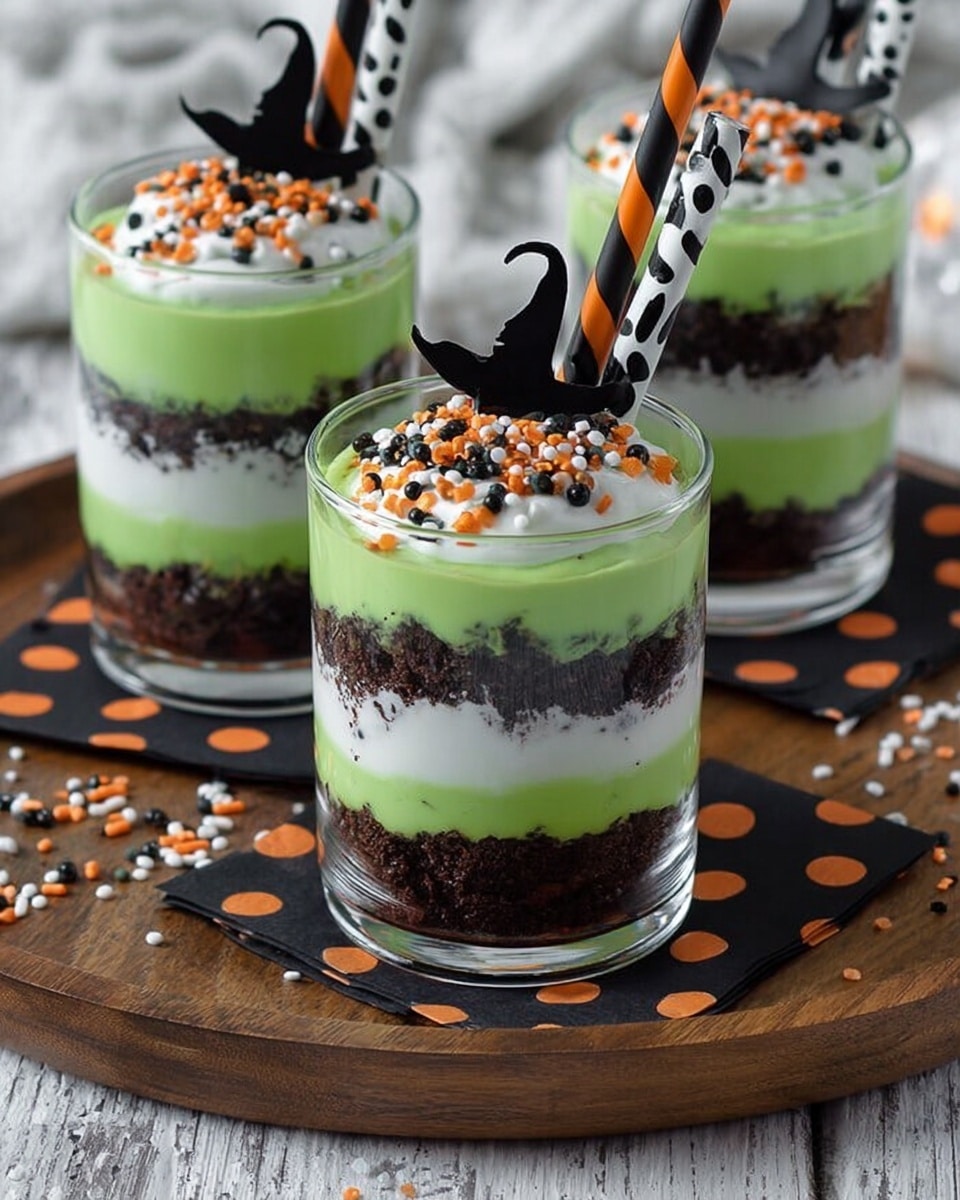
Melted Witch Pudding Parfaits Recipe
If you’re anything like me and adore festive treats that are simple yet impressively fun, you’re going to flip for this Melted Witch Pudding Parfaits Recipe. It’s perfect for Halloween parties or cozy nights when you want something spooky and sweet without the fuss. Trust me, these parfaits come together faster than a witch on a broomstick and taste just as magical. Stick with me, and I’ll show you exactly how to make these delightful layered treats that wow every time.
Why This Recipe Works
- Layered textures: Combining creamy pudding, crumbly brownies, crunchy Oreos, and fluffy whipped cream creates a delightful balance that keeps you coming back for more.
- Easy, no-bake assembly: This recipe requires zero baking time, saving you energy and stress while still delivering an impressive dessert.
- Fun and festive: The green pudding and Halloween sprinkles instantly bring seasonal charm that kids and adults alike adore.
- Flexible and forgiving: You can swap brownies for cookies or adjust colors to fit your party vibe without losing the magic.

Ingredients & Why They Work
This Melted Witch Pudding Parfaits Recipe relies on simple pantry staples that combine into something way more special than the sum of their parts. Each ingredient contributes texture and flavor, and I always recommend using the freshest brownies and Oreos you can find for maximum yum.

- Vanilla Snack Pack pudding cups: Convenient and creamy, perfect for coloring without extra prep; you could substitute homemade pudding if you’re feeling fancy.
- Green food coloring: Brings the wicked witch vibe to life—add slowly to hit that perfect spooky shade.
- Brownies: Crumbled for a fudgy, chewy base; I love to use slightly underbaked brownies so they’re moist and meld beautifully into the parfait.
- Oreos: Crushed for a crunchy contrast that mimics dirt—essential for that uneven, wild texture.
- Whipped cream: Light and airy, adds sweetness and lifts the layers; homemade or store-bought both work great.
- Halloween sprinkles: For that final festive punch that makes these parfaits feel special and fun.
Tweak to Your Taste
I like to play around with the toppings and even swap the brownies for different cookies depending on who I’m serving. Feel free to make this Melted Witch Pudding Parfaits Recipe your own—it’s forgiving and fun!
- Variation: For a dairy-free twist, I’ve used coconut-based pudding and whipped cream substitutes with great results, keeping the fun but accommodating dietary needs.
- Flavor swap: Try mixing in a little pumpkin spice to the pudding for autumn vibes that pop without overpowering the classic flavors.
- Extra spooky: Add gummy worms or candy eyes between layers for a kid-friendly creep factor that’s always a hit at parties.
Step-by-Step: How I Make Melted Witch Pudding Parfaits Recipe
Step 1: Color Your Pudding
Start by transforming your vanilla Snack Pack pudding cups into a witchy green. You can either add a few drops of green food coloring directly into each pudding cup and stir, or pour all the pudding into a bowl, mix until evenly green, then portion it back out. Personally, I like mixing in a bowl for even color and ease, but either way works—just be gentle so the pudding stays thick and creamy.
Step 2: Layer the Brownies
Next, crumble your brownies into bite-sized pieces and layer them evenly on the bottom of each parfait glass or cup. I find that starting with a solid brownie base gives you that chewy surprise in every bite, which contrasts beautifully with the smooth pudding.
Step 3: Add the Whipped Cream
Now, spoon or pipe a generous dollop of whipped cream over the brownies. I like to use a piping bag when I have it handy—it looks prettier and makes each bite more luscious, but a spoonful works just as well.
Step 4: Sprinkle on the Oreos
Sprinkle crushed Oreos over the whipped cream layer like “witch’s dirt.” Don’t worry about perfection here; the uneven texture is what brings these parfaits to life. Plus, kids love sneaking Oreos from the top!
Step 5: Top with Green Pudding and Sprinkles
Finally, spoon the green pudding on top to fill each glass. Give it a gentle tap to settle everything down a bit and then sprinkle your Halloween sprinkles for that festive pop. If you want, add candy witch’s legs poking out from the top to complete the look—super cute and easy!
Pro Tips for Making Melted Witch Pudding Parfaits Recipe
- Even Color Mixing: Stir pudding gently but thoroughly after adding food coloring to avoid streaky colors and preserve texture.
- Brownie Freshness: Use brownies that are a day old for the best texture—freshly baked ones can be too moist and make the parfait soggy.
- Layer Patience: Let each layer settle slightly before adding the next to keep the distinct layers visible and attractive.
- Serve Quickly: These parfaits are best enjoyed within minutes of assembly to avoid sogginess, so plan to serve right after you put them together.
How to Serve Melted Witch Pudding Parfaits Recipe
Garnishes
I love topping these parfaits with a few Halloween sprinkles, but sometimes I get creative with candy eyeballs or even edible glitter if I want to up the wow-factor for a party. The trick is to keep garnishes light so they don’t weigh down the pudding.
Side Dishes
Since this dessert is rich and sweet, I often serve it after simple savory snacks like roasted pumpkin seeds or warm, spiced apple cider cookies to keep things balanced and interesting.
Creative Ways to Present
For a Halloween bash, I’ve served these parfaits in mini mason jars with tiny broomstick stirrers and spooky straws for an extra playful touch. You can also layer the components in clear plastic Halloween cups if you’re taking them to a school party or picnic.
Make Ahead and Storage
Storing Leftovers
If you happen to have leftovers (which is rare!), cover the parfaits tightly with plastic wrap and store in the fridge. But heads-up: the brownie and Oreo layers will soften within a few hours, so texture changes slightly to more pudding-like, which some folks actually enjoy!
Freezing
I haven’t tried freezing these parfaits due to the delicate whipped cream and pudding layers, but if you want to prepare components ahead, the brownie and crushed Oreos freeze beautifully on their own.
Reheating
This dessert is best served cool and fresh, so I don’t recommend reheating. However, if the brownies or other components feel cold from the fridge, just let parfaits sit at room temperature for 5-10 minutes before enjoying.
FAQs
-
Can I use other pudding flavors for the Melted Witch Pudding Parfaits Recipe?
Absolutely! Vanilla is classic and easy to color, but chocolate or even banana pudding could add unique twists. Just consider how the flavors will blend with brownies and Oreos.
-
How far in advance can I prepare these parfaits?
It’s best to assemble the parfaits within 30 minutes of serving to keep the textures fresh. You can prep each component a day ahead, then layer right before guests arrive.
-
Can I substitute the brownies in this recipe?
Yes! Cookies like chocolate chip or ginger snaps work nicely too. Just crumble them similarly to maintain that satisfying bite within the layers.
-
What’s the best way to get the perfect green color for the pudding?
Start with just a couple of drops of green food coloring and stir well, then add more gradually until you hit the vibrant shade you want. Too much can alter the pudding’s texture and taste.
Final Thoughts
This Melted Witch Pudding Parfaits Recipe might look simple, but it’s one of those desserts that always draws compliments and smiles. It captures the spirit of Halloween in a way that’s accessible for cooks of all levels. I hope you enjoy making it as much as I do — my family literally asks for this every spooky season! Give it a try, and you might just find your new favorite quick holiday treat.
Print
Melted Witch Pudding Parfaits Recipe
- Prep Time: 20 minutes
- Cook Time: 0 minutes
- Total Time: 20 minutes
- Yield: 6 servings
- Category: Dessert
- Method: No-Cook
- Cuisine: American
- Diet: Vegetarian
Description
Melted Witch Pudding Parfaits are a fun and spooky Halloween treat made by layering green-dyed vanilla pudding, crumbled brownies, crushed Oreos, whipped cream, and festive sprinkles for a delightful and visually striking dessert perfect for parties or family gatherings.
Ingredients
Pudding Layer
- 6 vanilla Snack Pack pudding cups
- Green food coloring (to desired color)
Brownie Layer
- 1 cup brownies, crumbled into smaller pieces
Oreo Layer
- 1 cup Oreos, crushed
Topping
- 1 cup whipped cream
- Halloween sprinkles (to decorate)
- Witch’s legs (for garnish)
Instructions
- Dye the pudding: Transfer the vanilla Snack Pack pudding cups to a bowl and add green food coloring. Stir until you achieve the desired shade of green. Set aside.
- Layer brownies: Evenly divide and place the crumbled brownie pieces at the bottom of each parfait glass.
- Add whipped cream: Spoon a layer of whipped cream over the brownie pieces in each glass.
- Layer crushed Oreos: Sprinkle crushed Oreos on top of the whipped cream layer evenly in each parfait.
- Add pudding: Spoon the green-dyed vanilla pudding over the Oreos, filling each glass completely.
- Decorate: Top each parfait with Halloween sprinkles and garnish with witch’s legs for a festive touch.
- Serve promptly: Enjoy the parfaits within a few minutes to avoid sogginess of the ingredients.
Notes
- Use green gel food coloring for a more vibrant color without thinning the pudding.
- Crush Oreos gently if you prefer chunkier texture or more for finer crumbs.
- Use store-bought brownies or homemade for best flavor.
- Whipped cream can be homemade or pre-packaged like Reddi-wip.
- Enjoy these parfaits immediately after assembly to keep layers distinct and fresh.
Nutrition
- Serving Size: 1 parfait
- Calories: 350 kcal
- Sugar: 30 g
- Sodium: 150 mg
- Fat: 15 g
- Saturated Fat: 7 g
- Unsaturated Fat: 6 g
- Trans Fat: 0 g
- Carbohydrates: 45 g
- Fiber: 2 g
- Protein: 4 g
- Cholesterol: 25 mg


