Mummy Halloween Brownies Recipe
If you’re looking to wow your Halloween guests with something both spooky and seriously delicious, you’ve come to the right place! This Mummy Halloween Brownies Recipe has quickly become my go-to treat for October parties. Not only do these brownies bring that perfect fudgy chocolate flavor, but the adorable mummy design made from piped ganache and candy eyeballs makes them a conversation starter. Stick with me, and I’ll walk you through every step to make these cute creepy treats like a pro. You’re going to love how easy and fun they are!
Why This Recipe Works
- Fudgy, Rich Texture: The melted butter and dark chocolate combo creates brownies that are perfectly dense without being dry.
- Simple Ganache Piping: The chocolate ganache used as “mummy wrappings” is easy to make and pipe, giving a great visual without complicated decorating skills.
- Fun & Festive Presentation: Adding candy eyeballs instantly transforms the brownies into festive, spooky delights that kids and adults adore.
- Flexible Timing: You can make the brownies ahead, chill the ganache, and assemble right before serving for stress-free party prep.

Ingredients & Why They Work
Every ingredient in this Mummy Halloween Brownies Recipe plays a special role in making the final product just right. The classic butter and dark chocolate blend ensures a rich, fudgy brownie, while the ganache frosting adds smooth texture perfect for piping. Here’s the low-down on each component you’ll need:

- Unsalted Butter: Using unsalted lets you control the saltiness and keeps the flavor pure and creamy in the brownies.
- Dark Chocolate (for brownies and ganache): Adds deep chocolaty flavor — the higher cocoa content keeps the brownies rich and gives the ganache its silky texture.
- Granulated Sugar: Divided to both sweeten the brownies and balance the bittersweet chocolate without overpowering it.
- Large Eggs: Give structure and moisture, helping the brownies hold together yet stay tender.
- All-Purpose Flour: Provides just enough body for fudgy brownies, so they don’t turn cakey.
- Kosher Salt: Enhances the chocolate flavor and balances the sweetness beautifully.
- Heavy Cream (For Ganache): Creates the silky, pipeable ganache that mimics mummy wrappings perfectly.
- Candy Eyeballs: The fun finishing touch — make sure they’re small and sturdy so they hold up on the ganache.
Tweak to Your Taste
One of the things I love about this Mummy Halloween Brownies Recipe is how you can make it your own with some simple tweaks. Whether you want to dial up the chocolate, add a little texture, or keep it dairy-free, it’s a versatile canvas for your imagination.
- Nutty Twist: I sometimes fold in chopped walnuts or pecans to the batter — it adds a satisfying crunch contrasting the fudgy brownie.
- Spiced Up: Adding a pinch of cinnamon and a dash of cayenne turns these into “spooky spicy brownies,” great if you like a tiny heat kick.
- Dairy-Free Option: Substitute vegan butter and dairy-free dark chocolate to keep things allergy-friendly without losing the fudgy texture.
- Simplified Decoration: If you’re short on time, just drizzle melted white chocolate in lines for wrappings and mark eyes with mini chocolate chips.
Step-by-Step: How I Make Mummy Halloween Brownies Recipe
Step 1: Preheat and Prep Your Pan
First things first: set your oven to 350°F (175°C). Line a 9×9-inch baking pan with parchment paper, then lightly spray the parchment with nonstick cooking spray—trust me, this makes lifting the brownies out a breeze and keeps the edges intact. Having the pan properly prepped saves you the stress of uneven brownies or cracks later on.
Step 2: Melt Butter and Chocolate Gently
Using a double boiler or a heatproof bowl over a simmering pot of water, melt your butter and chopped dark chocolate together slowly. Stir occasionally to keep it smooth and avoid scorching. Removing it from heat as soon as everything’s melted will keep the chocolate silky and glossy—this base is the star of fudgy brownies!
Step 3: Combine Sugar and Egg Mixtures
Whisk one cup of sugar into the warm chocolate mixture until fully incorporated. In a separate bowl, whisk the remaining sugar with your eggs until the mix is smooth and slightly thickened. Slowly pour the chocolate mixture into the eggs while whisking steadily. This step is key to creating a batter that bakes up tender and rich without scrambling the eggs—patience pays off here!
Step 4: Fold in Flour and Salt
Gently fold in the flour and kosher salt using a rubber spatula. Be careful not to overmix—just bring everything together until there are no flour streaks. Overmixing can make the brownies tough, and you want them soft and succulent.
Step 5: Bake and Cool
Pour the batter into your prepped pan and bake for about 35 to 40 minutes. The toothpick test here is crucial — aim for a few moist crumbs sticking to the skewer rather than completely clean; that guarantees fudgy brownies. Once out, let it cool completely on a rack. I know it’s tempting to dive in right away, but the ganache decoration sticks better when brownies are fully cooled.
Step 6: Make the Ganache and Chill
Heat heavy cream gently in a small saucepan until it just begins to simmer, then remove from heat and stir in chopped dark chocolate until smooth and shiny. Let it cool in the fridge for about 30 minutes, or until it firms up enough to pipe without dripping—a crucial step for that mummy wrap look.
Step 7: Decorate Your Mummy Brownies
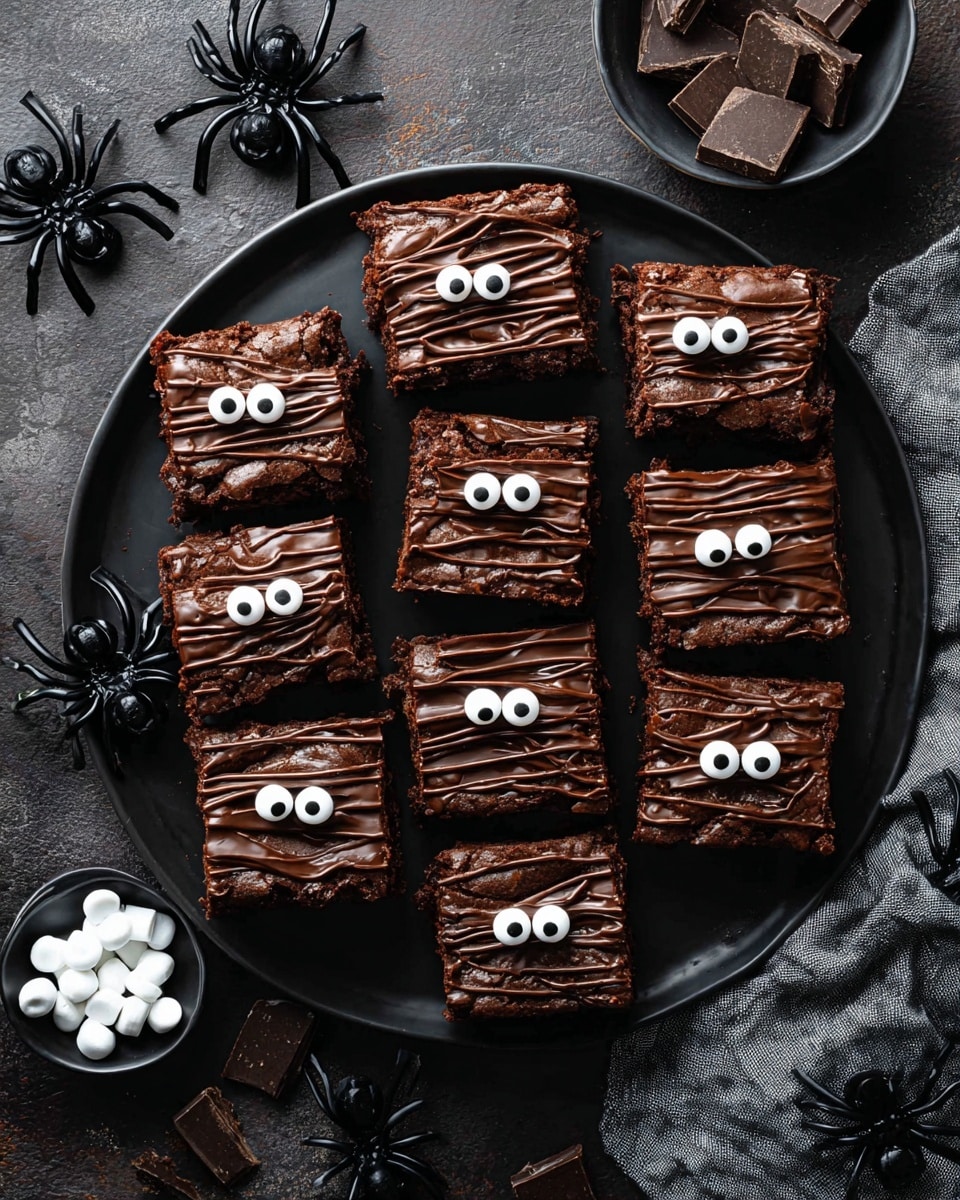
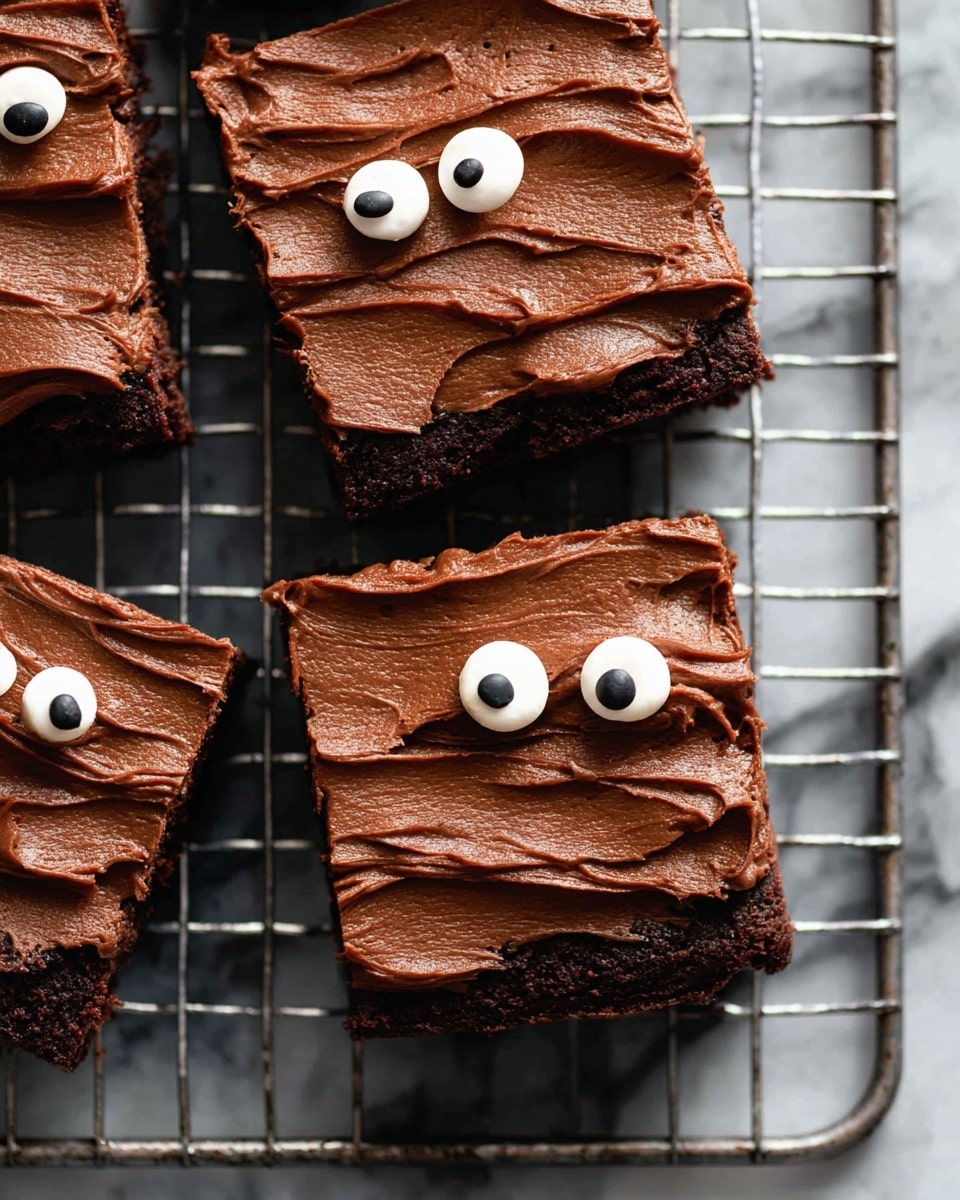
Using the parchment paper to lift the brownies out, peel it away and cut your brownies into 18 long, thin rectangles (6 rows by 3). Pipe the chilled ganache back and forth across each brownie strip to mimic mummy wrappings, then press two candy eyeballs into each one. This part is so much fun and looks fantastic — honestly, it’s the smile you get seeing those little eyes staring back that makes these worth it!
Pro Tips for Making Mummy Halloween Brownies Recipe
- Use Quality Chocolate: I’ve found that investing in good dark chocolate for both the brownies and ganache makes a world of difference in richness and smooth texture.
- Don’t Overbake: Pull your brownies out when the center is just set but still slightly gooey for that fudgy, melt-in-your-mouth bite.
- Chill Ganache Properly: Refrigerate the ganache until it’s just firm enough to pipe clean stripes—too soft and it will run, too hard and it’s tough to pipe.
- Cut with a Sharp Knife: Warm a knife under hot water, dry it off, and slice to get clean edges, giving your mummies a neat presentation.
How to Serve Mummy Halloween Brownies Recipe
Garnishes
I keep the decoration simple with candy eyeballs and the piped ganache wrapping for the classic mummy look, but sometimes I sprinkle just a pinch of edible glitter or orange sanding sugar around the tray edges to add some spooky sparkle. It’s subtle but festive—and the kids always get a kick out of it!
Side Dishes
These brownies pair beautifully with a scoop of vanilla ice cream or a dollop of whipped cream to balance the rich chocolate. For drinks, warm apple cider or a creamy pumpkin spice latte makes a cozy combo for a fall party.
Creative Ways to Present
I’ve had fun arranging these brownies on a platter decorated with fake spider webs and plastic spiders for that extra Halloween vibe. Another idea is serving them on individual mini plates with a drizzle of raspberry sauce to look like a “bloody” effect—perfect for grown-up parties where you want a little more dramatic flair.
Make Ahead and Storage
Storing Leftovers
I store leftovers in a single layer inside an airtight container at room temperature for up to three days. This keeps the brownies fresh without the ganache melting or the candy eyes sliding off. If I need to stack them, I separate layers with parchment paper to protect the decorations.
Freezing
While I don’t usually freeze these brownies fully decorated (the ganache can get messy), you can freeze the plain brownies wrapped tightly in plastic wrap and foil for up to two months. Then defrost overnight in the fridge before decorating. This way, you can prep the base ahead and add the fun mummy details closer to your party.
Reheating
If you like your brownies warm, gently microwave individual pieces for about 10 seconds. Just skip reheating if they have ganache and candy eyes on top to avoid melting decorations—otherwise, reheat plain brownies and add your mummy touches fresh.
FAQs
-
Can I use milk chocolate instead of dark chocolate in this recipe?
Yes, you can substitute milk chocolate for dark chocolate, but keep in mind the flavor will be sweeter and less intense. Dark chocolate gives the brownies their rich depth, but milk chocolate will still yield tasty results if that’s what you have on hand.
-
How do I make sure the ganache is the right consistency for piping?
After making the ganache, refrigerate it for about 30 minutes, then check by scooping a bit with a spoon. It should be thick enough to hold its shape but still soft enough to pipe easily. If it’s too soft, chill a bit longer; if too firm, let it warm slightly at room temperature.
-
Can I make these brownies gluten-free?
Yes, you can substitute the all-purpose flour with a gluten-free flour blend that’s suitable for baking. Be sure to use a blend designed for brownies or cakes to maintain the fudgy texture.
-
What if I don’t have candy eyeballs? Any alternatives?
If you can’t find candy eyeballs, mini marshmallows with a dot of melted chocolate or edible marker for pupils work great. You could also use white chocolate chips with a small dab of dark melted chocolate for eyes.
Final Thoughts
This Mummy Halloween Brownies Recipe has become a little seasonal tradition in my house—there’s something so joyful about combining classic chocolate brownies with playful decoration that makes Halloween extra fun. I love sharing this recipe because it’s not only delicious but approachable for all levels of bakers. So, grab your apron, invite a friend to help, and whip up these adorable mummies. Trust me, the smiles (and maybe a few happy “oohs!”) you get are worth every minute in the kitchen!
Print
Mummy Halloween Brownies Recipe
- Prep Time: 45 minutes
- Cook Time: 40 minutes
- Total Time: 1 hour 55 minutes
- Yield: 18 brownies
- Category: Dessert
- Method: Baking
- Cuisine: American
Description
These spooky Mummy Halloween Brownies are a fun and festive treat perfect for Halloween parties. Rich, fudgy brownies are topped with a smooth chocolate ganache piped to look like mummy bandages and decorated with candy eyeballs for a playful finish.
Ingredients
For the Brownies:
- Nonstick cooking spray
- 8 ounces unsalted butter, cut into tablespoons
- 6 ounces dark chocolate, roughly chopped
- 2 cups granulated sugar, divided
- 4 large eggs
- 1 cup all-purpose flour
- 1 teaspoon kosher salt
For the Ganache:
- ½ cup heavy cream
- 4 ounces dark chocolate, roughly chopped
For Decoration:
- 36 small candy eyeballs
Instructions
- Preheat and prepare pan: Preheat the oven to 350 degrees F. Line a 9 x 9-inch pan with parchment paper and spray the parchment with nonstick cooking spray to ensure easy removal of the brownies.
- Melt butter and chocolate: Using a double boiler over medium-low heat, melt the butter and chopped dark chocolate together, stirring occasionally until smooth. Remove from heat.
- Add sugar to chocolate mixture: Whisk 1 cup of the granulated sugar into the melted chocolate and butter mixture until fully combined and smooth.
- Mix eggs and remaining sugar: In a large bowl, whisk the 4 eggs with the remaining 1 cup of granulated sugar until smooth and slightly thickened.
- Combine chocolate and egg mixtures: Slowly pour the chocolate mixture into the egg mixture while whisking continuously until just combined.
- Add dry ingredients: Fold the flour and kosher salt into the wet mixture gently with a rubber spatula until just combined, being careful not to overmix.
- Bake brownies: Pour the batter evenly into the prepared pan and bake for 40 minutes or until a toothpick inserted into the center comes out just barely clean. Transfer to a cooling rack and allow brownies to cool completely before decorating.
- Prepare ganache: Heat the heavy cream in a small saucepan over medium heat until it just begins to simmer. Remove from heat and add the chopped dark chocolate, whisking until smooth and fully melted.
- Chill ganache: Transfer the ganache to the refrigerator for 30 minutes or until it firms up enough to be piped.
- Cut brownies: Lift the cooled brownies out of the pan using the parchment paper. Peel away the parchment and use a sharp knife to cut the brownies into 18 long, thin rectangles by slicing into 6 rows by 3 rows.
- Pipe ganache bandages: Whisk the chilled ganache until smooth. Transfer it to a piping bag fitted with a small flat tip or a gallon Ziploc bag with a small hole cut at the tip. Pipe back and forth over each brownie to resemble mummy wrappings.
- Add candy eyeballs and serve: Place two candy eyeballs onto the ganache on each brownie. Serve immediately or store in a single layer in an airtight container at room temperature for up to 3 days.
Notes
- Use a sharp knife dipped in hot water and wiped dry between cuts for cleaner brownie slices.
- If you don’t have a piping bag, use a resealable plastic bag and cut a small hole in one corner to pipe the ganache.
- Ensure brownies are completely cool before decorating to prevent ganache from melting.
- Store brownies in a single layer to prevent decorations from smudging.
- For a richer flavor, use high-quality dark chocolate with at least 60% cacao.
Nutrition
- Serving Size: 1 brownie
- Calories: 280 kcal
- Sugar: 24 g
- Sodium: 150 mg
- Fat: 18 g
- Saturated Fat: 10 g
- Unsaturated Fat: 6 g
- Trans Fat: 0 g
- Carbohydrates: 28 g
- Fiber: 3 g
- Protein: 3 g
- Cholesterol: 55 mg

