
No Bake Biscoff Cheesecakes Recipe
If you love the warm, caramel-spiced flavor of Biscoff and creamy, dreamy cheesecakes, then you’re going to absolutely adore this No Bake Biscoff Cheesecakes Recipe. These mini cheesecakes are unbelievably easy to whip up, need zero oven time, and deliver rich, silky texture that melts in your mouth. I’ve made these at least a dozen times for gatherings, and trust me, they’re crowd-pleasers every single time—so let me walk you through how to make them shine in your kitchen.
Why This Recipe Works
- No Oven Required: Perfect for hot days or when you want dessert fast and fuss-free.
- Rich Biscoff Flavor: Both the crust and filling spotlight that signature spicy caramel cookie goodness.
- Mini Size, Big Impact: Easy to portion, great for parties, and they feel just like a fancy treat.
- Creamy, Silky Texture: The whipped cream folded in makes these cheesecakes wonderfully light while still indulgent.

Ingredients & Why They Work
This No Bake Biscoff Cheesecakes Recipe blends simple ingredients that deliver layers of texture and flavor. The crust is straightforward but crunchy, the filling is luxuriously smooth thanks to the cream cheese and whipped cream, and the Biscoff elements tie everything together with their irresistible caramelized spice notes. Here’s why each part is essential:

- Biscoff Cookies: These offer that unmistakable caramelized, spiced crunch that makes the crust uniquely delicious.
- Unsalted Butter: Melts into the cookie crumbs to bind them perfectly without overpowering the flavor.
- Heavy Cream: Whipped to stiff peaks, it gives the filling a light, airy texture that’s not too dense.
- Cream Cheese: The creamy base for the cheesecake, softened to avoid lumps and ensure silky texture.
- Powdered Sugar: Dissolves smoothly into the cream cheese, sweetening without graininess.
- Biscoff Cookie Butter: It’s the star flavor in the filling and topping, bringing creamy caramel spice in every bite.
- Sour Cream: Adds tang and balance, keeping the filling from being overly sweet.
- Vanilla Extract: Deepens the flavor and complements the warm Biscoff notes beautifully.
- Salt: Just a pinch enhances all the sweet flavors, preventing blandness.
- Additional Biscoff Cookies & Whipped Cream for Garnish: Makes for pretty, tasty finishing touches that guests will notice.
Tweak to Your Taste
One of my favorite things about this No Bake Biscoff Cheesecakes Recipe is how easy it is to customize depending on what you like or have on hand. I personally love adding a little espresso powder to amplify the caramel notes, but you can experiment with a few other ideas to make it your own.
- Chocolate Swirl: I tried folding in melted dark chocolate for a mocha-biscoff twist—so good and decadent!
- Vegan Version: You can swap cream cheese for vegan cream cheese and use coconut cream instead of heavy cream to make it dairy-free.
- Spice It Up: A dash of cinnamon or nutmeg in the crust adds warmth and complements the Biscoff flavor beautifully.
Step-by-Step: How I Make No Bake Biscoff Cheesecakes Recipe
Step 1: Make the Crunchy Biscoff Crust
I start by blitzing the Biscoff cookies in a food processor until they turn into fine crumbs. This is the easiest way to get a crust that packs plenty of flavor and texture without giant chunks. Then, I slowly stream in melted unsalted butter—it should feel sandy but when you press it between fingers, it sticks together nicely. Make sure not to add too much butter; otherwise, you’ll end up with a soggy crust. Then, I press about a tablespoon of this mixture into each mini cheesecake mold or cupcake liner. Pop these into the fridge or freezer so they’re firm and ready for the filling.
Step 2: Whip the Cream to Perfection
Cold heavy cream whipped to stiff peaks is what gives these cheesecakes that airy lightness. I always chill my mixing bowl beforehand—it really helps speed up the whipping process. Be careful though, it’s easy to overdo it and start turning cream into butter. Stop once you see those firm, shiny peaks that hold their shape.
Step 3: Create the Silky Biscoff Cream Cheese Filling
Next up, I beat softened full-fat cream cheese with powdered sugar until smooth—always choose full-fat, trust me, the texture is unbeatable. Then I add in the luscious Biscoff cookie butter, sour cream, vanilla, and a pinch of salt. The sour cream adds a beautiful tang that balances out the sweetness. Once that’s silky, I fold in the whipped cream gently using a rubber spatula, so you keep all that extra fluff without deflating the mixture.
Step 4: Assemble and Chill
I like using a piping bag here because it makes filling the mini crusts neat and pretty, but a spoon works just as well. Once filled, smooth the tops and refrigerate for about 6 hours or ideally overnight—this resting time lets everything set up so the flavors marry and the texture becomes perfectly firm yet creamy.
Step 5: Top with Melted Biscoff and Garnish
Before serving, I melt some Biscoff cookie butter briefly in the microwave until pourable, then spread it over each cheesecake. It’s okay if it drips a little down the sides—it looks rustic and appetizing! Chill again for 15-20 minutes so the topping firms. For the final flourish, I add crushed Biscoff cookies and a dollop of whipped cream, sometimes even a whole cookie tilted on top for that bakery vibes.
Pro Tips for Making No Bake Biscoff Cheesecakes Recipe
- Chill Bowls and Beaters: Cold tools help the heavy cream whip faster and better—trust me, it’s a game changer.
- Softened Cream Cheese Only: If the cream cheese isn’t softened, you’ll get lumps; leave it out at room temp for at least 30 mins.
- Freeze Crusts for Extra Firmness: If you want an even crisper crust, freeze the crust layer before adding filling.
- Don’t Rush the Chill Time: Patience pays off here—the longer the chill, the better the texture and flavor melding.
How to Serve No Bake Biscoff Cheesecakes Recipe

Garnishes
I love topping these mini cheesecakes with a dollop of freshly whipped cream and crumbled Biscoff cookies for crunch. Sometimes I add a whole cookie angled on top for a little wow factor—makes them look extra special when serving guests or gifting. If you want a pop of color, a sprinkle of cinnamon or a few toasted nuts adds subtle texture.
Side Dishes
Because these are mini and rich, I usually serve them alongside fresh berries or a citrus fruit salad to cut through the sweetness. A cup of strong coffee or chai tea paired with these is straight-up perfection, balancing the caramel-spiced flavors beautifully.
Creative Ways to Present
For special occasions, I sometimes swap the mini pans for a large springform pan to make one big Biscoff cheesecake, then decorate the top with fresh flowers and edible gold leaf. Another idea I tried was layering these in clear glass jars for a grab-and-go dessert box—everyone loved how cute and portable they were!
Make Ahead and Storage
Storing Leftovers
These cheesecakes keep beautifully in the fridge for up to 4 days. I like to store them in an airtight container or cover the dish tightly with plastic wrap so they don’t dry out or pick up fridge odors. The texture remains spot on, and flavors even deepen a little!
Freezing
I’ve frozen these mini cheesecakes wrapped individually in plastic wrap and then placed in a zip-top bag for up to 3 months. When ready to enjoy, just thaw them overnight in the fridge. The texture holds up surprisingly well for a no bake cheesecake, making this a great make-ahead dessert option.
Reheating
Since these are best served chilled, I don’t really reheat them. If you want a slightly softer texture, bring them to room temperature for 15-20 minutes before serving. Avoid microwaving, as it’ll melt the cream cheese filling and mess with the texture.
FAQs
-
Can I make these cheesecakes dairy-free or vegan?
Yes! Swap the cream cheese for a vegan version (like almond or cashew-based) and use coconut cream whipped in place of heavy cream. Make sure your Biscoff cookie butter is also vegan-friendly. The texture and flavor will be slightly different but still delicious.
-
How long do these no bake Biscoff cheesecakes need to set?
Chilling for at least 6 hours is best, but overnight gives the creamiest, firmest results. The longer resting time lets the filling fully set and the flavors meld beautifully.
-
Can I make these mini cheesecakes in regular cupcake pans?
Absolutely! Just use cupcake liners and spray the pan with non-stick spray. Press the crust firmly and add the filling, then chill as directed. The liners make it easy to pop the mini cheesecakes out for serving.
-
What’s the best way to melt the Biscoff cookie butter for the topping?
I find microwaving it in short 10-15 second bursts, stirring in between, prevents overheating and keeps it smooth and pourable without burning or separating.
Final Thoughts
This No Bake Biscoff Cheesecakes Recipe has quickly become one of my signature go-tos for casual dinners, birthday parties, or whenever a sweet treat is needed without the oven heat. What I love most is how easy it is to make yet so impressive to share—with that incredible caramelized Biscoff flavor woven into every creamy bite, it feels like you’re indulging in a dessert masterpiece. Give it a try, and I promise it’ll become a new favorite in your dessert rotation too. Happy baking (or, well, no baking!)!
Print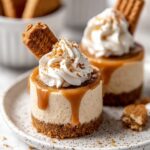
No Bake Biscoff Cheesecakes Recipe
- Prep Time: 30 minutes
- Cook Time: 0 minutes
- Total Time: 6 hours 30 minutes
- Yield: 24 mini cheesecakes
- Category: Dessert
- Method: No-Cook
- Cuisine: American
Description
These No Bake Mini Biscoff Cheesecakes are a creamy, indulgent dessert featuring a crunchy Biscoff cookie crust, a smooth Biscoff-flavored cream cheese filling, and a luscious Biscoff spread topping. Perfect for gatherings or a sweet treat, these cheesecakes are easy to prepare without baking and can be customized with additional garnishes like whipped cream and extra Biscoff cookies.
Ingredients
Crust
- 1 (8.8 oz, 250g) package Biscoff cookies
- 1/2 cup melted butter, unsalted
Filling
- 1 cup heavy cream, cold
- 3 (8 oz. blocks) full-fat cream cheese, softened to room temperature
- 1 cup powdered sugar
- 1 cup creamy Biscoff cookie butter
- 1/3 cup sour cream, room temperature
- 2 tsp. pure vanilla extract
- pinch of salt
Topping
- 1/2 cup creamy Biscoff cookie butter
- additional Biscoff cookies for garnish, whole or crushed
- whipped cream
Instructions
- Prepare the crust: Blitz the Biscoff cookies in a food processor until finely ground. Stream in the melted butter until the mixture is sandy but holds together when pressed.
- Form the crust: Spray 2 mini cheesecake pans or two 12-count muffin pans with non-stick spray or line with cupcake liners. Press about 1 tablespoon of the crumb mixture into each cavity. Freeze or refrigerate while preparing the filling.
- Whip the cream: Beat the cold heavy cream with a hand mixer or stand mixer whisk attachment until stiff peaks form, approximately 2 minutes. Be careful not to overbeat. Chill until needed.
- Make the filling: In a separate bowl, beat the softened cream cheese, powdered sugar, creamy Biscoff cookie butter, sour cream, vanilla extract, and pinch of salt until smooth and fully combined.
- Fold in whipped cream: Gently fold the whipped cream into the cream cheese mixture using a rubber spatula until no white streaks remain.
- Assemble cheesecakes: Spoon the filling into a piping bag fitted with a round 1A tip and pipe it onto the chilled crusts. Smooth the tops evenly.
- Chill: Refrigerate the cheesecakes for 6 hours or overnight, loosely covered.
- Add topping: Melt the Biscoff cookie butter topping in the microwave for 20-30 seconds until melted. Spread this evenly over the tops of the cheesecakes, allowing some to drip down the sides. Return to the fridge to set for 15-20 minutes.
- Garnish and serve: Decorate with whipped cream and additional Biscoff cookies either whole, crushed, or at an angle. Serve and enjoy!
Notes
- Storage: Store cheesecakes covered in the refrigerator for up to 4 days or freeze for up to 3 months.
- Use non-stick spray or cupcake liners in muffin tins to ease removal of mini cheesecakes.
- Do not overbeat the heavy cream to prevent it from becoming butter.
- Let the cream cheese soften fully at room temperature for a smooth filling.
- Chilling time is essential for the cheesecake to set properly.
Nutrition
- Serving Size: 1 mini cheesecake
- Calories: 210 kcal
- Sugar: 15 g
- Sodium: 120 mg
- Fat: 15 g
- Saturated Fat: 8 g
- Unsaturated Fat: 6 g
- Trans Fat: 0 g
- Carbohydrates: 18 g
- Fiber: 1 g
- Protein: 3 g
- Cholesterol: 50 mg
