
No-Bake Cookie Butter Icebox Cake Recipe
If you’ve ever wished for a dessert that feels festive, indulgent, and yet requires almost no effort, you’re going to love this one. Here’s my personal favorite: the No-Bake Cookie Butter Icebox Cake Recipe. It’s a dreamy layering of those crunchy Lotus Biscoff cookies with silky cookie butter cream, all chilled together into a sliceable, show-stopping treat. Trust me, once you try this, it’ll quickly become a go-to for impressing friends or just spoiling yourself without turning on the oven.
Why This Recipe Works
- Effortless No-Bake Prep: No ovens, no fuss—just a mixer and patience while it chills.
- Perfect Cookie-Cream Balance: Cookie layers soak just enough to soften without turning soggy.
- Iconic Biscoff Flavor: That spiced, caramelized cookie butter taste ties every bite together.
- Make-Ahead Friendly: You can prep it days ahead, making it ideal for stress-free entertaining.

Ingredients & Why They Work
Each ingredient in this No-Bake Cookie Butter Icebox Cake Recipe plays a unique role in creating that luscious texture and flavor combo we crave. Selecting good-quality Lotus Biscoff products and balancing creaminess with just the right hint of sweetness will set you up for delicious success.

- Heavy cream: Whipping it to medium peaks gives the cake its airy, creamy body that holds everything together.
- Lotus Biscoff spread (cookie butter): This is the star ingredient, infusing every bite with that signature spiced caramel flavor.
- Mascarpone cheese: Adds richness and a silky texture—trust me, it’s the secret to a decadent cream layer.
- Pure vanilla extract: Enhances flavor depth without overpowering the cookie butter taste.
- Pinch of Kosher salt: Balances sweetness and brightens all the flavors, essential in desserts.
- Confectioner’s sugar: Sweetens the cream gently without any graininess.
- Lotus Biscoff cookies: These cookies soak up the cream and soften just perfectly, giving the cake its iconic crunch-cum-softness texture.
Tweak to Your Taste
One of the things I adore about this No-Bake Cookie Butter Icebox Cake Recipe is how easy it is to play around with. Whether you like it more or less sweet, or want to add a little texture twist—make it yours! I’ve experimented with some fun spin-offs over time.
- Add Crunch: Sometimes I sprinkle chopped pecans or toasted almonds between layers for a nutty surprise—it amps up the texture wonderfully.
- Chocolate Lovers’ Variation: Swirling melted dark chocolate into the cream mixture before layering adds a rich, bittersweet contrast that my family can’t get enough of.
- Dairy-Free Swap: Using coconut cream and a dairy-free mascarpone alternative works beautifully too, making it accessible to more diets.
- Spiced Up: A pinch of cinnamon or ginger in the cream complements the Biscoff’s warm spices without overwhelming the palate.
Step-by-Step: How I Make No-Bake Cookie Butter Icebox Cake Recipe
Step 1: Whip That Cream to Perfection
Start by chilling your mixing bowl and whisk attachment if you can—it helps the heavy cream whip better. Pour in 2 cups of heavy cream and whisk on medium-high speed until you see medium peaks forming. The cream should hold its shape but still be soft and smooth, not stiff. This step makes or breaks the light texture of your final cake.
Step 2: Fold in the Cookie Butter Goodness
In goes ½ cup of Lotus Biscoff spread, ⅓ cup of mascarpone cheese, 1 teaspoon of vanilla extract, a pinch of Kosher salt, and 2 tablespoons of confectioner’s sugar. Gently fold everything into the whipped cream using a spatula—don’t overmix or you’ll lose that fluffy texture. The cream will take on a gorgeous caramel hue and that irresistible cookie butter aroma.
Step 3: Assemble Like a Pro
Line your loaf pan with plastic wrap to make removal easy later. Place a single layer of Biscoff cookies on the bottom (about 9 cookies, depending on your pan size). Spread a layer of the luscious cookie butter cream on top—aim for roughly the same thickness as your cookie layer. Repeat layering cookies and cream until you reach the top, ending with a cookie layer. This creates that perfect ratio of crunch and cream in every bite.
Step 4: Patience Is a Virtue—Chill for 24 Hours
Pop the pan into the fridge, loosely wrapped in plastic wrap to avoid absorbing other fridge flavors. This chilling time lets the cookies soften just right, soaking up flavor while still retaining a little bite. The cake firms enough to slice cleanly—a must for presentation and texture. I usually prepare it the night before for next-day dessert perfection.
Creative Ways to Present
For special occasions, I’ve turned this into mini parfaits layered in glass jars—perfect for gifting or party favors. Another fun idea is to assemble the cake in a clear trifle dish so guests can see the gorgeous layers. Add edible gold leaf or a dusting of cinnamon for a festive touch.
Make Ahead and Storage
Storing Leftovers
I keep leftover cake in the original loaf pan, tightly covered with plastic wrap. It stays fresh for up to 3 days in the fridge, and honestly, it tastes even better after a day or two when the flavors have had more time to meld. Just slice and serve straight from the fridge.
Freezing
If you ever want to stash some away for later, wrap it extremely well in plastic wrap and then place it in a freezer-safe container. When you’re ready, thaw it overnight in the fridge. The texture stays pretty much intact, though it’s best eaten within a month for peak flavor.
Reheating
Since this dessert is meant to be served chilled, reheating isn’t necessary. If you like the cookie butter drizzle warm, gently heat that portion in short bursts in the microwave and drizzle right before serving for that melt-in-your-mouth feeling.
FAQs
-
Can I make this No-Bake Cookie Butter Icebox Cake Recipe ahead of time?
Absolutely! This cake actually benefits from making it a day or two in advance, allowing the flavors to meld and the cookies to soften perfectly. Just keep it tightly covered in the fridge.
-
Do I have to use Lotus Biscoff cookies and spread?
While Lotus Biscoff is iconic for this recipe, you can experiment with similar spiced cookies and spreads, but keep in mind it will alter the flavor profile. For the authentic taste, I recommend sticking with the original Biscoff products.
-
Can I make this recipe dairy-free?
Yes! Substitute coconut cream for heavy cream and use a dairy-free mascarpone or cream cheese alternative. The texture might be slightly different, but it’s still delicious.
-
What if I don’t have a loaf pan?
A trifle bowl or any straight-sided container works well too. Just adjust the number of cookies per layer according to the size of your dish.
-
How long does this icebox cake keep?
Stored properly in the fridge, it stays fresh for up to 3 days. Beyond that, texture and flavor may start to decline.
Final Thoughts
I can honestly say that this No-Bake Cookie Butter Icebox Cake Recipe is a total showstopper in my kitchen. Whether it’s a last-minute dessert plan or a special occasion treat, I always get rave reviews. The ease combined with that unmistakable Biscoff flavor makes it feel like a little luxury you can whip up anytime. Give it a try—you’re going to love how effortless and delicious this cake is, and I bet it will become one of your favorites too.
Print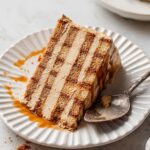
No-Bake Cookie Butter Icebox Cake Recipe
- Prep Time: 15 minutes
- Cook Time: 0 minutes
- Total Time: 1 day 15 minutes
- Yield: 8 servings
- Category: Dessert
- Method: No-Cook
- Cuisine: American
Description
A no-bake, creamy and indulgent icebox cake featuring layers of crispy Lotus Biscoff cookies and a luscious cookie butter mascarpone cream, perfect for make-ahead dessert lovers.
Ingredients
Cookie Butter Cream
- 2 cups heavy cream
- ½ cup (150g) Lotus Biscoff spread
- ⅓ cup (80g) mascarpone cheese
- 1 tsp pure vanilla extract
- Pinch of Kosher salt
- 2 Tbsp confectioner’s sugar
Assembly
- 2 packages Lotus Biscoff cookies (32 cookies per package)
- ⅓ cup Lotus Biscoff spread, warmed for serving
- Extra crushed Biscoff cookies for serving (optional)
Instructions
- Whip the cream: Pour 2 cups heavy cream into the bowl of a stand mixer fitted with the whisk attachment. Whisk until medium peaks form.
- Make the cookie butter cream: Add ½ cup (150g) Biscoff spread, ⅓ cup (80g) mascarpone cheese, 1 tsp vanilla extract, a pinch of Kosher salt, and 2 Tbsp confectioner’s sugar to the whipped cream. Gently fold and mix until fully combined and smooth.
- Prepare the pan: Line a loaf pan with plastic wrap ensuring enough overhang for easy removal later.
- Assemble the cake: Place a single layer of Biscoff cookies along the bottom of the loaf pan. Spread a layer of the cookie butter cream over the cookies matching roughly the thickness of the cookie layer. Repeat layering cookies and cream until you fill the pan, ending with a final layer of cookies.
- Refrigerate: Loosely cover the loaf pan with plastic wrap and refrigerate for 24 hours to allow the cake to set and flavors to meld.
- Serve: When ready, unmold the cake onto a plate. Drizzle the warmed ⅓ cup Biscoff spread over the top and sprinkle with crushed Biscoff cookies for an extra crunchy touch.
Notes
- Nutrition facts are estimated based on using 45 cookies in total.
- Pan size affects cookie quantity needed: a straight-sided loaf pan uses about 9 cookies per layer; tapered pans need fewer.
- To warm Biscoff spread, heat ⅓ cup in a microwave-safe bowl in 30-second increments, stirring between, until melted and smooth.
- This icebox cake can be made up to 3 days in advance; keep refrigerated tightly wrapped.
- Store leftovers in an airtight container or wrapped tightly in the loaf pan for up to 3 days.
- For freezing, wrap tightly in plastic wrap, place in a freezer-safe container, and thaw overnight in the fridge before serving.
Nutrition
- Serving Size: 1 slice (approximately 1/8 of cake)
- Calories: 450 kcal
- Sugar: 28 g
- Sodium: 150 mg
- Fat: 32 g
- Saturated Fat: 18 g
- Unsaturated Fat: 12 g
- Trans Fat: 0.2 g
- Carbohydrates: 35 g
- Fiber: 1 g
- Protein: 5 g
- Cholesterol: 100 mg

