
No Bake Peanut Butter Oat Cups Recipe
If you’re on the hunt for a snack that’s super simple, delicious, and satisfying, you’re going to love this No Bake Peanut Butter Oat Cups Recipe. Seriously, these little cups bring together creamy peanut butter, hearty oats, and melty chocolate for a combo that hits all the right spots. And the best part? No oven required—just a handful of ingredients and a little fridge time. Stick around, and I’ll show you how to whip these up effortlessly.
Why This Recipe Works
- No Oven Needed: You can make these cups quickly without heating up your kitchen—perfect for warm days or quick snacks.
- Simple Ingredients: Basic pantry staples come together for a wholesome snack that satisfies sweet and salty cravings.
- Customizable Texture: The thick, moldable mixture lets you add moisture or sweetness until you get the perfect consistency.
- Great Make-Ahead Treat: They keep well in the fridge, so you’re always ready with a grab-and-go snack.

Ingredients & Why They Work
This No Bake Peanut Butter Oat Cups Recipe keeps things simple but effective by combining the creamy richness of peanut butter with finely processed oats for structure, and just the right amount of sweetness from maple syrup. Each ingredient pulls its weight to achieve texture, flavor, and balance.

- Peanut Butter: Use natural or creamy peanut butter for that signature rich, nutty flavor and binding power.
- Rolled Oats: Processed into oat flour for a finer texture, making the cups less crumbly yet still hearty.
- Maple Syrup: Adds natural sweetness and moisture to help everything stick together.
- Chocolate Chips: For the melt-in-your-mouth topping that gives these cups a decadent finish.
- Coconut Oil (optional): Helps melt the chocolate smoothly and adds a silky shine when it cools.
Tweak to Your Taste
I’ve played around with this No Bake Peanut Butter Oat Cups Recipe a bunch, and it’s so fun to tweak based on what you love or have on hand. You can go classic or add your own spin—trust me, it never gets old!
- Variation: I sometimes add a scoop of pumpkin puree and a dash of pumpkin spice for a cozy fall twist that makes these cups extra moist.
- Nut-Free Option: Swap peanut butter for almond or sunflower seed butter if peanuts aren’t your thing or for allergies.
- Extra Crunch: Toss in chopped nuts or seeds for more texture — sunflower seeds or chopped peanuts are my go-to’s.
- Sweetness: Adjust the maple syrup amount depending on how sweet you like these; I usually add a little extra when serving to kids.
Step-by-Step: How I Make No Bake Peanut Butter Oat Cups Recipe
Step 1: Grinding the Oats to Oat Flour
Start with rolling oats and blitz them in a high-speed blender or food processor until they’re fine like flour. This step is key because it helps give the cups a smooth texture and makes mixing easier. Don’t rush this part—pulse in short bursts and scrape down the sides so you get a consistent oat flour.
Step 2: Warming Peanut Butter and Maple Syrup
In a medium microwave-safe bowl, combine the peanut butter and maple syrup, then heat for about 40-60 seconds. This softens the peanut butter, making it easier to mix. Stir it well until smooth and fully combined. This warm mixture is going to hold everything together beautifully.
Step 3: Mixing in the Oat Flour
Slowly add the oat flour to the peanut butter mixture. It will require a bit of muscle to blend—the dough should be thick and sticky, yet moldable. If it feels dry or crumbly, don’t hesitate to mix in a teaspoon of extra maple syrup or peanut butter. A little extra moisture makes all the difference! For a softer cup, adding pumpkin puree here is a fantastic hack.
Step 4: Forming the Cups
Line a muffin pan with cupcake liners or use a silicone muffin pan. I prefer the silicone one because it makes it easier to pop the cups out without sticking. Scoop the peanut butter oat mixture evenly into the cups, then press them down firmly with your fingers to shape.
Step 5: Melting and Adding Chocolate
Place the chocolate chips and coconut oil (if using) in a small microwave-safe bowl. Heat in 30-second bursts, stirring between each, until the chocolate is fully melted and silky smooth. Pour a layer of chocolate on top of each oat cup, smoothing with the back of a spoon. If you like a little extra something, sprinkle flaky sea salt, sprinkles, or mini chocolate chips on top before chilling.
Step 6: Chill and Set
Pop the pan in the fridge for 2-3 hours until the chocolate is firm and the cups feel set. Once chilled, carefully remove the cups from the liners or silicone mold, and store them in an airtight container in the fridge to keep fresh.
Pro Tips for Making No Bake Peanut Butter Oat Cups Recipe
- Perfect Consistency: The mixture should be thick and sticky—if it’s crumbly, add more maple syrup or peanut butter a teaspoon at a time until it holds well.
- Use Silicone Molds: Silicone muffin pans make removal a breeze; I’ve saved myself from smashed cups many times this way.
- Don’t Skip Cooling Time: Patience pays off — chilling ensures the cups firm up nicely and chocolate sets with a satisfying snap.
- Customize as You Go: Feel free to taste and adjust sweetness or texture before setting, especially since different peanut butters vary in moisture and saltiness.
How to Serve No Bake Peanut Butter Oat Cups Recipe

Garnishes
I love sprinkling just a pinch of flaky sea salt on top after pouring the chocolate—it really enhances the peanut butter flavor and adds a hint of crunch. Sometimes I toss on mini chocolate chips or colorful sprinkles if it’s a treat for the kids or a party.
Side Dishes
These cups pair wonderfully with a cold glass of milk or a cup of coffee for breakfast or a midday snack. For a wholesome snack plate, I’ll add some fresh fruit like apple slices or banana for a bit of refreshing contrast.
Creative Ways to Present
When I’ve made these for gatherings, I like to display them on a pretty platter lined with parchment paper and add fresh berries around them. For a fun twist, try layering them with yogurt and granola in mini glass jars for an adorable dessert cup.
Make Ahead and Storage
Storing Leftovers
I store leftover oat cups in an airtight container in the fridge. They last about 5 days when chilled properly. Just make sure to keep them cold because of the maple syrup and peanut butter’s freshness.
Freezing
These cups freeze beautifully! I wrap them individually in plastic wrap then freeze in a sealed bag. When I want one, I just pop it in the fridge to thaw overnight or enjoy it straight from the freezer for a cool treat.
Reheating
Since they’re meant to be eaten cold, I usually don’t reheat. But if you want to soften the chocolate a bit, a few seconds in the microwave (10-15 seconds) works fine—just be careful not to melt them completely.
FAQs
-
Can I use crunchy peanut butter in this recipe?
Absolutely! Crunchy peanut butter will add extra texture inside the cups, which some people love. Just keep in mind it may make mixing a little more challenging, but it won’t affect the overall outcome.
-
What if I don’t have a food processor for the oats?
Don’t worry! You can pulse oats in a blender or even use oat flour from the store. If you only have whole oats, soaking them lightly before mixing can help, but the texture will be chewier.
-
Can I make these vegan?
Yes! Use dairy-free chocolate chips and ensure your peanut butter and maple syrup are vegan-friendly. Coconut oil is optional but also vegan.
-
How long do these cups last?
Stored in an airtight container in the fridge, they stay fresh for up to 5 days. Their no-bake nature means they benefit from being kept chilled rather than at room temperature.
Final Thoughts
This No Bake Peanut Butter Oat Cups Recipe has become one of my favorite go-to snacks whenever I want something quick, satisfying, and homemade without turning on the oven. It’s easy to adapt and hard not to love. I’m confident once you try it, you’ll be making these cups for mornings, afternoon treats, or even dessert. So give it a try—you’ll be amazed how something so simple can taste so incredible!
Print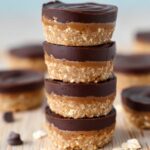
No Bake Peanut Butter Oat Cups Recipe
- Prep Time: 15 minutes
- Cook Time: 0 minutes
- Total Time: 3 hours 15 minutes
- Yield: 12 servings
- Category: Snack
- Method: No-Cook
- Cuisine: American
- Diet: Vegetarian
Description
Delicious no-bake peanut butter oat cups featuring a rich peanut butter and maple syrup base combined with oat flour, topped with a smooth chocolate layer. Perfect as a healthy snack or dessert, these cups require no baking and set quickly in the refrigerator.
Ingredients
Main Ingredients
- 1.5 cups peanut butter
- 1.5 cups rolled oats, processed finely in a food processor to make oat flour
- 1/4 cup maple syrup
Chocolate Topping
- 1 cup chocolate chips
- 1 tsp coconut oil, optional
Instructions
- Prepare Oat Flour: Blend the rolled oats in a high-speed blender or food processor until finely ground into oat flour.
- Mix Peanut Butter and Maple Syrup: In a medium microwave-safe bowl, combine peanut butter and maple syrup. Microwave for 40-60 seconds, then stir thoroughly until completely combined.
- Add Oat Flour: Slowly add the oat flour to the peanut butter mixture and mix well. The mixture should be thick but moldable. If too dry, add extra maple syrup or peanut butter one teaspoon at a time. Optionally, add 1/4 – 1/3 cup pumpkin puree for moisture.
- Prepare Muffin Pan: Line a muffin pan with cupcake liners or use a silicone muffin pan for easy removal.
- Fill Muffin Cups: Scoop the peanut butter oat mixture evenly into each muffin cup and press down firmly with your fingers.
- Melt Chocolate Topping: In a microwave-safe small bowl, melt chocolate chips and coconut oil in 30-second increments, stirring between each until smooth.
- Top Cups: Pour a layer of melted chocolate over each cup and smooth the tops with the back of a spoon. Optionally, sprinkle flaky salt, sprinkles, or mini chocolate chips before the chocolate hardens.
- Refrigerate to Set: Refrigerate the cups for 2-3 hours until fully set.
- Store Properly: Carefully remove cups from the pan or liners and store in an airtight container in the refrigerator for up to 5 days.
Notes
- For a pumpkin-flavored variation, add 1/3 cup pumpkin puree and 1 1/2 teaspoons pumpkin spice to the mixture.
- If the mixture is too dry, adjust by adding additional maple syrup or peanut butter gradually.
- Using silicone muffin pans or liners prevents sticking and eases removal.
- Storing the cups in the refrigerator preserves freshness since they contain fresh ingredients like maple syrup.
Nutrition
- Serving Size: 1 cup
- Calories: 210 kcal
- Sugar: 10 g
- Sodium: 90 mg
- Fat: 15 g
- Saturated Fat: 5 g
- Unsaturated Fat: 9 g
- Trans Fat: 0 g
- Carbohydrates: 15 g
- Fiber: 3 g
- Protein: 6 g
- Cholesterol: 0 mg
