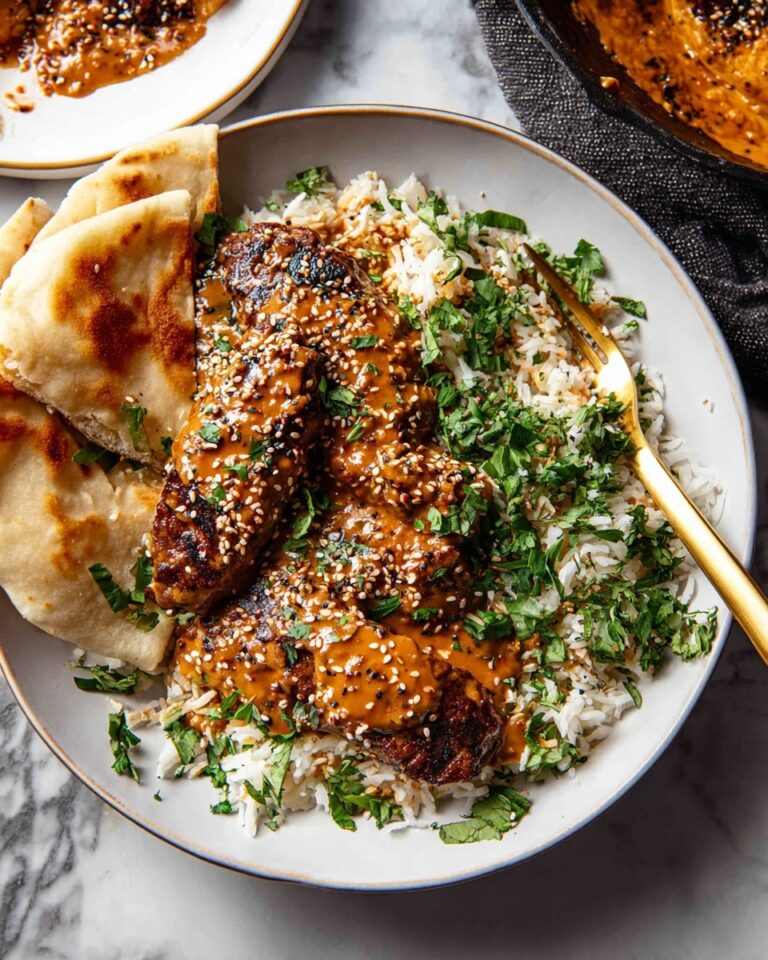
Pan Fried Chicken Strips Recipe
Oh, I absolutely love sharing this Pan Fried Chicken Strips Recipe with you! It’s one of those dishes that feels like a warm hug on a plate—crispy, golden strips of tender chicken that come together fast and satisfyingly. Whether you’re looking for a quick weeknight dinner or a snack to impress friends, these strips hit the spot every time without making you spend hours in the kitchen.
What makes this Pan Fried Chicken Strips Recipe so special is how accessible it is—no fancy equipment needed—and how well the seasoning just sings in every bite. Plus, you get that gorgeous, crunchy crust with juicy chicken inside, something I always crave but didn’t think was possible without deep-frying. Trust me, once you try these, you’ll want to keep this recipe in your go-to rotation.
Why This Recipe Works
- Perfectly Balanced Seasoning: A blend of garlic, onion, paprika, salt, and pepper gives flavor that’s bold without overpowering the chicken.
- Double Dredging for Crunch: Rolling the chicken strips twice in flour and egg creates that crave-worthy crispy crust every time.
- Simple Ingredients & Method: No complicated steps or rare ingredients make this recipe accessible for cooks of all levels.
- Cast Iron Skillet Magic: Using a well-heated cast iron skillet locks in heat evenly and ensures a golden crisp texture.

Ingredients & Why They Work
Each ingredient in this Pan Fried Chicken Strips Recipe plays a role in building that iconic crispy, flavorful finish. Let me walk you through what I pick and why it’s worth paying attention to these choices.

- Flour: It’s the foundation for the crispy coating—makes sure to get all-purpose for that just-right crispiness.
- Kosher salt: A pure, clean salt that seasons well and brings out the best in the chicken and breading.
- Garlic powder: Adds savory warmth without moisture, so the coating stays crunchy.
- Onion powder: Adds a subtle sweetness, balancing out the garlic and salt.
- Freshly ground pepper: The bit of heat and bite that livens up the flavor.
- Paprika: Gives a mild smoky flavor and that inviting color we all love on fried chicken.
- Egg: Acts like glue, holding the seasoned flour coating firmly on each strip.
- Chicken breasts: The star—lean protein that cooks quickly and stays tender when cut into strips.
- Cooking oil: I use non-GMO canola oil for its neutral taste and high smoke point, perfect for pan frying without burning.
Tweak to Your Taste
I love how versatile this Pan Fried Chicken Strips Recipe is, so I like to play around with the seasonings and dipping sauces depending on my mood or what’s in my pantry. Don’t hesitate to make it your own—you’ll find a few tweaks that transform it into a signature dish you’ll always come back to.
- Spicy Kick: I’ve added cayenne pepper to the flour mixture when I wanted heat—it gives a nice warm burn without overwhelming the flavors.
- Herb Twist: Once, I mixed some dried thyme and oregano in the seasoned flour, which gave a lovely earthy note that pairs beautifully with a tomato-based dipping sauce.
- Gluten-free Version: I swapped the flour for a gluten-free blend and it worked surprisingly well—just be sure to watch the cooking time closely.
- Extra Crispy: For a crunch on steroids, I like to add panko crumbs after the second flour dip for a perfect crunch.
Step-by-Step: How I Make Pan Fried Chicken Strips Recipe
Step 1: Prep Your Ingredients and Heat Your Pan
First things first, heat your cooking oil in a 12″ cast iron skillet over medium heat. I like to use a candy thermometer to make sure the oil hits 350°F—that sweet spot for frying that crisps without burning. While the oil heats, whisk together your flour and seasonings in a shallow dish and beat the egg in a small bowl. Cutting the chicken into even strips here helps them cook uniformly, so take your time with that.
Step 2: Coat the Chicken for Crunch Perfection
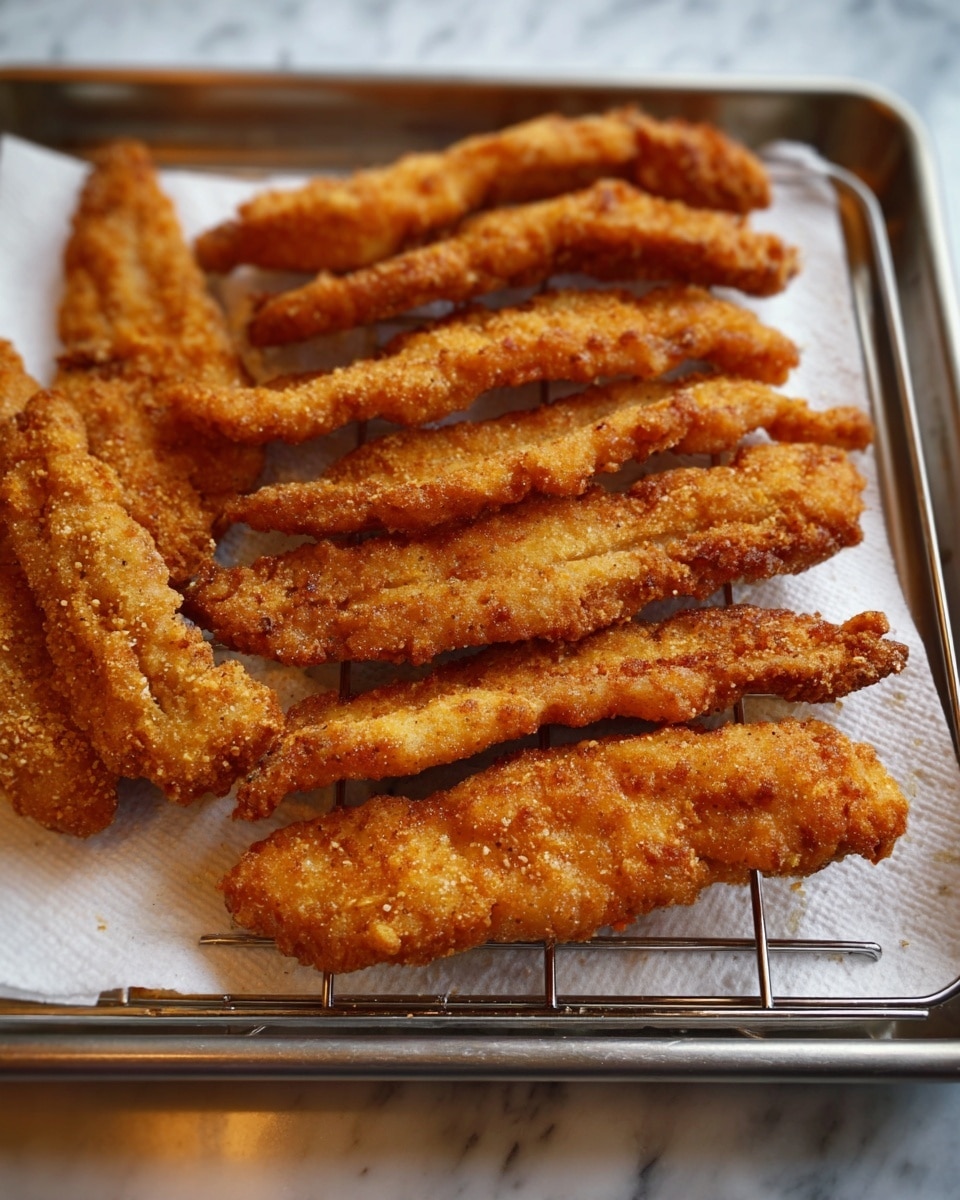
Roll your chicken strips lightly in the seasoned flour first. Then dip each strip in the beaten egg, and back into the flour again—this double dredge trick is my secret to that irresistible crispiness. Before frying, I like to roll them one last time in the flour mixture to build up a thick, crunchy crust. It’s a little extra time that really pays off.
Step 3: Fry with Care and Patience
Gently place each strip into the hot oil without overcrowding the pan—crowding lowers the temperature and makes things soggy. Cook them for about 4 minutes, then flip with tongs or a fork and fry for another 3-4 minutes. Use a meat thermometer to check: they’re done when the internal temperature hits 160°F. Keep the heat steady, and avoid flipping multiple times—you want a nice golden crust to develop.
Step 4: Drain and Serve
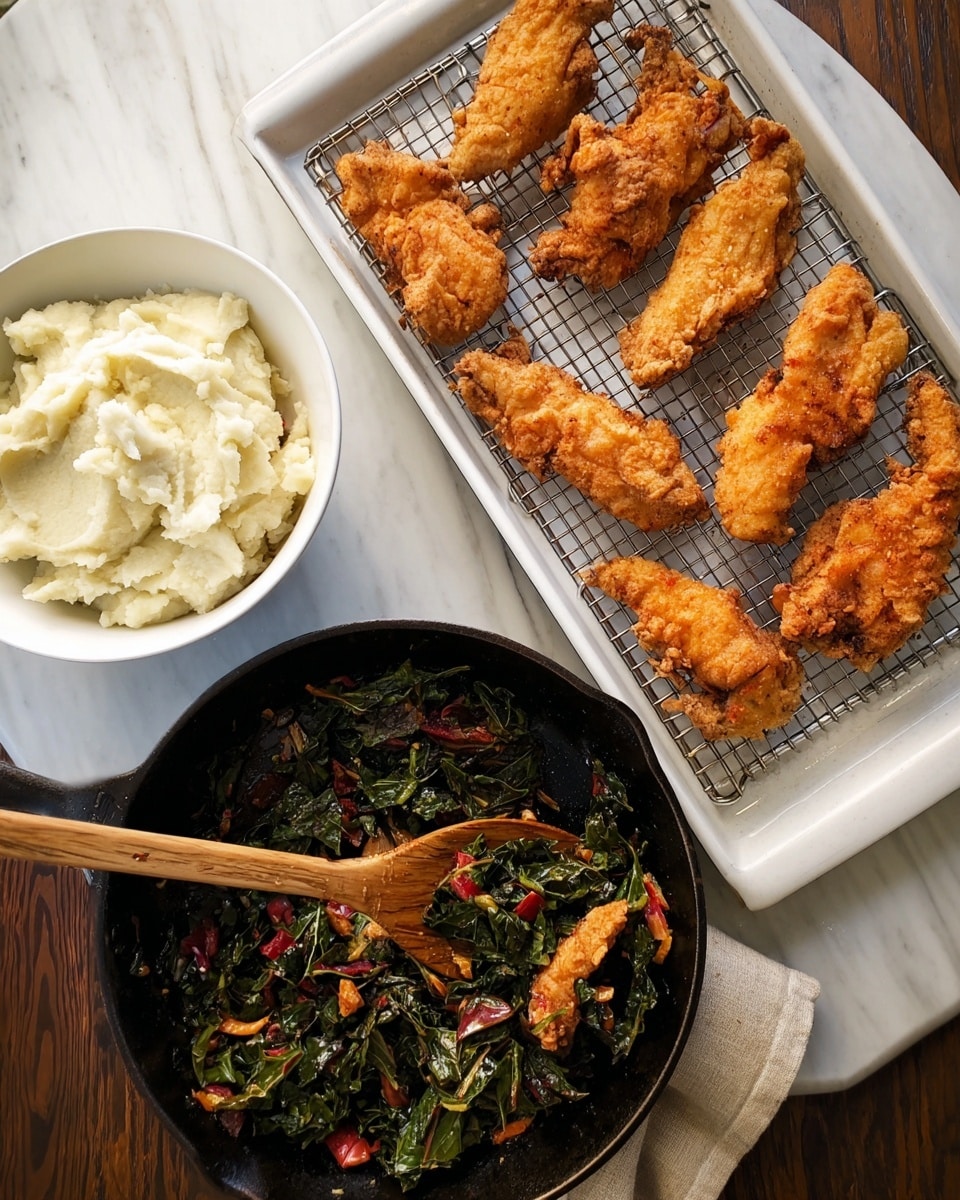
Once cooked, transfer the chicken strips to a cooling rack set over a baking sheet lined with paper towels. This lets excess oil drip off without making the strips soggy. Serve these beauties immediately for the crispiest texture, or keep them warm in the oven while you get sides ready.
Pro Tips for Making Pan Fried Chicken Strips Recipe
- Oil Temperature Matters: Keep your oil around 350°F—the sweet spot for achieving a crunchy crust without greasy strips.
- Don’t Overcrowd: Fry in batches to keep the oil hot and your chicken evenly crispy.
- Patience Pays Off: Resist the urge to flip the strips constantly; just once halfway through is perfect.
- Use a Cooling Rack: Trust me, draining on a rack keeps the bottom crispy, unlike paper towels alone which can trap steam.
How to Serve Pan Fried Chicken Strips Recipe
Garnishes
I usually sprinkle mine with some chopped fresh parsley or crispy fried shallots—they add a pop of color and extra flavor that brighten up the dish beautifully. Sometimes I add a squeeze of fresh lemon over the top; it cuts through the richness perfectly and adds a refreshing zing.
Side Dishes
My favorite sides to serve with these chicken strips are creamy mashed potatoes or a tangy coleslaw for contrast. Sometimes I just go classic with crispy fries and a cool ranch dip—can’t go wrong there! A light garden salad also balances the meal nicely if you want to keep it on the lighter side.
Creative Ways to Present
For family game nights or weekend get-togethers, I like laying the chicken strips out on a big platter surrounded by colorful veggies and an array of dipping sauces—honey mustard, spicy mayo, or barbecue sauce all make an appearance. Turning it into a “build your own wrap” station with tortillas, avocado, and greens is another winner that gets everyone involved.
Make Ahead and Storage
Storing Leftovers
I like to cool leftover chicken strips completely, then store them in an airtight container lined with a paper towel on the bottom to absorb moisture. This keeps them from getting soggy in the fridge for up to 3 days.
Freezing
Freezing works well if you want to save some for later. I freeze them in a single layer on a sheet pan first, then transfer to a freezer bag—this way they don’t clump together. When you’re ready to eat, thaw overnight in the fridge for best results.
Reheating
To reheat, I pop the strips in a 375°F oven on a wire rack for about 8-10 minutes. This warms them through and revives the crispiness much better than the microwave, which tends to leave them chewy or soggy.
FAQs
-
Can I use chicken thighs instead of breasts for this Pan Fried Chicken Strips Recipe?
Absolutely! Chicken thighs have more fat, which makes them juicier and flavorful, but they do have slightly longer cooking times. Just cut them into uniform strips and watch the temperature, aiming for the same 160°F internal temperature to ensure safety and tenderness.
-
What’s the best oil for pan frying chicken strips?
I use non-GMO canola oil because it has a high smoke point and neutral flavor, which allows the seasoning and chicken flavor to shine through without burning. Other great options include peanut or vegetable oil. Avoid olive oil as it doesn’t tolerate high heat well for frying.
-
How do I know when my chicken strips are properly cooked?
The safest and most reliable way is to use a meat thermometer to check that the internal temperature is at least 160°F. The exterior should be golden brown and the chicken juice clear when you cut into it. Overcooking can dry them out, so keeping an eye on time and temperature helps.
-
Can I bake these instead of pan frying?
You can! Baking is a healthier alternative though you’ll miss some of that deep-fried crispiness. To bake, place the coated strips on a greased wire rack over a baking sheet and bake at 425°F for about 15-20 minutes, flipping halfway through for even browning.
-
How do I keep my chicken strips crispy after frying?
Drain them on a wire rack instead of paper towels to prevent sogginess, and serve immediately. If you need to hold them, keep them warm in a low oven (around 200°F) on a rack to maintain crispness without drying out.
Final Thoughts
Cooking this Pan Fried Chicken Strips Recipe feels like a little celebration every time for me—it’s so simple but incredibly rewarding. I hope once you try it, you’ll see how approachable homemade crispy chicken can be without the mess of deep frying. So grab your skillet, gather your ingredients, and enjoy making this comforting dish that’s sure to bring smiles around your table. Trust me, you’re going to love it just as much as I do!
Print
Pan Fried Chicken Strips Recipe
- Prep Time: 15 minutes
- Cook Time: 10 minutes
- Total Time: 25 minutes
- Yield: 4 servings
- Category: Main Course
- Method: Frying
- Cuisine: American
Description
Crispy and flavorful pan fried chicken strips coated in a seasoned flour breading, perfect for a quick and delicious meal or snack.
Ingredients
Seasoned Flour Mixture
- 2/3 cup flour
- 2 tsp kosher salt
- 1 1/2 tsp garlic powder
- 1 1/2 tsp onion powder
- 3/4 tsp freshly ground pepper
- 3/4 tsp paprika
Chicken and Coating
- 1 egg
- 2 chicken breasts
For Frying
- 1 cup cooking oil (non-GMO canola oil recommended)
Instructions
- Heat the oil: Heat 1 cup of cooking oil in a 12-inch cast iron skillet over medium heat until it reaches 350°F, using a candy thermometer to check the temperature.
- Prepare the coating: In a shallow dish, whisk together the flour, kosher salt, garlic powder, onion powder, freshly ground pepper, and paprika until well blended. Crack the egg into a small bowl and beat with a fork. Cut the chicken breasts into strips.
- Coat the chicken strips: Roll each chicken strip lightly in the seasoned flour mixture. Dip it into the beaten egg, then roll it again in the seasoned flour to fully coat. For extra breading, roll each strip one more time in the flour before frying. Transfer coated strips to a plate or cutting board.
- Fry the chicken strips: Gently place strips into the hot oil once it reaches 350°F. Cook for 4 minutes on one side, then use tongs or a fork to flip and cook for another 4 minutes or until the internal temperature of the chicken reaches 160°F.
- Drain and serve: Place a cooling rack over a baking sheet lined with paper towels. Transfer cooked chicken strips onto the rack to drain excess oil. Serve immediately or keep warm in the oven until ready to eat.
Notes
- Ensure oil temperature stays at 350°F for crispy, evenly cooked strips.
- Use a candy thermometer to accurately monitor oil temperature.
- Adjust quantities of flour and egg if making more than 8 strips.
- Can substitute chicken breasts with chicken tenderloins for quicker cooking.
- Use canola oil or another neutral high smoke point oil for best frying results.
- Ensure chicken is cooked to at least 160°F internally for safety.
- Keep cooked strips warm in an oven set to low heat if not serving immediately.
Nutrition
- Serving Size: 1 serving
- Calories: 350 kcal
- Sugar: 1 g
- Sodium: 600 mg
- Fat: 20 g
- Saturated Fat: 3 g
- Unsaturated Fat: 15 g
- Trans Fat: 0 g
- Carbohydrates: 18 g
- Fiber: 1 g
- Protein: 28 g
- Cholesterol: 90 mg
