
Spider Cookies Recipe
If you’re looking for a festive, fun treat that’s as delicious as it is cute, you’re going to adore this Spider Cookies Recipe. These cookies are not your everyday chocolate chip variety – they come with a fun Halloween twist thanks to those quirky spider legs made from melted chocolate, and they taste just like the classic cookies you love. Stick around, because I’ll walk you through every step, share my favorite tips, and maybe even a little story or two from my own kitchen adventures.
Why This Recipe Works
- Perfect Cookie Texture: The combination of brown and granulated sugar plus melted butter creates soft yet slightly chewy cookies that hold up beautifully to decorating.
- Easy yet Impressive: Melting chocolate and piping spider legs sounds fancy, but I’ll show you how simple it is to get a professional-looking finish at home.
- Kid-Friendly Fun: This recipe instantly becomes a family activity – decorating the “spiders” is always a hit, especially around Halloween.
- Reliable Results Every Time: My go-to Spider Cookies Recipe has never failed me – you can trust it to come out perfectly every single time.

Ingredients & Why They Work
Every ingredient in this Spider Cookies Recipe plays a role in making these treats taste delicious and look adorable. I always make sure to use good-quality chocolate chips, and don’t skip the extra egg yolk – trust me, it makes the dough soft and chewy, which is exactly what these cookies need.

- All-purpose flour: Provides structure and the perfect balance for a tender crumb.
- Baking soda: Helps cookies rise just enough, giving a soft texture without spreading too thin.
- Salt: Enhances flavor and balances the sweetness.
- Butter: Using melted butter here boosts the chewiness and richness of the cookie.
- Light brown sugar: Adds moisture and caramel notes, making the cookie wonderfully chewy.
- Granulated sugar: Gives a slight crispness on the edges and balances the brown sugar’s softness.
- Egg and egg yolk: The egg yolk specifically adds extra tenderness and richness.
- Vanilla extract: A simple flavor booster that warms up the cookie flavor.
- Semi-sweet chocolate chips: Divided in use – some in the dough for melty pockets, and some on top for decorating.
Tweak to Your Taste
One thing I love about this Spider Cookies Recipe is how easy it is to tweak depending on what you have or what flavor you want. I like to toss in a handful of chopped nuts sometimes for an extra crunch, or swap half the chips for white chocolate to mix things up.
- Variation: Adding a pinch of cinnamon or pumpkin pie spice can give these cookies a lovely warm twist – perfect for fall vibes.
- Dietary Modification: Use dairy-free butter and vegan chocolate chips for a dairy-free version that everyone can enjoy.
- Make it Extra Special: Top each cookie with a candy eyeball instead of just chocolate chips for a creepier, kid-friendly touch.
Step-by-Step: How I Make Spider Cookies Recipe
Step 1: Mix the Dry Ingredients
Start by whisking together the flour, baking soda, and salt in a medium bowl. This is key to spreading those leavening agents evenly so your cookies bake up perfectly. I like to set this aside while I tackle the wet ingredients to keep things organized and avoid any flour mess.
Step 2: Cream Butter and Sugars
In a large mixing bowl, beat the melted butter, brown sugar, and granulated sugar with an electric mixer until well blended. Make sure the butter is warm, not hot – this helps the sugars dissolve and results in a smoother dough. Then add the egg, egg yolk, and vanilla extract, mixing everything until combined.
Step 3: Combine Wet and Dry Ingredients
Slowly add in the dry ingredients and gently mix until just blended – don’t overdo it, since overmixing can make the cookies tough. Then fold in about 3/4 cup of the chocolate chips directly into the dough for those melty bites throughout. The dough will be soft and a bit sticky, which is totally normal.
Step 4: Bake the Cookies
Scoop dough into roughly golf-ball-sized balls and place them on a parchment-lined baking sheet, spaced about 2 inches apart. Bake at 350°F for 10 to 12 minutes until the edges set but centers are still soft. They’ll firm up as they cool. This part always makes my kitchen smell irresistible!
Step 5: Add Chocolate Chips and Draw Spider Legs
Right after you pull them from the oven, press 3–4 chocolate chips into the top of each cookie with the points facing up—these will be your spider’s body. While the cookies cool, melt the remaining chocolate chips gently in the microwave, stirring every 30 seconds. When smooth, transfer melted chocolate to a ziplock bag and cut a tiny hole in one corner.
Pipe 8 thin lines coming out from around the chocolate chip cluster to look like spider legs. This step is so fun – my kids always insist on doing the decorating, which makes it even more special.
Pro Tips for Making Spider Cookies Recipe
- Butter Temperature Matters: Let your melted butter cool until warm but not hot to avoid cooking the eggs or creating greasy cookies.
- Cutting the Piping Bag Tip: Make the slit in your ziplock bag corner as small as possible for thin, realistic spider legs.
- Don’t Overbake: Pull cookies from the oven when the edges look set but the centers are still soft to keep them chewy.
- Chocolate Chip Placement: Press the chips into the cookies immediately after baking so they stick well without melting too much.
How to Serve Spider Cookies Recipe

Garnishes
I like to keep garnishes simple – the chocolate legs are the stars here. But occasionally, I sprinkle a tiny pinch of flaky sea salt on top just before baking to add a subtle flavor pop. For party presentations, edible candy eyes are a fun addition that makes each cookie look even creepier and cuter.
Side Dishes
These spider cookies pair wonderfully with a cold glass of milk or a warm cup of spiced hot chocolate – think cinnamon and nutmeg. For gatherings, I love serving them alongside simple fruit snacks or miniature pumpkin lattes for a full autumnal treat table.
Creative Ways to Present
One time I set up a spooky “spider web” on a large platter by weaving spun sugar or pulled sugar strands gently around the cookies — it looked spectacular and wowed my guests. Another idea is to display them in individual treat bags tied with a festive ribbon for party favors. Little details like these make all the difference!
Make Ahead and Storage
Storing Leftovers
I usually store leftover Spider Cookies in an airtight container at room temperature – they keep fresh and chewy for 1 to 2 days. If you want to keep them longer, just pop them in the fridge, but I find they’re best enjoyed fresh.
Freezing
Freezing is a lifesaver! I bake the cookies completely, then freeze them in a freezer-safe container with parchment paper between layers to prevent sticking. They last up to 3 months and thaw beautifully — perfect for making ahead of parties or Halloween night.
Reheating
When I reheat frozen or leftover cookies, I warm them in a preheated 300°F oven for about 5 minutes. This revives their softness without drying them out or melting the chocolate decorations — just enough heat to make them feel freshly baked.
FAQs
-
Can I use store-bought cookie dough to make Spider Cookies Recipe?
Absolutely! While homemade dough gives you the best texture and flavor, you can use store-bought dough and just add the spider legs and extra chocolate chips on top for decoration. Just follow the baking times on the package and add the finishing touches after baking.
-
What chocolate works best for the spider legs?
Semi-sweet chocolate chips melt nicely for piping spider legs, but you can also use dark or milk chocolate depending on your preference. Just be sure to melt them slowly in short intervals to avoid burning and ruining the glossy finish.
-
How do I make sure the spider legs don’t smudge?
Once you pipe the spider legs, let the cookies cool completely on a wire rack before storing them. Chilling for 10-15 minutes can help the chocolate set firmly. Handle gently afterward to keep those adorable legs intact.
-
Can I substitute the butter with oil?
I usually recommend sticking with butter for this recipe since it adds flavor and texture that oil doesn’t replicate. If you must use oil, expect slightly different texture and flavor – the cookies might be less tender and buttery.
Final Thoughts
Honestly, this Spider Cookies Recipe is one of those special treats that brings out the kid in me every time I bake it. It’s the perfect balance of fun and flavor, and it always impresses guests – whether it’s for Halloween, a spooky-themed party, or just a cozy day when you want to add a little whimsy to your baking. Give it a try, and I bet you’ll find yourself making these again and again. I can’t wait to hear how your spiders turn out!
Print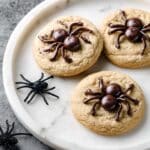
Spider Cookies Recipe
- Prep Time: 20 minutes
- Cook Time: 12 minutes
- Total Time: 32 minutes
- Yield: 15 cookies
- Category: Dessert
- Method: Baking
- Cuisine: American
Description
Spider Cookies are festive and fun treats perfect for Halloween or any spooky occasion. These soft, chewy cookies are packed with chocolate chips and decorated with melted chocolate spider legs, making them both delicious and visually impressive.
Ingredients
Dry Ingredients
- 2 cups all-purpose flour
- 2 tablespoons all-purpose flour
- ½ teaspoon baking soda
- ½ teaspoon salt
Wet Ingredients
- 12 tablespoons butter, melted and cooled until warm
- 1 cup light brown sugar
- ½ cup granulated sugar
- 1 large egg
- 1 large egg yolk
- 2 teaspoons vanilla extract
Chocolate
- 2 cups semi-sweet chocolate chips, divided (¾ cup mixed into dough, remaining for decoration and melting)
Instructions
- Preheat Oven: Preheat your oven to 350 degrees Fahrenheit to prepare for baking the cookies.
- Mix Dry Ingredients: In a medium bowl, whisk together the all-purpose flour, baking soda, and salt ensuring even distribution.
- Make Dough: In a large mixing bowl, beat melted butter, light brown sugar, and granulated sugar with an electric mixer until well blended and creamy. Add the egg, egg yolk, and vanilla extract, mixing until combined. Gradually stir in the dry ingredients just until incorporated, then gently fold in ¾ cup of the semi-sweet chocolate chips. The dough will be soft.
- Scoop Dough: Using a spoon or cookie scoop, form dough balls and place them on a parchment-lined cookie sheet, spaced evenly.
- Bake Cookies: Bake the dough balls in the preheated oven for 12 minutes until the edges are lightly golden and the centers are set.
- Decorate with Chocolate Chips: Remove cookies from the oven and gently press 3-4 semi-sweet chocolate chips point side up on top of each warm cookie to form the spider’s body.
- Melt Remaining Chocolate: Place the remaining chocolate chips in a microwave-safe bowl and melt on low power in 30-second intervals, stirring between each until smooth.
- Draw Spider Legs: Transfer the melted chocolate to a ziplock bag and cut a very small slit in one corner. Carefully pipe eight spider legs from the chocolate chips on each cookie by squeezing melted chocolate through the slit to create thin lines extending outward, resembling spider legs.
Notes
- Make-Ahead: Store leftover spider cookies in an airtight container at room temperature for 1-2 days to maintain freshness.
- Freezing: Freeze baked cookies in a freezer-safe bag or container for up to 3 months for long-term storage.
- Dough Softness: The cookie dough will be soft; chilling it for 15 minutes can make it easier to handle if desired.
- Chocolate Chips: Use semi-sweet chocolate chips for the best balance of sweetness and chocolate flavor.
Nutrition
- Serving Size: 1 cookie
- Calories: 180 kcal
- Sugar: 14 g
- Sodium: 90 mg
- Fat: 9 g
- Saturated Fat: 5 g
- Unsaturated Fat: 3 g
- Trans Fat: 0 g
- Carbohydrates: 23 g
- Fiber: 1 g
- Protein: 2 g
- Cholesterol: 40 mg


