Witch Hat Cookies Recipe
When October rolls around, I get so excited to bring out this fun, festive treat I’ve been making for years — my Witch Hat Cookies Recipe. These charming little cookies are not only deliciously chocolatey but also irresistibly cute, making them the perfect snack for Halloween parties or just a cozy night in. Let me walk you through everything so you can bake up your own batch of these magical treats — they’re simpler than they look, I promise, and your kitchen will smell amazing!
Why This Recipe Works
- Perfect Texture: The blend of cocoa and sugars keeps the cookies chewy with a delicate crisp edge.
- Simple Ingredients: No fancy extras here — just pantry staples that come together perfectly.
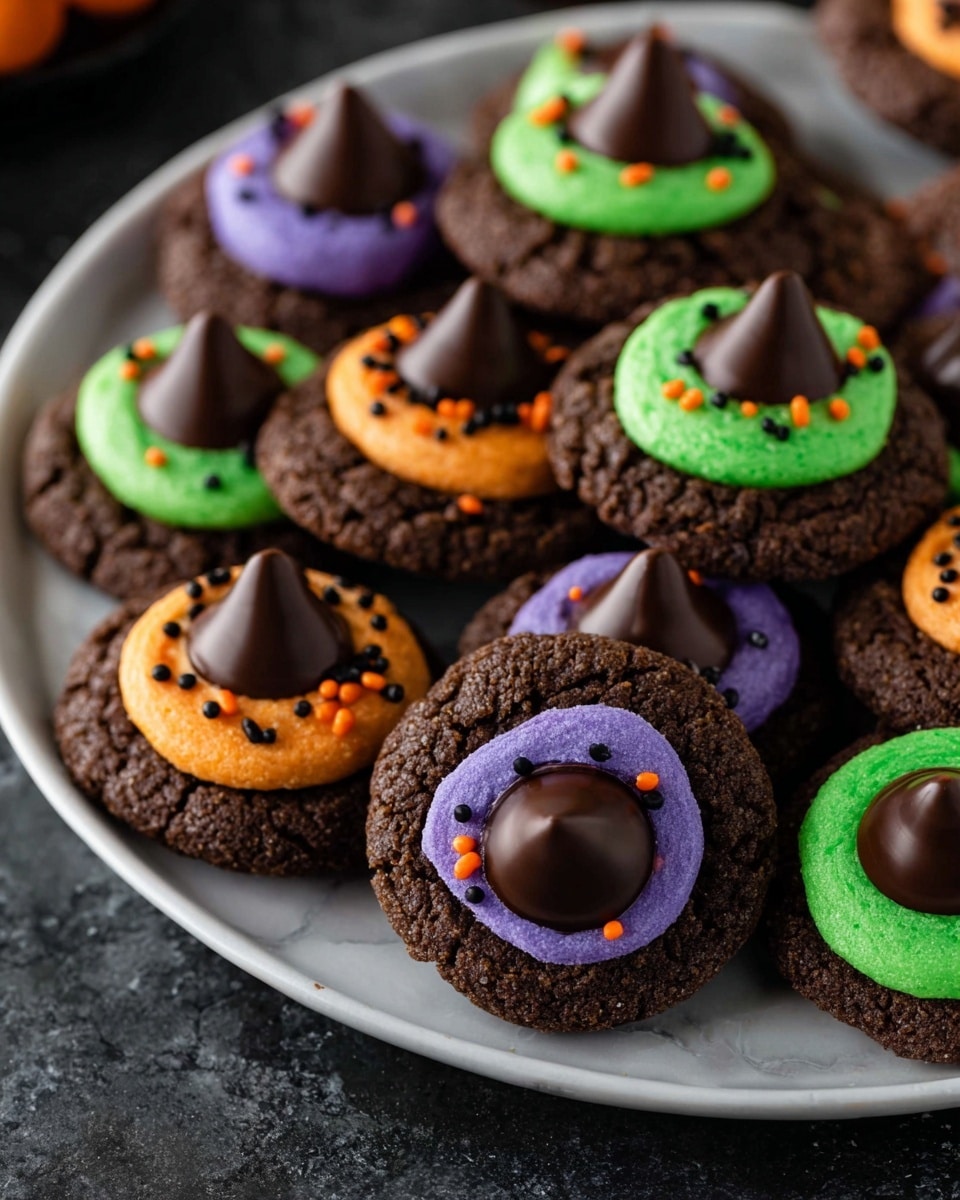
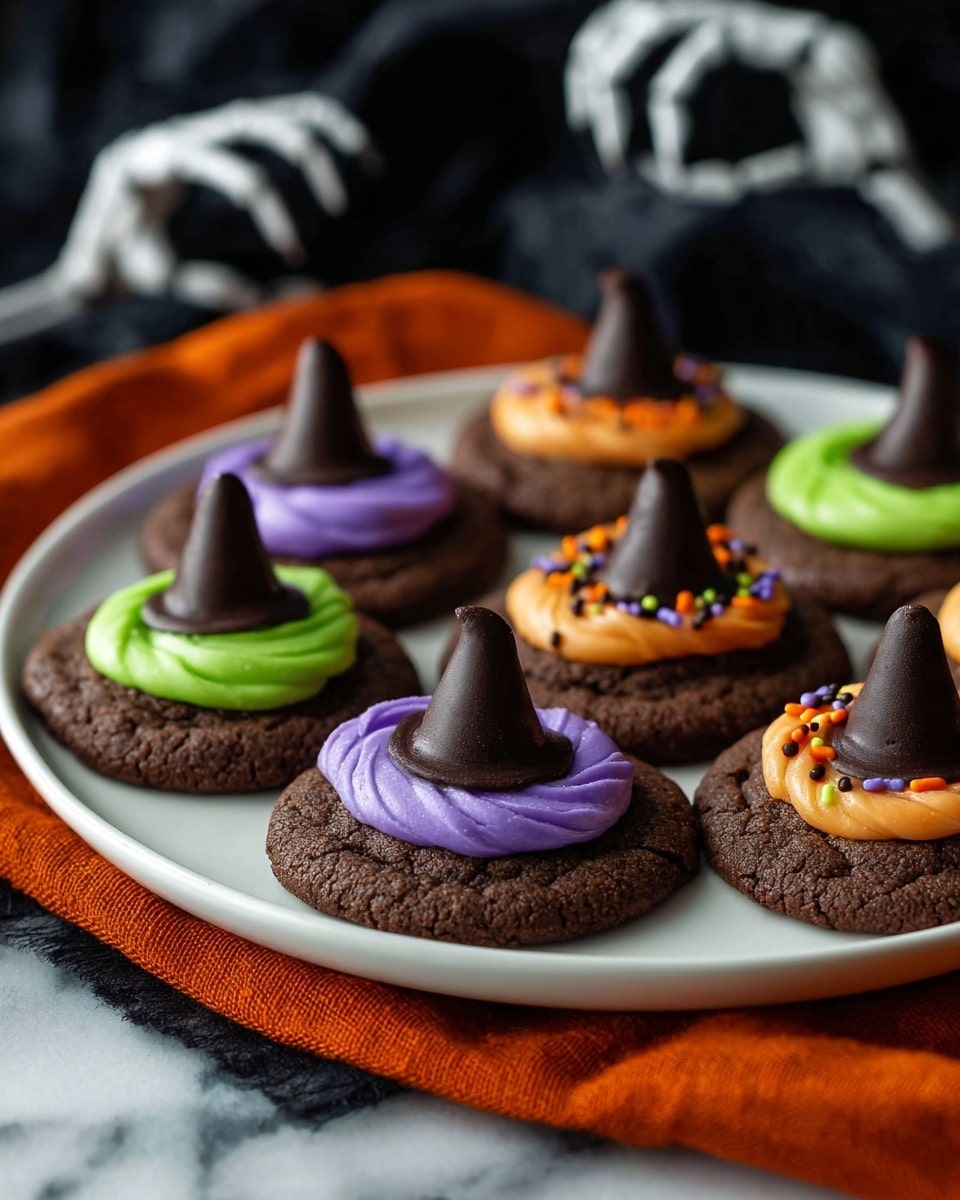
- Cute Presentation: The frosting dollop with a Hershey’s Kiss on top turns these cookies into miniature witch hats that look amazing on any Halloween table.
- Fun to Make: Rolling, coating with sugar, and decorating lets you get creative — a great activity to do with kids or friends.

Ingredients & Why They Work
Let’s chat about the ingredients for this Witch Hat Cookies Recipe. Each one was chosen so the cookies come out soft yet sturdy — perfect for holding that cute frosting and Hershey’s Kiss “hat.” Grab good quality cocoa powder for the best chocolate flavor, and don’t skip rolling the dough in sugar before baking, it adds a lovely sparkle and slight crunch.

- All purpose flour: Gives the cookie structure without being too dense.
- Natural unsweetened cocoa powder: Adds deep chocolate flavor without sweetness; choose a good brand for best taste.
- Baking soda: Helps the cookies rise slightly and keeps them from becoming too cakey.
- Salt: Balances the sweetness and enhances the chocolate notes.
- Unsalted butter: Provides richness — always soften it for easy creaming.
- Granulated sugar: Sweetens and creates a crisp outer edge.
- Brown sugar: Adds chewiness and a hint of molasses flavor that complements the cocoa.
- Large egg: Binds the dough and helps with the tenderness.
- Vanilla extract: Brings warmth and rounds out the flavors beautifully.
- Additional granulated sugar (for rolling): This step is key for texture and appearance — don’t skip!
- Powdered sugar (for frosting): Makes a smooth, sweet, and fluffy frosting.
- Gel food coloring: Lets you customize your frosting colors — I love classic Halloween shades like purple or green.
- Hershey’s Kisses: The star “hat” piece — the perfect size and shape to sit right on top.
- Halloween sprinkles: Add extra festive flair and fun texture.
Tweak to Your Taste
Here’s the cool part — this Witch Hat Cookies Recipe is super adaptable. I like to switch up the frosting colors depending on the year or mood, and sometimes I swap out Hershey’s Kisses for mini peanut butter cups, which adds a fun twist. Feel free to make these your own and get creative!
- Variation: For a minty twist, add a drop of mint extract to the frosting and use green food coloring — guests love the fresh flavor surprise.
- Dairy-Free Option: Substitute butter with vegan butter alternatives and check your chocolate kisses for dairy-free versions.
- Spice It Up: Sprinkle a pinch of cinnamon or pumpkin pie spice into the dough for a warm fall flavor.
- Gluten-Free: Use a 1:1 gluten-free flour blend and check your leavening agents to keep things cozy for gluten-sensitive friends.
Step-by-Step: How I Make Witch Hat Cookies Recipe
Step 1: Mix the Dry Ingredients
Start by preheating your oven to 350ºF to get it nice and hot while you prep. In a bowl, whisk together the flour, unsweetened cocoa powder, baking soda, and salt. This ensures your dry ingredients are evenly combined and that your cookies have consistent flavor and texture.
Step 2: Cream Butter and Sugars
Using an electric mixer or even a sturdy spoon, cream together the softened butter with both the granulated and brown sugar until the mixture is light and fluffy — this usually takes about 2 to 3 minutes. This step is where your cookies start getting that wonderful texture; don’t rush it!
Step 3: Add Egg and Vanilla
Beat in the egg and vanilla extract on low speed. You want everything just incorporated here because the next step is adding the dry ingredients — mixing too much now can make the cookies tough.
Step 4: Combine Wet and Dry Ingredients
Gently fold in the dry ingredients with the mixer on low, or better yet, use a spatula and mix by hand. Stop once you no longer see flour streaks — you want soft dough, not overworked.
Step 5: Shape and Sugar-Coat the Cookies
Using a cookie scoop or tablespoon, scoop out dough balls and roll them between your palms to make smooth spheres. Then, roll each ball in that extra granulated sugar — this creates a sparkly, crackly coating on the finished cookie. Place them 2-3 inches apart on a silicone mat or parchment-lined baking sheet.
Step 6: Bake and Cool
Bake the cookies for 8-11 minutes. The edges will be set, but the centers might look soft — that’s perfect because they’ll firm up while cooling. Let them cool on the baking sheet for 10 minutes before transferring to a rack to cool completely. Patience here pays off; frosting warm cookies can cause melting.
Step 7: Make the Frosting and Decorate
Cream the butter, powdered sugar, and vanilla using your mixer until soft and fluffy. Divide the frosting into bowls and tint with food coloring as you like — I love purple and orange for a Halloween vibe. Transfer frosting to a piping bag or zip-top sandwich bag with a corner snipped off for easy piping.
Pipe a generous dollop in the middle of each cookie. Immediately press a Hershey’s Kiss into the frosting so it smushes out the sides — that’s your witch hat shape! Add a few festive sprinkles on the frosting for an extra pop of color. Repeat for all cookies and let the frosting set a bit before serving.
Pro Tips for Making Witch Hat Cookies Recipe
- Room Temperature Ingredients: Make sure your butter and egg are at room temp to get a smoother dough and fluffy frosting.
- Don’t Overbake: Pull the cookies out as soon as edges look set — they firm upon cooling and stay chewy inside.
- Roll in Sugar Thoroughly: The generous sugar coating before baking gives the cookies that classic crackled look and a fun crunch.
- Cool Completely Before Frosting: Frosting warm cookies can melt it and ruin the shape — patience here means perfect hats.
How to Serve Witch Hat Cookies Recipe
Garnishes
I love to add a handful of colorful Halloween confetti sprinkles around my cookie platter for a festive touch. Sometimes I dust a little edible glitter over the frosting for a magical shimmer! These tiny details make your Witch Hat Cookies pop visually and add just a hint of crunch.
Side Dishes
These cookies pair wonderfully with a warm drink. I often serve them alongside a cup of hot cocoa or a spiced chai latte — the warm flavors complement the chocolate beautifully and keep things cozy.
Creative Ways to Present
When I hosted a Halloween party last year, I arranged the cookies in a circle on a black platter with a little cauldron of extra frosting and sprinkles in the center. Kids loved dipping their cookies for extra fun! You can also stack them in a witch’s hat shape or package them in clear treat bags tied with ribbon as spooky party favors.
Make Ahead and Storage
Storing Leftovers
Once decorated, I store my Witch Hat Cookies in an airtight container at room temperature. They stay fresh and chewy for up to 4 days, which is perfect if you want to make them ahead for a party or holiday bake sale.
Freezing
If you want to freeze them, I recommend freezing plain baked cookies (without frosting) in a single layer on a baking sheet first, then transferring them to a sealed freezer bag. When you’re ready, thaw completely and decorate fresh for the best flavor and texture.
Reheating
To warm cookies without melting the frosting, I gently heat them in a low oven (around 275ºF) for 3-4 minutes before frosting. This gives a “fresh-baked” feel when serving but be sure not to leave them too long or you risk melting your adorable witch hats!
FAQs
-
Can I use a different type of chocolate instead of Hershey’s Kisses?
Absolutely! While Hershey’s Kisses are the classic choice because of their size and shape, you can experiment with mini peanut butter cups, chocolate drops, or even colored candy melts to create your own unique witch hats.
-
How do I prevent the frosting from sliding off the cookies?
Make sure your cookies are completely cooled before piping the frosting. If the cookies are warm, the frosting can melt and slide right off. Also, use frosting that’s thick enough — if it’s too runny, add a bit more powdered sugar to thicken it up.
-
Can these cookies be made gluten-free?
Yes! Simply swap the all purpose flour for a gluten-free baking blend that’s designed as a 1:1 substitute. Just be sure to check that your baking soda and other ingredients are gluten-free too.
-
What can I do if my cookie dough feels too sticky to roll?
If your dough is sticky, chill it in the fridge for about 30 minutes. Chilled dough is easier to shape and will hold its form better during baking.
Final Thoughts
I’ve baked these Witch Hat Cookies Recipe countless times, and every single time they bring a little spark of joy to whoever tries them — partly because they’re tasty, partly because they’re so dang adorable! If you want a fun, simple way to celebrate the season (or just indulge your sweet tooth), I can’t recommend baking these enough. Grab your apron, invite some helpers, and have a blast creating a batch of these magical treats that are sure to enchant friends and family alike.
Print
Witch Hat Cookies Recipe
- Prep Time: 15 minutes
- Cook Time: 11 minutes
- Total Time: 26 minutes
- Yield: 16 cookies
- Category: Dessert
- Method: Baking
- Cuisine: American
Description
Witch Hat Cookies are festive chocolate cookies perfect for Halloween. They feature a rich cocoa base rolled in sugar for a slight crunch, topped with fluffy vanilla frosting and a Hershey’s Kiss to create a charming witch hat shape, finished with colorful Halloween sprinkles.
Ingredients
For the Cookies
- 1 ½ cups (180g) all purpose flour
- ¼ cup (21g) natural unsweetened cocoa powder
- ½ tsp baking soda
- ½ tsp salt
- ½ cup (113g) unsalted butter, softened
- ½ cup (99g) granulated sugar
- ½ cup (107g) brown sugar
- 1 large egg
- 1 tsp vanilla extract
- ⅓ cup (66g) granulated sugar, for rolling
For the Frosting
- 1 stick (½ cup) unsalted butter, room temperature
- 1 cup (113g) powdered sugar
- 1 tsp vanilla extract
- Gel food coloring
- Hershey’s Kisses
- Halloween sprinkles
Instructions
- Preheat and mix dry ingredients: Preheat your oven to 350ºF. In a mixing bowl, whisk together the all purpose flour, cocoa powder, baking soda, and salt until evenly combined.
- Cream butter and sugars: In a separate bowl, use a mixer on low speed to cream together the softened unsalted butter, granulated sugar, and brown sugar until smooth and creamy.
- Add egg and vanilla: Beat in the egg and vanilla extract to the butter and sugar mixture, mixing on low speed until just incorporated.
- Combine wet and dry ingredients: Gently add the dry ingredients into the wet ingredients bowl, mixing on low speed or folding by hand just until the dough comes together. Avoid overmixing.
- Form and roll dough balls: Use a small cookie scoop or tablespoon to scoop out tablespoon-sized dough balls. Roll each dough portion between your hands to form smooth balls, then roll them in the ⅓ cup granulated sugar to coat evenly.
- Arrange and bake cookies: Place the sugar-coated dough balls onto a silicone lined baking sheet, spacing them 2-3 inches apart. Bake in the preheated oven for 11 minutes.
- Cool cookies: Allow the cookies to cool on the baking sheet for 10 minutes to set, then carefully transfer them to a wire rack to cool completely before decorating. Bake one baking sheet at a time.
- Prepare the frosting: In a clean bowl, beat together the room temperature unsalted butter, powdered sugar, and vanilla extract on medium speed until light and fluffy. Divide the frosting into bowls and tint with gel food coloring as desired for a festive look.
- Decorate the cookies: Spoon the colored frosting into a piping bag or a sandwich bag with the corner snipped off. Pipe a dollop of frosting onto the center of each cooled cookie. Press a Hershey’s Kiss gently into the frosting so it slightly spreads out.
- Add sprinkles and finish: Decorate the frosted cookies with Halloween sprinkles around the base of the Hershey’s Kiss. Repeat for all cookies until assembled and decorated.
Notes
- For a gluten-free version, substitute all-purpose flour with a gluten-free flour blend.
- Ensure the butter is softened to room temperature for smooth mixing and fluffy frosting.
- If you don’t have gel food coloring, use liquid food coloring sparingly to avoid thinning the frosting.
- Chill the dough before baking if you want thicker cookies that hold their shape better.
- Use a silicone baking mat to prevent sticking and promote even baking.
- Store decorated cookies in an airtight container at room temperature for up to 3 days.
Nutrition
- Serving Size: 1 cookie
- Calories: 150 kcal
- Sugar: 15 g
- Sodium: 90 mg
- Fat: 7 g
- Saturated Fat: 4 g
- Unsaturated Fat: 2 g
- Trans Fat: 0 g
- Carbohydrates: 20 g
- Fiber: 1 g
- Protein: 2 g
- Cholesterol: 25 mg
